This is the multi-page printable view of this section. .
Integrations
- 1: Using Silo with Veeam
- 2: Disaggregated HDP Spark and Hive with Silo
- 3: AWS CLI with Silo Server
- 4: Configure NGINX Proxy for Silo Server
- 5: Upload Files Using Pre-signed URLs
- 6: Generate a Let’s Encrypt Certificate for Silo with Certbot
The following pages provide integration guides between MinIO and select third-party software. The guides on this page were previously hosted under the Cookbook heading of our legacy documentation.
All provided guides assume familiarity with the third-party integration software, and do not replace the official documentation for that software.
1 - Using Silo with Veeam
When using Veeam Backup and Replication, you can use S3-compatible object storage such as Silo as a capacity tier for backups. This disaggregates storage for the Veeam infrastructure and allows you to retain control of your data. Silo’s straightforward setup and administration let a Veeam backup administrator deploy an object store for capacity tiering.
Prerequisites
- One or both of Veeam Backup and Replication with support for S3 compatible object store (e.g. 9.5.4) and Veeam Backup for Office365 (VBO)
- Silo object storage set up according to the deployment procedure
- Veeam requires TLS connections to the object storage. Configure TLS using the network encryption guide.
- The S3 bucket, Access Key and Secret Key have to be created before and outside of Veeam.
- Configure the Silo client for the Veeam Silo endpoint using the
mccommand reference.
Setting up an S3 compatible object store for Veeam Backup and Replication
Create a bucket for Veeam backups
Create a bucket for Veeam Backup, e.g.,
NOTE: For Veeam Backup with Immutability, create the bucket with object lock enabled, e.g.,
Object locking requires erasure coding on the silo server. See the erasure coding documentation for more information.
Add Silo as an object store for Veeam
Follow the Veeam documentation for adding S3-compatible object storage: Add Object Storage.
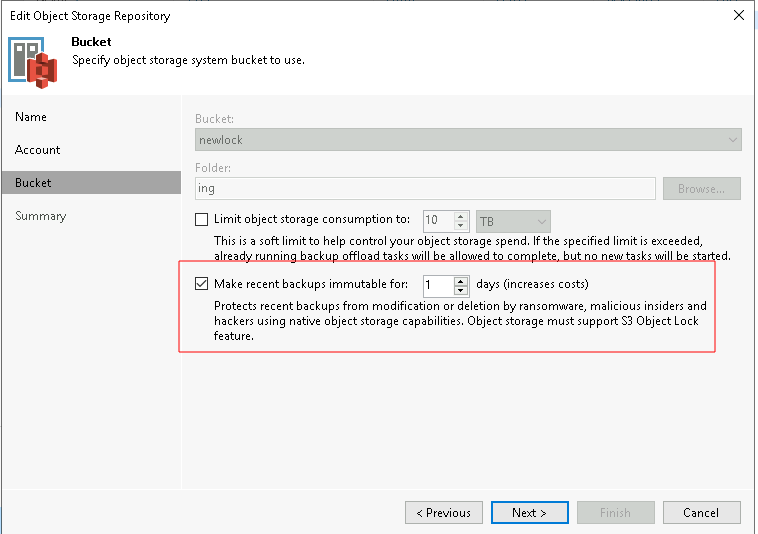
For Veeam Backup with Immutability, choose the amount of days you want to make backups immutable for
Creating the Scale-out Backup Repository
- Under the Backup Infrastructure view, click on Scale-out Repositories and click the Add Scale-out Repository button on the ribbon.
- Follow the on screen wizard
- On the Capacity Tier screen, check the box to Extend scale-out backup repository capacity with object storage checkbox and select the object storage. If you want to be able to test backup data immediately after a job is run, under the object storage selection, check the “Copy” box and uncheck the “Move” box.
Create a backup job
Backup Virtual Machines with Veeam Backup and Replication
- Under Home > Jobs > Backup in Navigation Pane, click on Backup Job button in the ribbon and choose Virtual Machine. Follow the on screen wizard.
- On the Storage screen, choose the Scale-out Backup Repository that was configured previously.
- Continue with the backup job creation. On the Summary screen, check the Run the Job when I click Finish checkbox and click the Finish button. The backup job will start immediately. This will create an Active Full backup of the VMs within the backup job.
- Since we selected Copy mode when creating the SOBR, the backup will be copied to the capacity tier as soon as it is created on the performance tier.
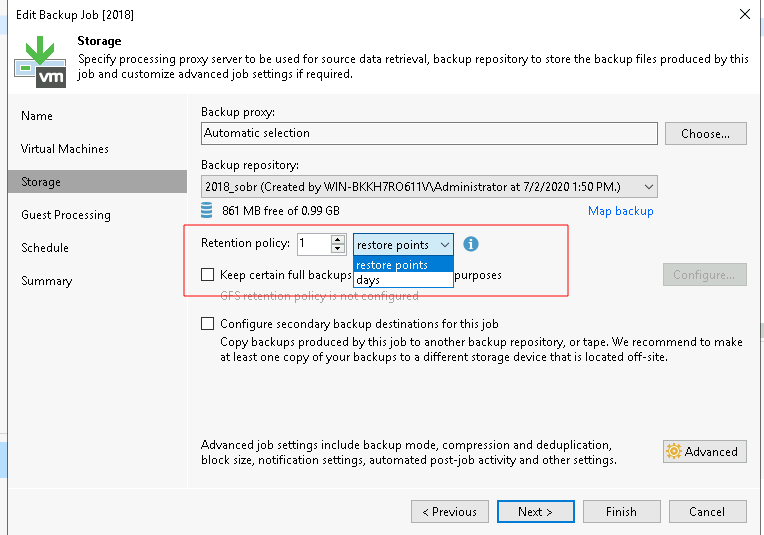
- For Veeam Backup with Immutability, you can choose a number of restore points or days to make backups immutable.
Backup Office 365 with VBO
- Create a new bucket for VBO backups
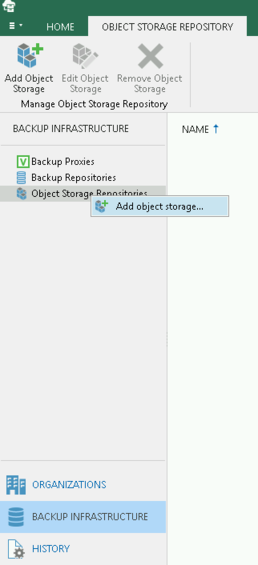
- Under Backup Infrastructure, right click on Object Storage Repositories and choose “Add object storage”
- Follow through the wizard as above for Veeam Backup and Replication as the steps are the same between both products
- Under Backup Infrastructure -> Backup Repositories, right click and “Add Backup Repository”
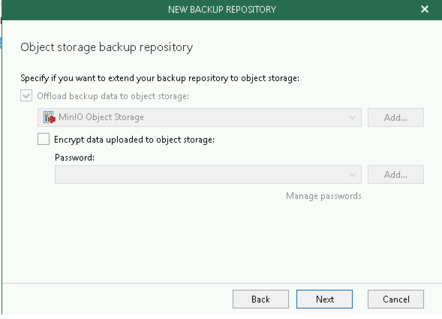
- Follow the wizard. Under the “Object Storage Backup Repository” section, choose the Silo object storage you created above
- When you create your backup job, choose the backup repository you created above.
Test the setup
The next time the backup job runs, you can use the mc admin trace myminio command and verify traffic is flowing to the Silo nodes. For Veeam Backup and Replication you will need to wait for the backup to complete to the performance tier before it migrates data to the Silo capacity tier.
2 - Disaggregated HDP Spark and Hive with Silo
1. Cloud-native Architecture
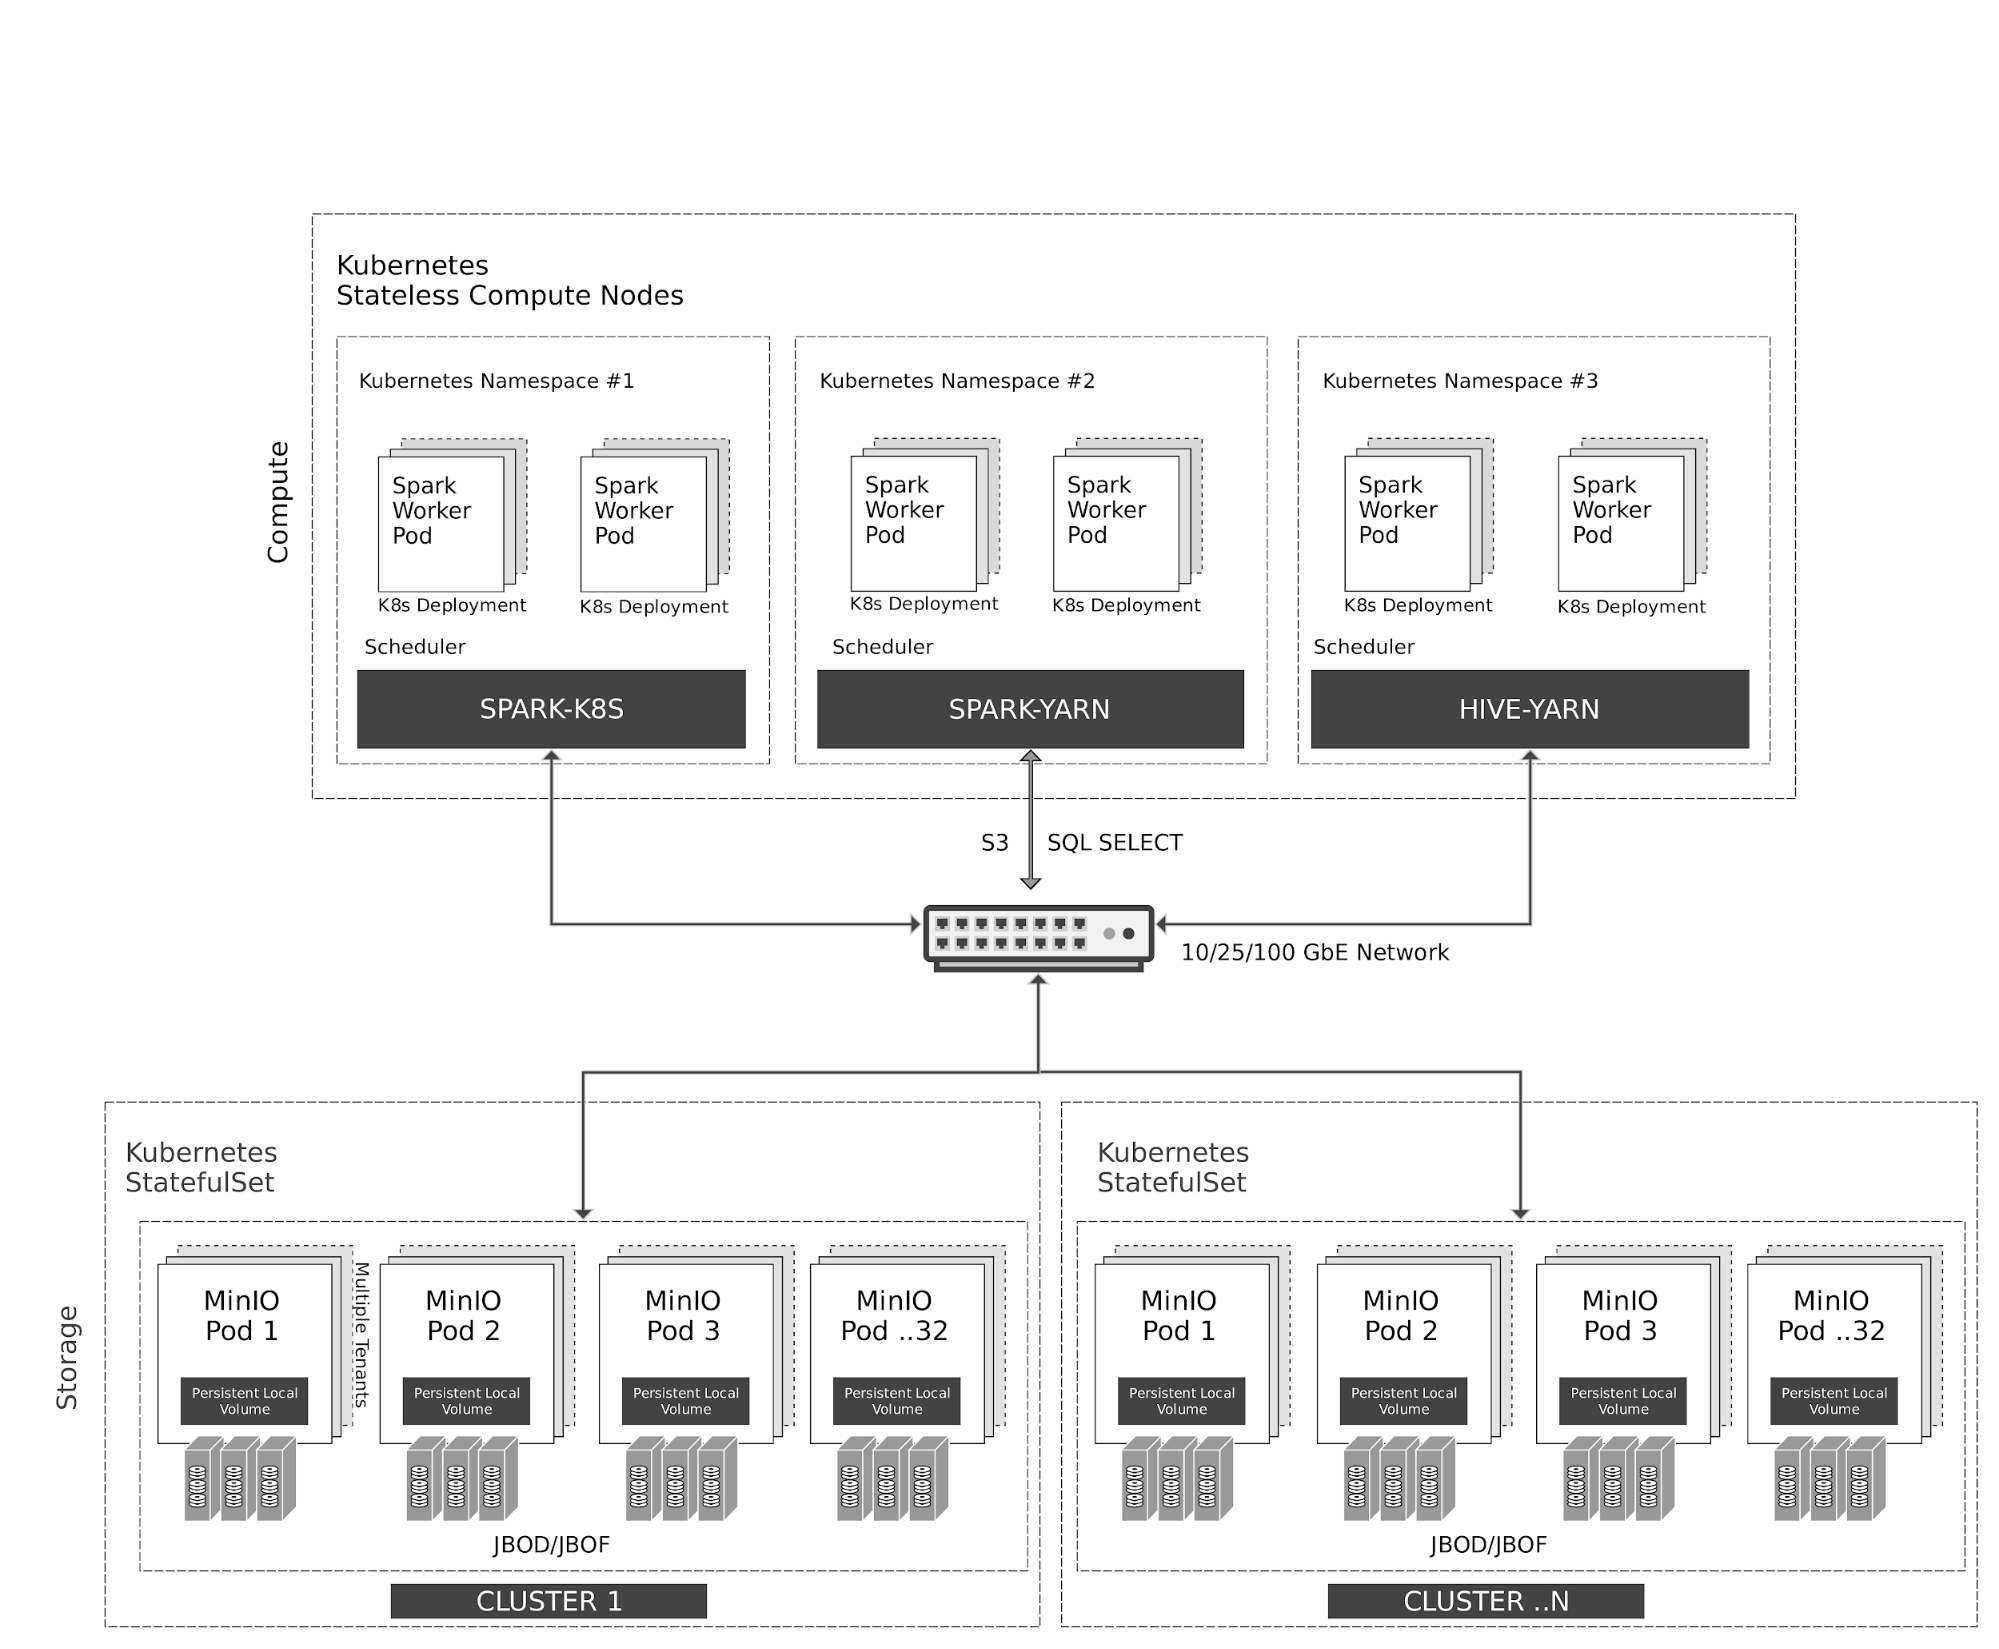
Kubernetes manages stateless Spark and Hive containers elastically on the compute nodes. Spark has native scheduler integration with Kubernetes. Hive, for legacy reasons, uses YARN scheduler on top of Kubernetes.
All access to MinIO object storage is via S3/SQL SELECT API. In addition to the compute nodes, MinIO containers are also managed by Kubernetes as stateful containers with local storage (JBOD/JBOF) mapped as persistent local volumes. This architecture enables multi-tenant MinIO, allowing isolation of data between customers.
MinIO also supports multi-cluster, multi-site federation similar to AWS regions and tiers. Using MinIO Information Lifecycle Management (ILM), you can configure data to be tiered between NVMe based hot storage, and HDD based warm storage. All data is encrypted with per-object key. Access Control and Identity Management between the tenants are managed by MinIO using OpenID Connect or Kerberos/LDAP/AD.
2. Prerequisites
-
Install Hortonworks Distribution using this guide.
- Setup Ambari which automatically sets up YARN
- Installing Spark
-
Install MinIO Distributed Server using one of the guides below.
3. Configure Hadoop, Spark, Hive to use MinIO
After successful installation navigate to the Ambari UI http://<ambari-server>:8080/ and login using the default credentials: [username: admin, password: admin]
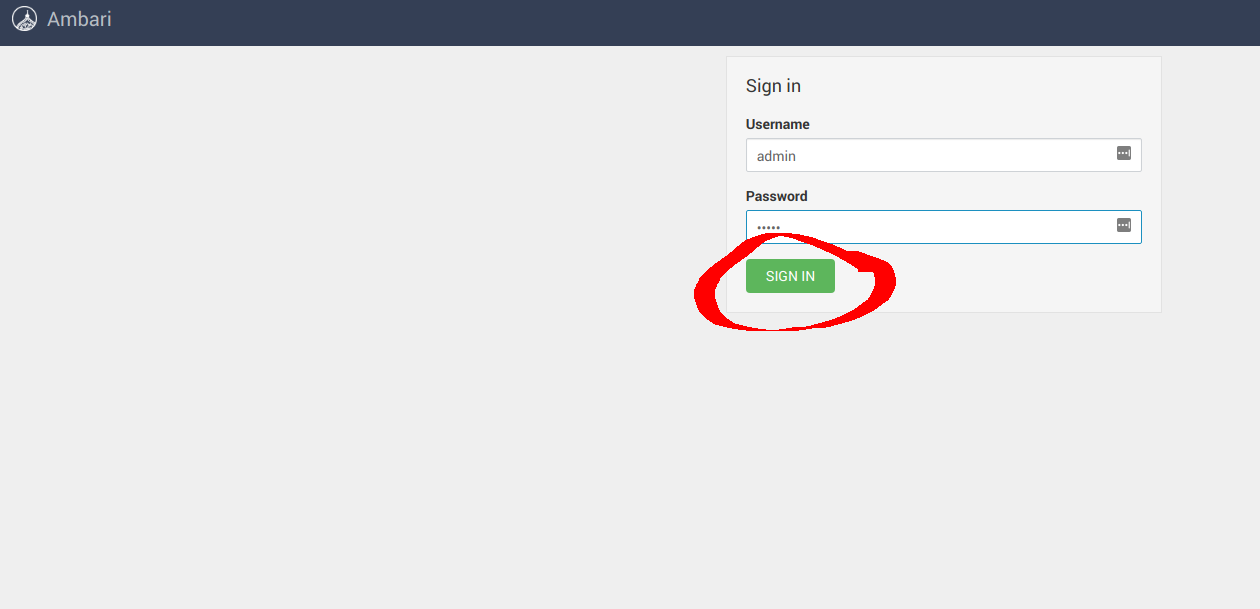
3.1 Configure Hadoop
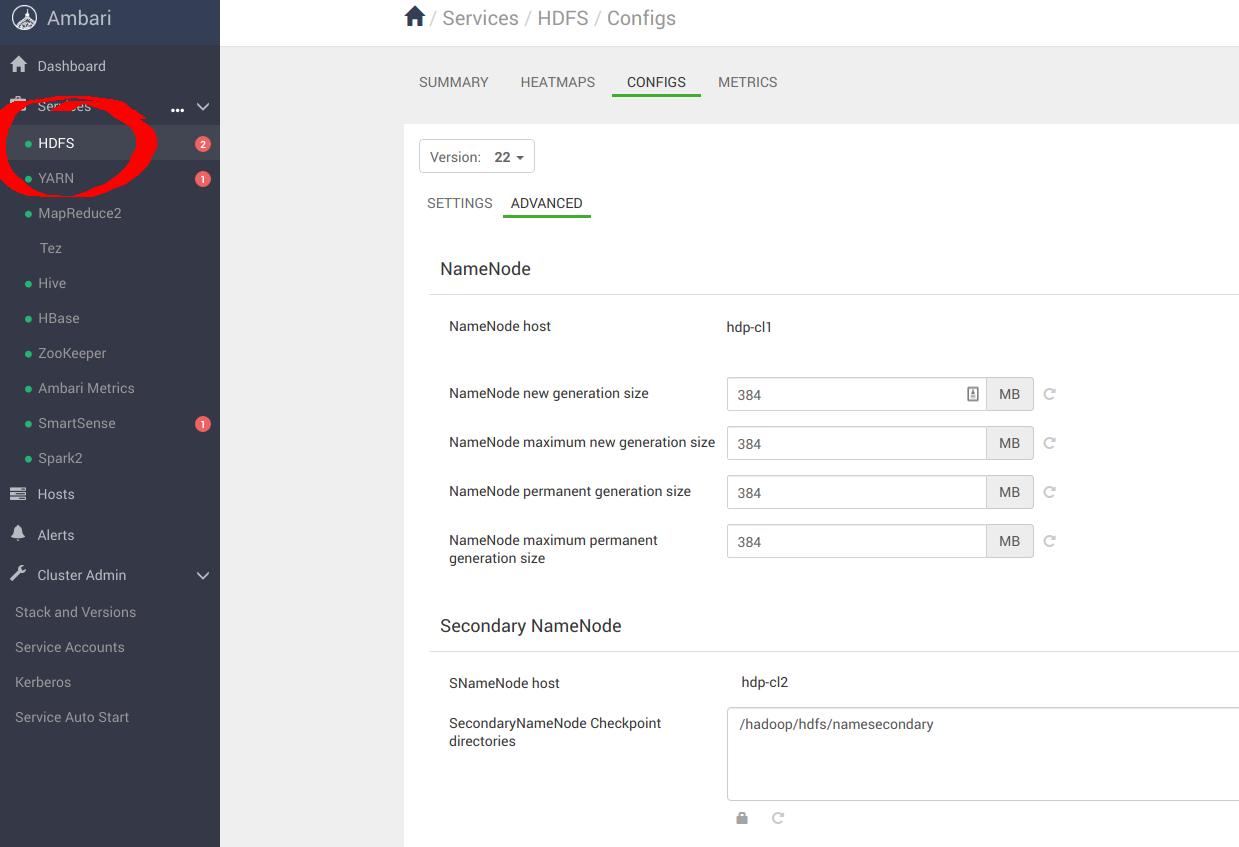
Navigate to Services -> HDFS -> CONFIGS -> ADVANCED as shown below
Navigate to Custom core-site to configure MinIO parameters for _s3a_ connector
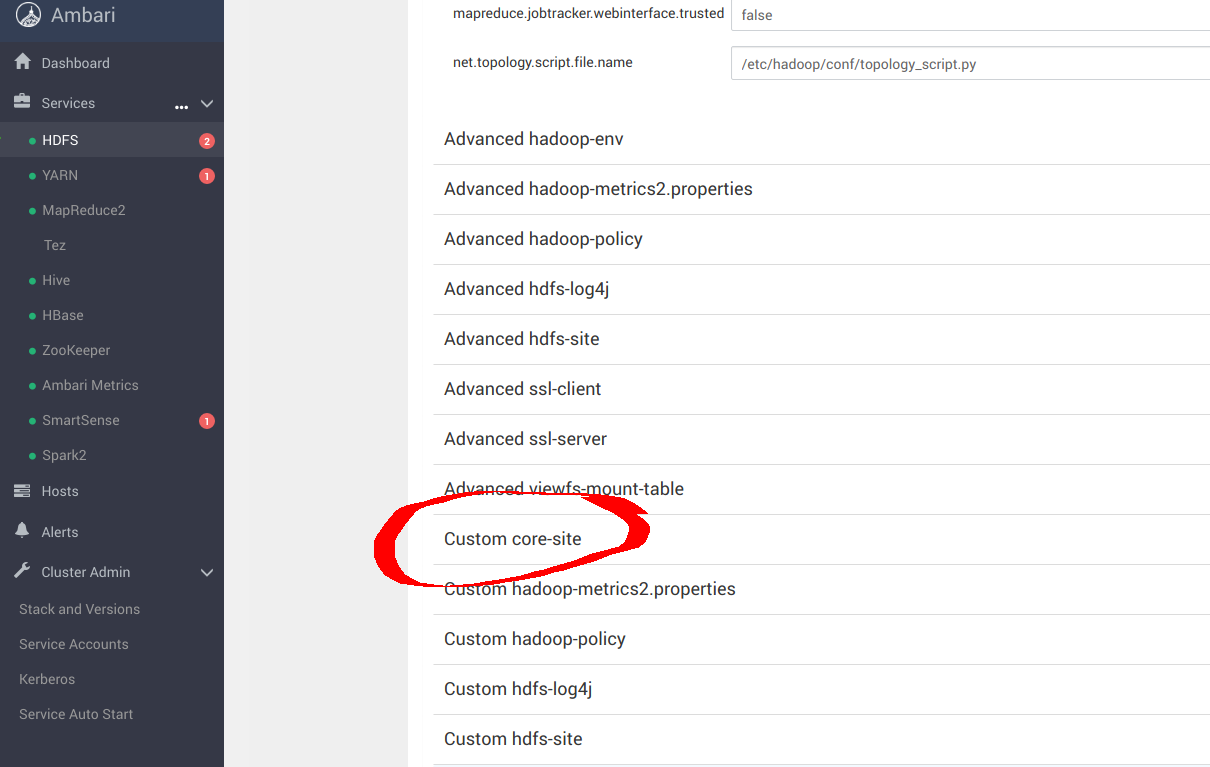
Let’s take for example a set of 12 compute nodes with an aggregate memory of 1.2TiB, we need to do following settings for optimal results. Add the following optimal entries for core-site.xml to configure s3a with MinIO. Most important options here are
S3A is the connector to use S3 and other S3-compatible object stores such as MinIO. MapReduce workloads typically interact with object stores in the same way they do with HDFS. These workloads rely on HDFS atomic rename functionality to complete writing data to the datastore. Object storage operations are atomic by nature and they do not require/implement rename API. The default S3A committer emulates renames through copy and delete APIs. This interaction pattern causes significant loss of performance because of the write amplification. Netflix, for example, developed two new staging committers - the Directory staging committer and the Partitioned staging committer - to take full advantage of native object storage operations. These committers do not require rename operation. The two staging committers were evaluated, along with another new addition called the Magic committer for benchmarking.
It was found that the directory staging committer was the fastest among the three, S3A connector should be configured with the following parameters for optimal results:
The rest of the other optimization options are discussed in the links below
- https://hadoop.apache.org/docs/current/hadoop-aws/tools/hadoop-aws/index.html
- https://hadoop.apache.org/docs/r3.1.1/hadoop-aws/tools/hadoop-aws/committers.html
Once the config changes are applied, proceed to restart Hadoop services.
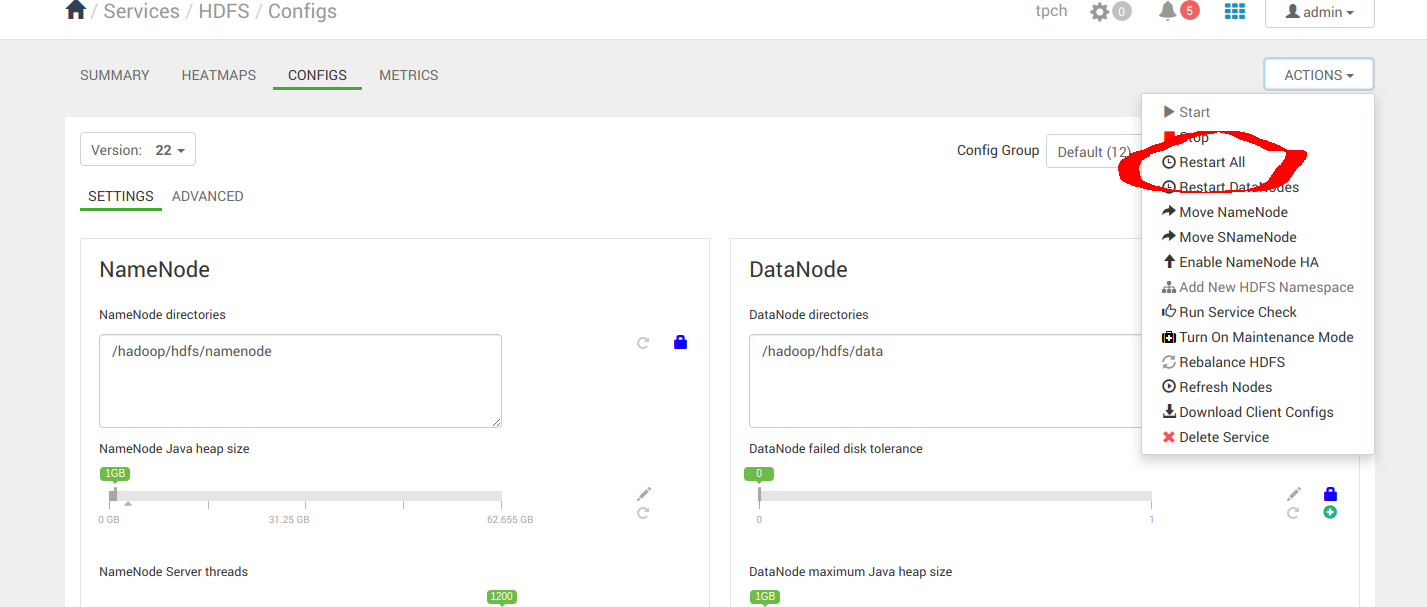
3.2 Configure Spark2
Navigate to Services -> Spark2 -> CONFIGS as shown below
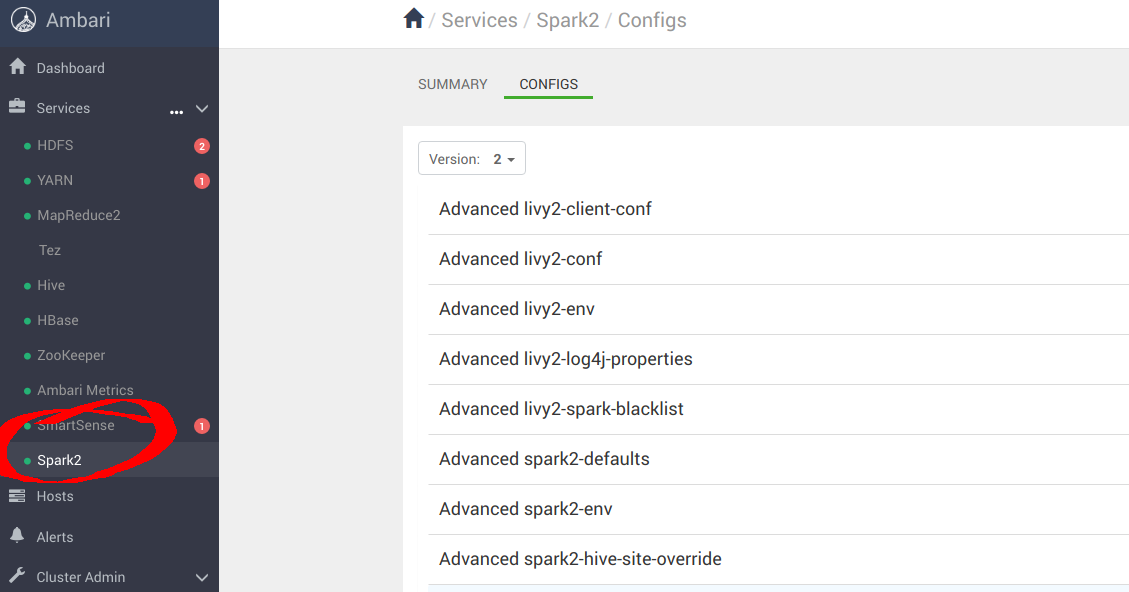
Navigate to “Custom spark-defaults” to configure MinIO parameters for _s3a_ connector
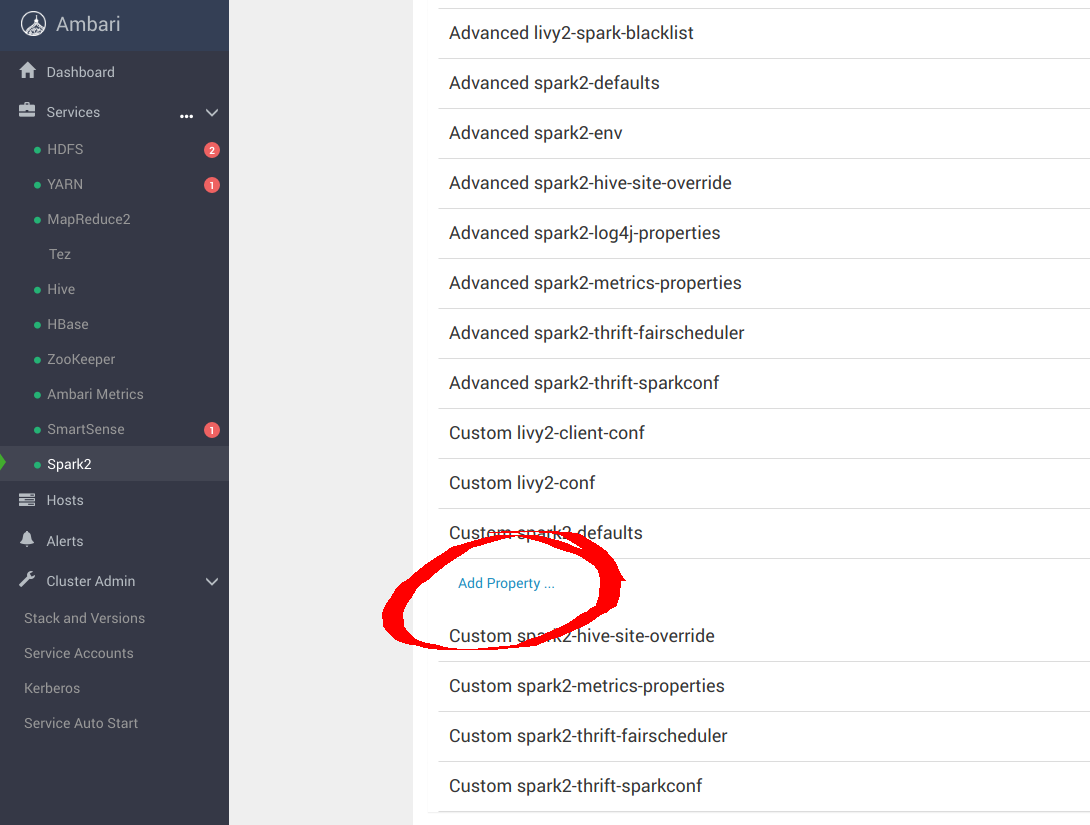
Add the following optimal entries for spark-defaults.conf to configure Spark with MinIO.
Once the config changes are applied, proceed to restart Spark services.
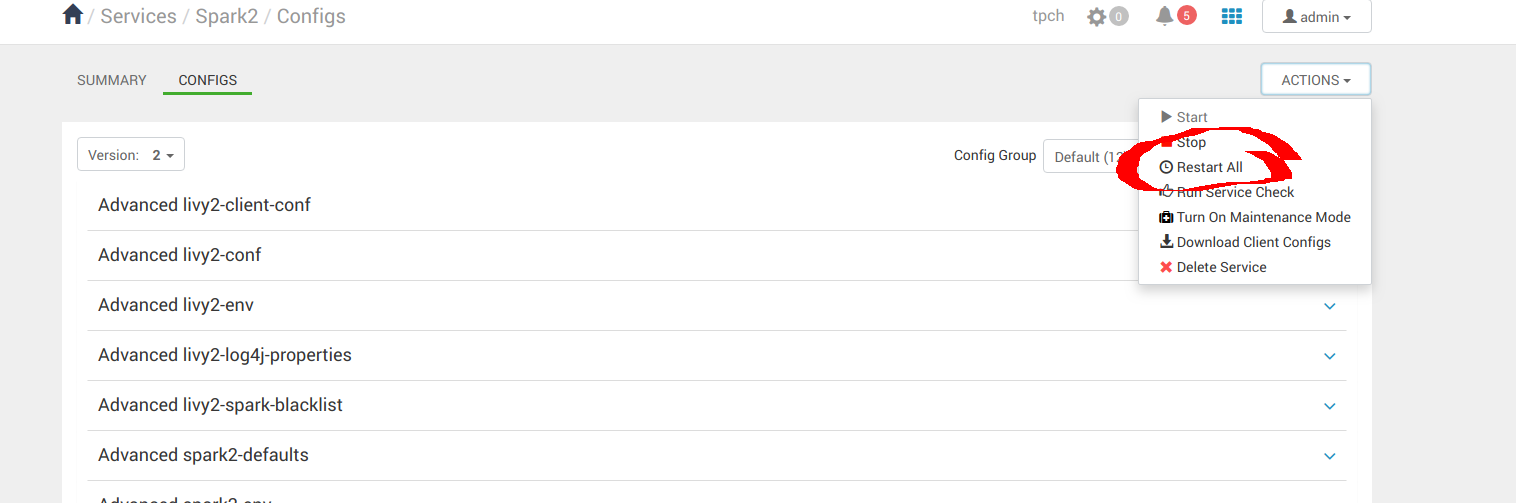
3.3 Configure Hive
Navigate to Services -> Hive -> CONFIGS-> ADVANCED as shown below
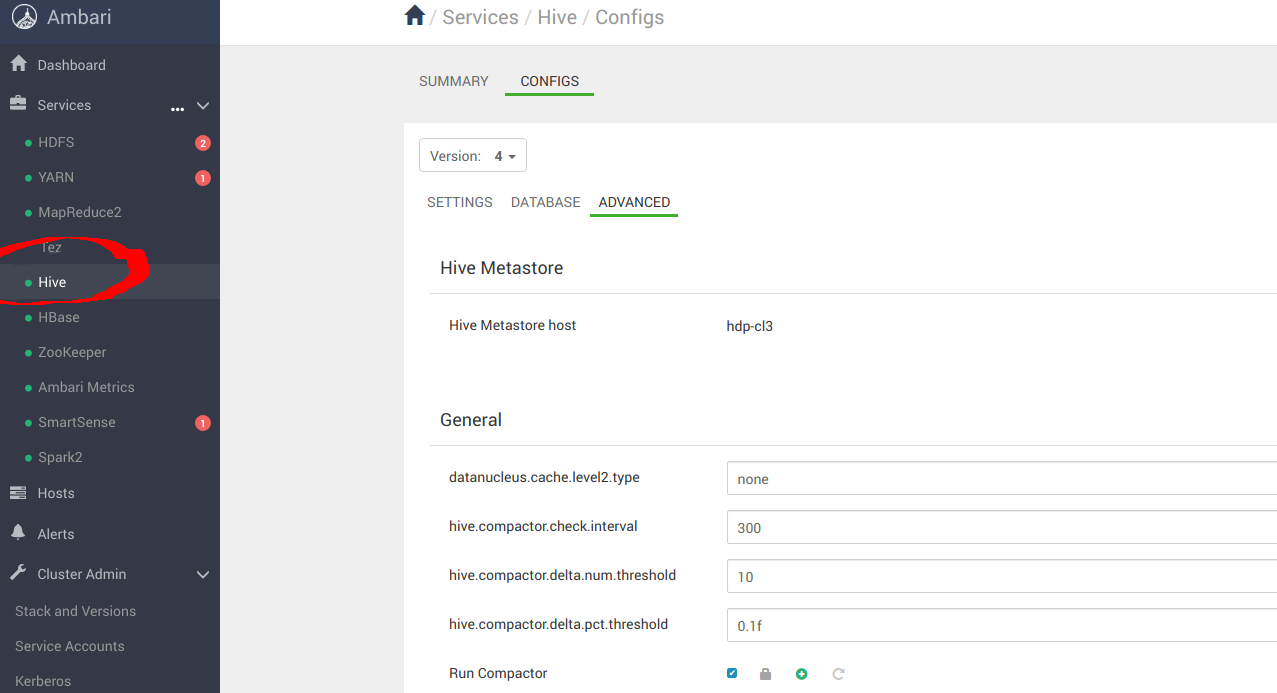
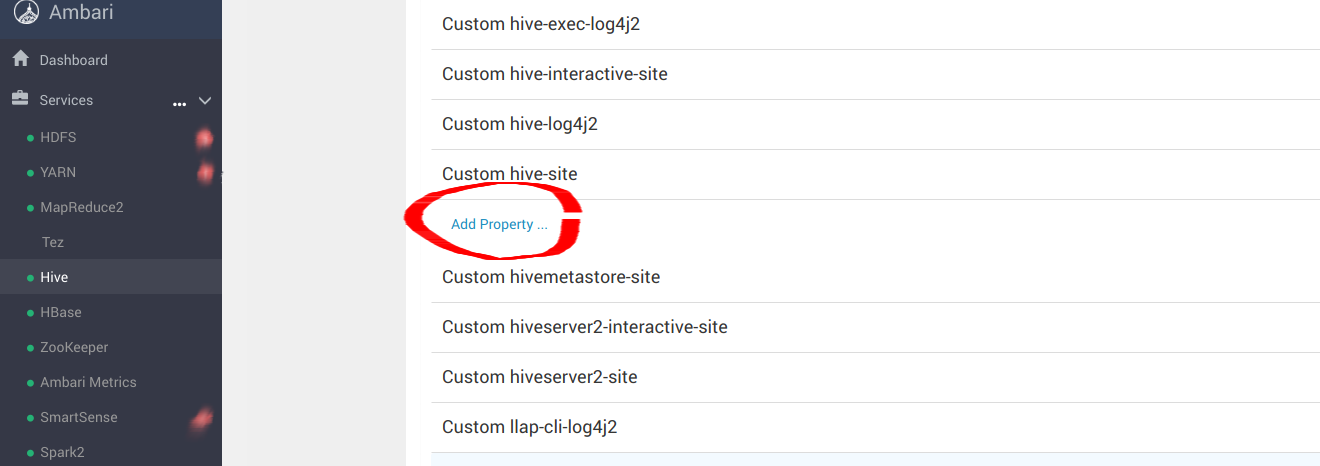
Navigate to “Custom hive-site” to configure MinIO parameters for _s3a_ connector
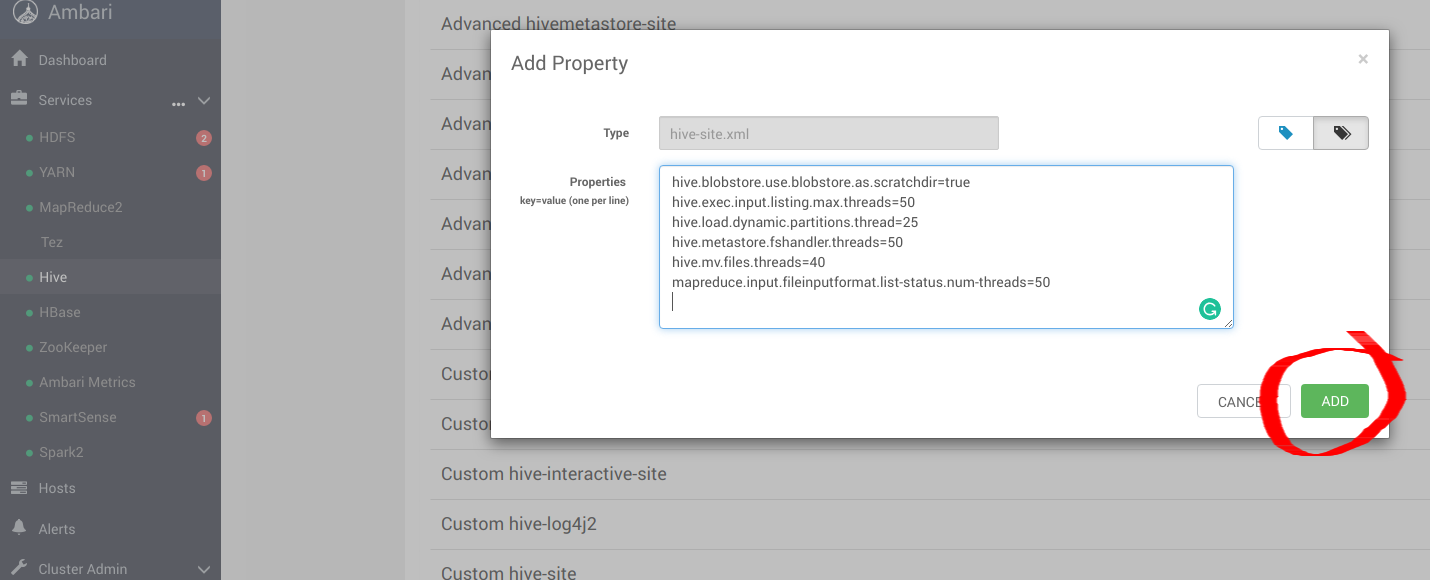
Add the following optimal entries for hive-site.xml to configure Hive with MinIO.
For more information about these options please visit https://www.cloudera.com/documentation/enterprise/5-11-x/topics/admin_hive_on_s3_tuning.html
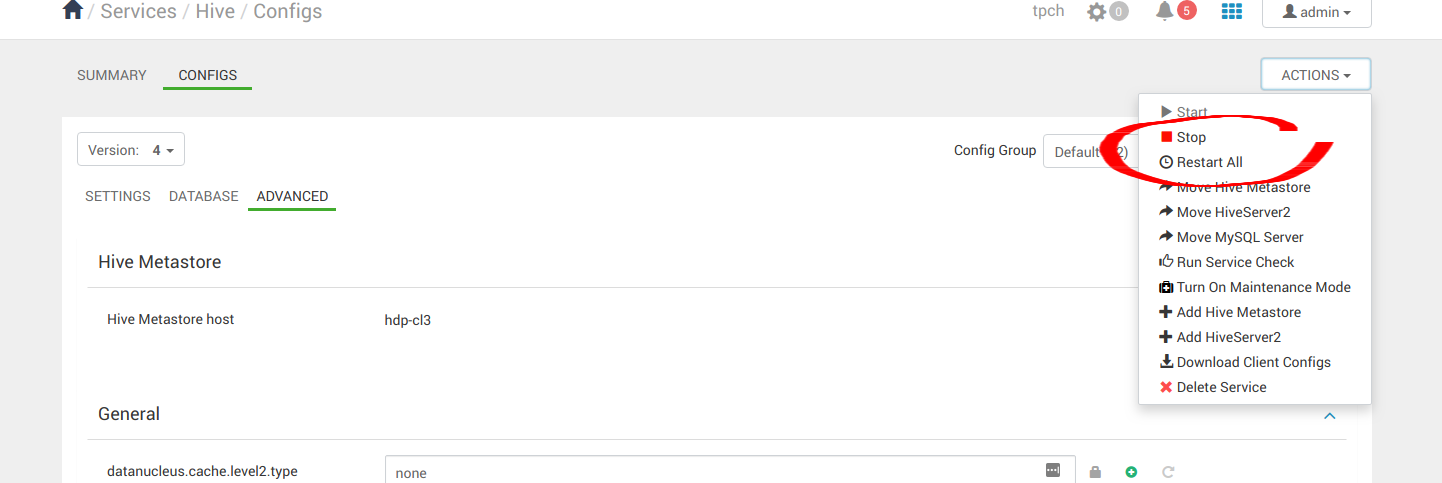
Once the config changes are applied, proceed to restart all Hive services.
4. Run Sample Applications
After installing Hive, Hadoop and Spark successfully, we can now proceed to run some sample applications to see if they are configured appropriately. We can use Spark Pi and Spark WordCount programs to validate our Spark installation. We can also explore how to run Spark jobs from the command line and Spark shell.
4.1 Spark Pi
Test the Spark installation by running the following compute intensive example, which calculates pi by “throwing darts” at a circle. The program generates points in the unit square ((0,0) to (1,1)) and counts how many points fall within the unit circle within the square. The result approximates pi.
Follow these steps to run the Spark Pi example:
- Login as user ‘spark’.
- When the job runs, the library can now use MinIO during intermediate processing.
- Navigate to a node with the Spark client and access the spark2-client directory:
- Run the Apache Spark Pi job in yarn-client mode, using code from org.apache.spark:
The job should produce an output as shown below. Note the value of pi in the output.
Job status can also be viewed in a browser by navigating to the YARN ResourceManager Web UI and clicking on job history server information.
4.2 WordCount
WordCount is a simple program that counts how often a word occurs in a text file. The code builds a dataset of (String, Int) pairs called counts, and saves the dataset to a file.
The following example submits WordCount code to the Scala shell. Select an input file for the Spark WordCount example. We can use any text file as input.
- Login as user ‘spark’.
- When the job runs, the library can now use MinIO during intermediate processing.
- Navigate to a node with Spark client and access the spark2-client directory:
The following example uses log4j.properties as the input file:
4.2.1 Upload the input file to HDFS:
4.2.2 Run the Spark shell:
The command should produce an output as shown below. (with additional status messages):
- At the scala> prompt, submit the job by typing the following commands, Replace node names, file name, and file location with your values:
Use one of the following approaches to view job output:
View output in the Scala shell:
To view the output from MinIO exit the Scala shell. View WordCount job status:
The output should be similar to the following:
3 - AWS CLI with Silo Server
AWS CLI is a unified tool to manage AWS services. It is frequently the tool used to transfer data in and out of AWS S3. It works with any S3 compatible cloud storage service.
In this recipe we will learn how to configure and use AWS CLI to manage data with MinIO Server.
1. Prerequisites
Install MinIO Server using the SILO installation guide.
2. Installation
Install AWS CLI from https://aws.amazon.com/cli/
3. Configuration
To configure AWS CLI, type aws configure and specify the MinIO key information.
Access credentials shown in this example belong to https://play.min.io:9000. These credentials are open to public. Feel free to use this service for testing and development. Replace with your own MinIO keys in deployment.
Additionally enable AWS Signature Version ‘4’ for MinIO server.
4. Commands
To list your buckets
To list contents inside bucket
To make a bucket
To add an object to a bucket
To delete an object from a bucket
To remove a bucket
4 - Configure NGINX Proxy for Silo Server
The following documentation provides a baseline for configuring NGINX to proxy requests to MinIO in a Linux environment. It is not intended as a comprehensive approach to NGINX, proxying, or reverse proxying in general. Modify the configuration as necessary for your infrastructure.
This documentation assumes the following:
- An existing NGINX deployment
- An existing MinIO deployment
- A DNS hostname which uniquely identifies the MinIO deployment
There are two models for proxying requests to the MinIO Server API and the MinIO Console:
Create or configure a dedicated DNS name for the MinIO service.
For the MinIO Server S3 API, proxy requests to the root of that domain. For the MinIO Console Web GUI, proxy requests to the /minio subpath.
For example, given the hostname minio.example.net:
- Proxy requests to the root
https://minio.example.netto the MinIO Server listening onhttps://minio.local:9000. - Proxy requests to the subpath
https://minio.example.net/minio/uito the MinIO Console listening onhttps://minio.local:9001.
The following location blocks provide a template for further customization in your unique environment:
The S3 API signature calculation algorithm does not support proxy schemes where you host the MinIO Server API such as example.net/s3/.
You must also set the following environment variables for the MinIO deployment:
- Set the
MINIO_BROWSER_REDIRECT_URLto the proxy host FQDN of the MinIO Console (https://example.net/minio/ui)
Create or configure separate, unique subdomains for the MinIO Server S3 API and for the MinIO Console Web GUI.
For example, given the root domain of example.net:
- Proxy request to the subdomain
minio.example.netto the MinIO Server listening onhttps://minio.local:9000 - Proxy requests to the subdomain
console.example.netto the MinIO Console listening onhttps://minio.local:9001
The following location blocks provide a template for further customization in your unique environment:
The S3 API signature calculation algorithm does not support proxy schemes where you host the MinIO Server API on a subpath, such as minio.example.net/s3/.
You must also set the following environment variables for the MinIO deployment:
- Set the
MINIO_BROWSER_REDIRECT_URLto the proxy host FQDN of the MinIO Console (https://console.example.net/)
5 - Upload Files Using Pre-signed URLs
Using pre-signed URLs, a client can upload files directly to an S3-compatible cloud storage server (S3) without exposing the S3 credentials to the user.
This guide describes how to use the presignedPutObject API from the MinIO JavaScript Library to generate a pre-signed URL. This is demonstrated through a JavaScript example in which an Express Node.js server exposes an endpoint to generate a pre-signed URL and a client-side web application uploads a file to MinIO Server using that URL.
1. Create the Server
The server consists of an Express Node.js server that exposes an endpoint called /presignedUrl. This endpoint uses a Minio.Client object to generate a short-lived, pre-signed URL that can be used to upload a file to MinIO Server.
2. Create the Client-side Web Application
The client-side web application’s user interface contains a selector field that allows the user to select files for upload, as well as a button that invokes an onclick handler called upload:
Note: This uses the File API, QuerySelector API, fetch API & Promise API.
6 - Generate a Let’s Encrypt Certificate for Silo with Certbot
Let’s Encrypt is a new free, automated, and open source, Certificate Authority.
Certbot is a console based certificate generation tool for Let’s Encrypt.
In this recipe, we will generate a Let’s Encypt certificate using Certbot. This certificate will then be deployed for use in the MinIO server.
1. Prerequisites
- Install MinIO Server using the Red Hat Linux deployment guide.
- Install Certbot from the Certbot website.
2. Dependencies
- Port 443 for https needs to be open and available at time of executing
certbot. - Certbot needs root access while executing because only root is allowed to bind to any port below 1024.
- We will be using our own domain
myminio.comas an example in this recipe. Replace with your own domain under your setup.
3. Recipe Steps
Step 1: Install Certbot
Install Certbot by following the documentation at https://certbot.eff.org/.
Step 2: Generate Let’s Encrypt cert
Step 3: Verify Certificates
List your certs saved in /etc/letsencrypt/live/myminio.com directory.
Step 4: Set up SSL on MinIO Server with the certificates.
The certificate and key generated via Certbot needs to be placed inside user’s home directory.
Step 5: Change ownership of certificates.
Step 6: Start MinIO Server using HTTPS.
If you are not going to run MinIO with root privileges, you will need to give MinIO the capability of listening on ports less than 1024 using the following command:
Now, you can start MinIO Server on port “443”.
If you are using dockerized version of MinIO then you would need to
Step 7: Visit https://myminio.com in the browser.
