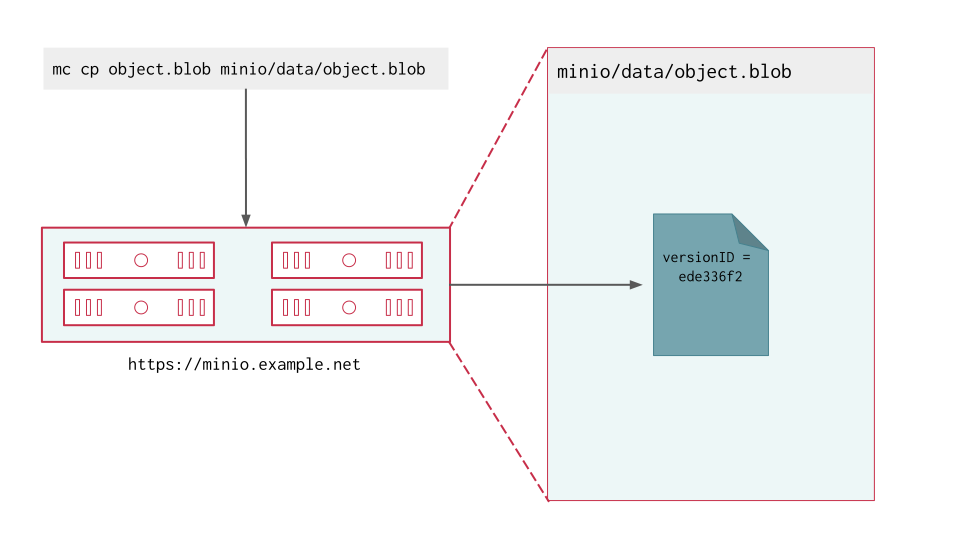
Object with Single Version
MinIO adds a unique version ID to each object as part of write operations.
This is the multi-page printable view of this section. .
Added: MinIO
RELEASE.2022-10-09T21-10-59Z
The Batch Framework was introduced with the replicate job type in the mc RELEASE.2022-10-09T21-10-59Z.
The MinIO Batch Framework allows you to create, manage, monitor, and execute jobs using a YAML-formatted job definition file (a “batch file”). The batch jobs run directly on the MinIO deployment to take advantage of the server-side processing power without constraints of the local machine where you run the MinIO Client.
The replicate batch job replicates objects from one MinIO deployment (the source deployment) to another MinIO deployment (the target deployment). Either the source or the target must be the local deployment.
Batch Replication between MinIO deployments have the following advantages over using mc mirror:
Starting with the MinIO Server RELEASE.2023-05-04T21-44-30Z, the other deployment can be either another MinIO deployment or any S3-compatible location using a realtime storage class. Use filtering options in the replication YAML file to exclude objects stored in locations that require rehydration or other restoration methods before serving the requested object. Batch replication to these types of remotes uses mc mirror behavior.
Batch replication shares similar access and permission requirements as bucket replication.
The credentials for the “source” deployment must have a policy similar to the following:
The credentials for the “remote” deployment must have a policy similar to the following:
See mc admin user, mc admin user svcacct, and mc admin policy for more complete documentation on adding users, access keys, and policies to a MinIO deployment.
MinIO deployments configured for Active Directory/LDAP or OpenID Connect user management can instead create dedicated access keys for supporting batch replication.
The batch job definition file can limit the replication by bucket, prefix, and/or filters to only replicate certain objects. The access to objects and buckets for the replication process may be restricted by the credentials you provide in the YAML for either the source or target destinations.
Changed: MinIO
Server RELEASE.2023-04-07T05-28-58Z
You can replicate from a remote MinIO deployment to the local deployment that runs the batch job.
For example, you can use a batch job to perform a one-time replication sync to push objects from a bucket on a local deployment at minio-local/invoices/ to a bucket on a remote deployment at minio-remote/invoices. You can also pull objects from the remote deployment at minio-remote/invoices to the local deployment at minio-local/invoices.
Starting with RELEASE.2023-12-09T18-17-51Z, batch replication by default automatically batches and compresses objects smaller than 5MiB to efficiently transfer data between the source and remote. The remote MinIO deployment can check and immediately apply lifecycle management tiering rules to batched objects. The functionality resembles that offered by S3 Snowball Edge small file batching.
You can modify the compression settings in the replicate job configuration.
The YAML must define the source and target deployments. If the source deployment is remote, then the target deployment must be local. Optionally, the YAML can also define flags to filter which objects replicate, send notifications for the job, or define retry attempts for the job.
Changed: MinIO
RELEASE.2023-04-07T05-28-58Z
You can replicate from a remote MinIO deployment to the local deployment that runs the batch job.
Changed: MinIO
RELEASE.2024-08-03T04-33-23Z
This release introduces a new version of the Batch Job Replicate API, v2. The updated API allows you to list multiple prefixes on the source to replicate from. To replicate multiple prefixes from a source, specify replicate.apiVersion as v2.
For the source deployment
Required information
|
Must be |
|
The bucket on the deployment. |
Optional information
|
The prefix on the object(s) that should replicate. Beginning with MinIO Server RELEASE.2024-08-03T04-33-23Z, v2 of the Batch Job Replicate API allows you to list multiple prefixes.Specify replicate.apiVersion as v2 to replicate from multiple prefixes. |
|
Location of the deployment to use for either the source or the target of a replication batch job. For example, https://minio.example.net.If the deployment is the mc alias set specified to the command, omit this field to direct MinIO to use that alias for the endpoint and credentials values. Either the source deployment or the remote deployment must be the “local” alias. The non-“local” deployment must specify the endpoint and credentials. |
|
Directs MinIO to use Path or Virtual Style (DNS) lookup of the bucket. - Specify on for Path style- Specify off for Virtual style- Specify auto to let MinIO determine the correct lookup style.Defaults to auto. |
|
The accesskey: and secretKey: or the sessionToken: that grants access to the object(s).Only specify for the deployment that is not the local deployment. |
|
version added: RELEASE.2023-12-09T18-17-51Z Configuration options for controlling the batch-and-compress functionality. |
|
Specify true to disable the batch-and-compress functionality during replication.Defaults to false. |
|
Specify the maximum integer number of objects to batch for compression. Defaults to 100. |
|
Specify false to stage archives using local storage or true to stage to memory (RAM).Defaults to true. |
|
Specify true to generate compress batched objects over the wire using the S2/Snappy compression algorithm.Defaults to false or no compression. |
|
Specify the size of object in Megabits (MiB) under which MinIO should batch objects. Defaults to 5MiB. |
|
Specify false to direct MinIO to halt on any object which produces errors on read.Defaults to true. |
For the target deployment
Required information
|
Must be |
|
The bucket on the deployment. |
Optional information
|
The prefix on the object(s) to replicate. |
|
The location of the target deployment. If the target is the alias specified to the command, you can omit this and the credentials fields.If the target is “local”, the source must specify the remote deployment with endpoint and credentials. |
|
The |
For filters
|
A string representing a length of time in Only objects newer than the specified length of time replicate.
For example, |
|
A string representing a length of time in Only objects older than the specified length of time replicate. |
|
A date in Only objects created after the date replicate. |
|
A date in Only objects created prior to the date replicate. |
For notifications
|
The predefined endpoint to send events for notifications. |
|
An optional JWT <JSON Web Token> to access the |
For retry attempts
If something interrupts the job, you can define how many attempts to retry the job batch. For each retry, you can also define how long to wait between attempts.
|
Number of tries to complete the batch job before giving up. |
|
The least amount of time to wait between each attempt. |
replicate Job Type
Use mc batch generate to create a basic replicate batch job for further customization.
For the local deployment, do not specify the endpoint or credentials. Either delete or comment out those lines for the source or the target section, depending on which is the local.
You can use the MinIO Console to perform many of the deployment monitoring and management functions available in MinIO, such as:
Important
The MinIO Console is a web-based interface for the MinIO Server.
It is distinct and independent from the MinIO Kubernetes Operator Console which was deprecated and removed as of Operator 6.0.0.
The Monitoring section provides an interface for monitoring the MinIO deployment.
The section contains the following subsections: Some subsections may not be visible if the authenticated user does not have the required administrative permissions.
The Console Dashboard section displays metrics for the MinIO deployment. The default view provides a high-level overview of the deployment status, including the uptime and availability of individual servers and drives.
The Console also supports displaying time-series and historical data by querying a Prometheus service configured to scrape data from the MinIO deployment. Specifically, the MinIO Console uses the Prometheus query API to retrieve stored metrics data and display historical metrics See Monitoring and Alerting using Prometheus for more information on scraping MinIO metrics into Prometheus.
The Console Logs section displays server logs generated by the MinIO Deployment.
Select the Start Logs button to begin collecting logs using the selected filters and settings.
Important
MinIO plans to deprecate the Tenant Console Audit Log feature and remove it in an upcoming release. As an alternative, use any webhook-capable database or logging service to capture audit logs from the Tenant.
The Audit Log section provides an interface for viewing audit logs collected by a configured PostgreSQL service.
The Trace section provides HTTP trace functionality for a bucket or buckets on the deployment. This section provides similar functionality to mc admin trace.
You can modify the trace to show only specific trace calls. The default is to show only S3 related HTTP traces.
Select Filters to open additional filters to apply to trace output, such as restricting the Path on which the trace applies to a specific bucket or bucket prefix.
The Watch section displays S3 events as they occur on the selected bucket. This section provides similar functionality to mc watch.
The Encryption section allows you to view the status and metrics for configured Key Encryption Service providers.
Changed: Console
0.23.1
Notifications section renamed to Events.
The Events section provides an interface to view, add, or remove Event Notification targets.
You can use this screen configure MinIO to push notification events to the one or more target destinations, including Redis, MySQL, Kafka, PostgreSQL, AMQP, MQTT, Elastic Search, NATS, NSQ, or a Webhook.
Select the Add Event Destination + button to add a new event target to the deployment.
You can select an existing notification target from the list to view its details or delete the target.
The Site Replication section provides an interface for adding and managing the site replication configuration for the deployment.
Configuring site replication requires that only a single site have existing buckets or objects (if any).
The Encryption setting provides an interface for listing, creating, and deleting keys for use with MinIO Server-Side Encryption.
You can use keys created or listed in this view for object encryption operations, including setting a bucket-level default key.
Important
Deleting a key prevents MinIO from decrypting any objects protected with that key. If no backups of that key exist, deleting a key renders objects permanently unreadable. See Secure Erasure and Locking for more information.
The Settings section provides an interface for viewing and retrieving configuration settings for all MinIO Servers in the deployment. Use the buttons to Export and Import the settings between deployments.
This section contains the following subsections.
Added: Console
v0.24.0
Environment variable configuration settings override any customizations added in the MinIO Console. Hover your mouse cover over a configuration field to display a tooltip that indicates whether an environment variable controls the setting.
Some subsections may not be visible if the authenticated user does not have the required administrative permissions.
The interface functionality mimics that of using mc admin config get or mc admin config set. Refer to those commands for details on how to define the many options.
Some configuration settings may require restarting the MinIO deployment to apply changes.
Added: MinIO
RELEASE.2023-04-07T05-28-58Z
The MinIO Batch Framework allows you to create, manage, monitor, and execute jobs using a YAML-formatted job definition file (a “batch file”). The batch jobs run directly on the MinIO deployment to take advantage of the server-side processing power without constraints of the local machine where you run the MinIO Client.
The keyrotate batch job type cycles the sse-s3 or sse-kms keys for encrypted objects on a MinIO deployment.
The YAML configuration supports filters to restrict key rotation to a specific set of objects by creation date, tags, metadata, or kms key. You can also define retry attempts or set a notification endpoint and token.
Added: MinIO
RELEASE.2023-04-07T05-28-58Z
Use the keyrotate job type to create a batch job that cycles the sse-s3 or sse-kms keys for encrypted objects.
type:Either
sse-s3orsse-kms.
key:Only for use with the
sse-kmstype. The key to use to unseal the key vault.
For flag based filters
|
A string representing a length of time in Keys rotate only for objects newer than the specified length of time.
For example, |
|
A string representing a length of time in Keys rotate only for objects older than the specified length of time. |
|
A date in Keys rotate only for objects created after the date. |
|
A date in Keys rotate only for objects created prior to the date. |
|
Only for use with the |
|
Rotate keys only for objects with tags that match the specified |
|
Rotate keys only for objects with metadata that match the specified |
|
Rotate keys only for objects with a KMS key-id that match the specified value.
This is only applicable for the |
For notifications
|
The predefined endpoint to send events for notifications. |
|
An optional JSON Web Token (JWT) to access the |
For retry attempts
If something interrupts the job, you can define a maximum number of retry attempts. For each retry, you can also define how long to wait between attempts.
|
Number of tries to complete the batch job before giving up. |
|
The amount of time to wait between each attempt. |
keyrotate Job Type
Use mc batch generate to create a basic keyrotate batch job for further customization:
You can use the MinIO Console to perform several of the bucket and object management and interaction functions available in MinIO. Depending on the permissions and IAM policies for the authenticated user, you can:
The Object Browser lists the buckets and objects the authenticated user has access to on the deployment.
After logging in or navigating to the tab, the object browser displays a list of the user’s buckets, which the user can filter. Select a bucket to show a list of objects in the bucket.
Select a specific object to display summary information about the object such as name, size, tags, holds, and retention policies that apply. The console also shows the object’s metadata.
The user can perform actions on the bucket’s objects, depending on the policies and permissions that apply. Example actions the user may be able to perform include:
Added: Console
v0.24.0
View the status of uploading or downloading objects with the object manager button available on the top right corner of the Console. If you have not uploaded or downloaded any objects during the current session, the button does not appear.
Changed: Console
v0.35.0
If you select multiple objects to download, MinIO creates a ZIP archive of those objects for downloading. You must unzip or uncompress this archive after downloading to access the files.
The Console’s Bucket section displays all buckets to which the authenticated user has access. Use this section to create or manage these buckets, depending on your user’s access.
Select Create Bucket to create a new bucket on the deployment. MinIO validates bucket names. To see the rules for bucket names, select View Bucket Naming Rules.
MinIO does not limit the total number of buckets allowed on a deployment. However, MinIO recommends no more than 500,000 buckets per deployment as a general guideline.
While creating a bucket, you can enable versioning, object locking, bucket size (quota) limits, and retention rules (which require versioning).
Changed: Console
v0.35.0
If you enable versioning, you can specify prefixes to exclude from versioning.
You must configure replication, locking, and versioning options at the time of bucket creation. You cannot change these settings for the bucket later.
Use the Search bar to filter for specific buckets. Select the row for the bucket to display summary information about the bucket.
Form the summary screen, select any of the available tabs to further manage the bucket.
Note
Some management features may not be available if the authenticated user does not have the required administrative permissions.
When managing a bucket, your access settings may allow you to view or change any of the following:
The Summary section displays a summary of the bucket’s configuration.
Use this section to view and modify the bucket’s access policy, encryption, quota, and tags.
Configure alerts in the Events section to trigger notification events when a user uploads, accesses, or deletes matching objects.
Copy objects to remote locations in the Replication section with Server Side Bucket Replication Rules.
Expire or transition objects in the bucket from the Lifecycle section by setting up Object Lifecycle Management Rules.
Review security in the Access section by listing the policies and users with access to that bucket.
Properly secure unauthenticated access with the Anonymous section by managing rules for prefixes that unauthenticated users can use to read or write objects.
The Tiering section provides an interface for adding and managing remote tiers to support lifecycle management transition rules. MinIO tiering supports moving objects from the deployment to the remote storage, but does not support automatically restoring them to the deployment.
The tiering tab allows users with the appropriate permissions to:
Added: MinIO
RELEASE.2023-12-02T10-51-33Z
The MinIO Batch Framework allows you to create, manage, monitor, and execute jobs using a YAML-formatted job definition file (a “batch file”). The batch jobs run directly on the MinIO deployment to take advantage of the server-side processing power without constraints of the local machine where you run the MinIO Client.
The expire batch job applies Automatic Object Expiration behavior to a single bucket. The job determines expiration eligibility based on the provided configuration, independent of any configured expiration rules.
Batch expiration occurs immediately as part of the batch job, as compared to the passive scanner-based application of expiration rules. Specifically, batch expiration does not yield to application I/O and may impact performance of regular read/write operations on the deployment.
The batch expiration works per-bucket and runs once to completion. The job determines expiration eligibility at the time the job runs, and does not rescan or recheck for new objects periodically.
To capture any new objects eligible for expiration, re-run the batch job.
The batch expiration job only checks the latest or “current” version of each object against each batch expiration rule.
Field |
Description |
|
Required Top-level field for the expiration job type. |
|
Required Set to |
|
Required Specify the name of the bucket in which the job runs. |
|
Optional Specify the bucket prefix in which the job runs. |
|
Required An array of one or more expiration rules to apply to objects in the specified |
|
Required Supports one of the following two values:
See Object Deletion for more complete documentation on |
|
Optional Specify a match string to use for filtering objects. Supports glob-style wildcards ( |
|
Optional Specify the age of objects for filtering objects. The rule applies to only those objects older than the specified unit of time. For example, |
|
Optional Specify an RFC3339 date and time for filtering objects. The rule applies to only those objects created before the specified timestamp. |
|
Optional Specify an array of key-value pairs describing object tags to use for filtering objects.
The For example, the following filters the rule to only objects with matching tags: This key is incompatible with |
|
Optional Specify an array of key-value pairs describing object metadata to use for filtering objects.
The For example, the following filters the rule to only objects with matching metadata: This key is incompatible with |
|
Optional Specify the range of object sizes for filtering objects.
|
|
Optional Specify the number of object versions to retain when applying expiration. Defaults to |
|
Optional The predefined endpoint to send events for notifications. |
|
Optional An optional JSON Web Token (JWT) to access the |
|
Optional The number of tries to complete the batch job before giving up. |
|
Optional The amount of time to wait between each attempt ( |
expire Job Type
Use mc batch generate to create a basic expire batch job for further customization.
You can use the MinIO Console to perform several of the identity and access management functions available in MinIO, such as:
The Access Keys or Service Accounts section displays all Access Keys associated to the authenticated user. The summary list of access keys that already exist for a particular user includes the access key, expiration, status, name, and description.
Access Keys support providing applications authentication credentials which inherit permissions from the “parent” user.
For deployments using an external identity manager such as Active Directory or an OIDC-compatible provider, access keys provide a way for users to create long-lived credentials.
You can select the access key row to view its custom policy, if one exists.
You can create or modify the policy from this screen. Access key policies cannot exceed the permissions granted to the parent user.
You can create a new access key by selecting Create access key.
The Console auto-generates an access key and password. You can select the eye icon on the password field to reveal the value. You can override these values as needed.
You can set a custom policy for the access key that further restricts the permissions granted to users authenticating with that key. Select Restrict beyond user policy to open the policy editor and modify as necessary.
Ensure you have saved the access key password to a secure location before selecting Create to create the access key. You cannot retrieve or reset the password value after creating the access key.
To rotate credentials for an application, create a new access key and delete the old one once the application updates to using the new credentials.
The Policies section displays all policies on the MinIO deployment. The Policies section allows you to create, modify, or delete policies.
Policies define the authorized actions and resources to which an authenticated user has access. Each policy describes one or more actions a user, group of users, or access key can perform or conditions they must meet.
The policies are JSON formatted text files compatible with Amazon AWS Identity and Access Management policy syntax, structure, and behavior. Refer to Policy Based Action Control for details on managing access in MinIO with policies.
This section or its contents may not be visible if the authenticated user does not have the required administrative permissions.
Select + Create Policy to create a new MinIO Policy.
Select the policy row to manage the policy details.
The Summary view displays a summary of the policy.
The Users view displays all users assigned to the policy.
The Groups view displays all groups assigned to the policy.
The Raw Policy view displays the raw JSON policy.
Use the Users and Groups views to assign a created policy to users and groups, respectively.
The Identity section provides a management interface for MinIO-Managed users.
The section contains the following subsections. Some subsections may not be visible if the authenticated user does not have the required administrative permissions.
The Users section displays all MinIO-managed users on the deployment.
This section is not visible for deployments using an external identity manager such as Active Directory or an OIDC-compatible provider.
Select Create User to create a new MinIO-managed user.
You can assign groups and policies to the user during creation.
Select a user’s row to view details for that user.
You can view and modify the user’s assigned groups and policies.
You can also view and manage any Access Keys associated to the user.
The Groups section displays all groups on the MinIO deployment.
This section is not visible for deployments using an external identity manager such as Active Directory or an OIDC-compatible provider.
Select Create Group to create a new MinIO Group.
You can assign new users to the group during creation.
You can assign policies to the group after creation.
Select the group row to open the details for that group.
You can modify the group membership from the Members view.
You can modify the group’s assigned policies from the Policies view.
Changing a user’s group membership modifies the policies that user inherits. See Access Management for more information.
MinIO supports using an OpenID Connect (OIDC) compatible IDentity Provider (IDP) for external management of user identities.
Examples of OpenID providers include:
Configuring an external IDP enables Single-Sign On workflows, where applications authenticate against the external IDP before accessing MinIO.
Use the screens in this section to view, add, or edit OIDC configurations for the deployment. MinIO supports any number of active OIDC configurations.
MinIO supports using an Active Directory or LDAP (AD/LDAP) service for external management of user identities. Configuring an external IDentity Provider (IDP) enables Single-Sign On (SSO) workflows, where applications authenticate against the external IDP before accessing MinIO.
Use the screens in this section to view, add, or edit an LDAP configuration for the deployment. MinIO only supports one active LDAP configuration.
MinIO queries the Active Directory / LDAP server to verify the client-specified credentials. MinIO also performs a group lookup on the AD/LDAP server if configured to do so.
You can use the MinIO Console to perform several of the license and subscription related functions available in MinIO, such as:
MinIO offers three licensing options:
The License page shows the current license status of the deployment. You can also begin the registration process to sign up for a paid subscription or add the deployment to an existing subscription.
Deployments licensed under AGPLv3 must comply to the terms of the license. MinIO cannot make the determination as to whether your application’s usage of MinIO is in compliance with the AGPLv3 license requirements. You should instead rely on your own legal counsel or licensing specialists to audit and ensure your application is in compliance with the licenses of MinIO and all other open-source projects with which your application integrates or interacts.
MinIO Commercial Licensing is the best option for applications which trigger AGPLv3 obligations (for example, open sourcing your application). Applications using MinIO—or any other OSS-licensed code—without validating their usage do so at their own risk.
The Health section provides an interface for running a health diagnostic for the MinIO Deployment. For clusters connected to the Internet, the report uploads automatically to SUBNET.
The resulting health report is intended for use by MinIO Engineering via MinIO SUBNET and may contain internal or private data points such as hostnames. Exercise caution before sending a health report to a third party or posting the health report in a public forum.
If desired, you can download the latest report from the page.
The Performance section provides an interface for running a performance test of the deployment. The resulting test can provide a general guideline of deployment performance under S3 GET and PUT requests.
For more complete performance testing, consider using a combination of load-testing using your staging application environments and the MinIO WARP tool.
The Profile section provides an interface for running system profiling of the deployment. The results can provide insight into the MinIO server process running on a given node.
The resulting report is intended for use by MinIO Engineering via MinIO SUBNET. Independent or third-party use of these profiles for diagnostics and remediation is done at your own risk.
The Inspect section provides an interface for capturing the erasure-coded metadata associated to an object or objects. MinIO Engineering may request this output as part of diagnostics in MinIO SUBNET.
The resulting object may be read using MinIO’s debugging tool. Independent or third-party use of the output for diagnostics or remediation is done at your own risk. You can optionally encrypt the object such that it can only be read if the generated encryption key is included as part of the debugging toolchain.
Added: Console
v0.24.0
Call Home is an optional feature where a deployment registered for MinIO SUBNET can automatically send daily health diagnostic reports or real-time error logs to SUBNET. Having these reports equips engineering support with a record of diagnostics, logs, or both when responding to support requests.
MinIO installs with Call Home options disabled by default.
Important
Call Home requires an active Enterprise license.
Use the Call Home section to enable or disable uploading either once-per-day health diagnostic reports or real-time error logs to SUBNET. The health reports and real-time logs are separate functions you can enable or disable separately. You can enable both diagnostics and logs at the same time, if desired.
The MinIO Console is a rich graphical user interface that provides similar functionality to the mc command line tool.
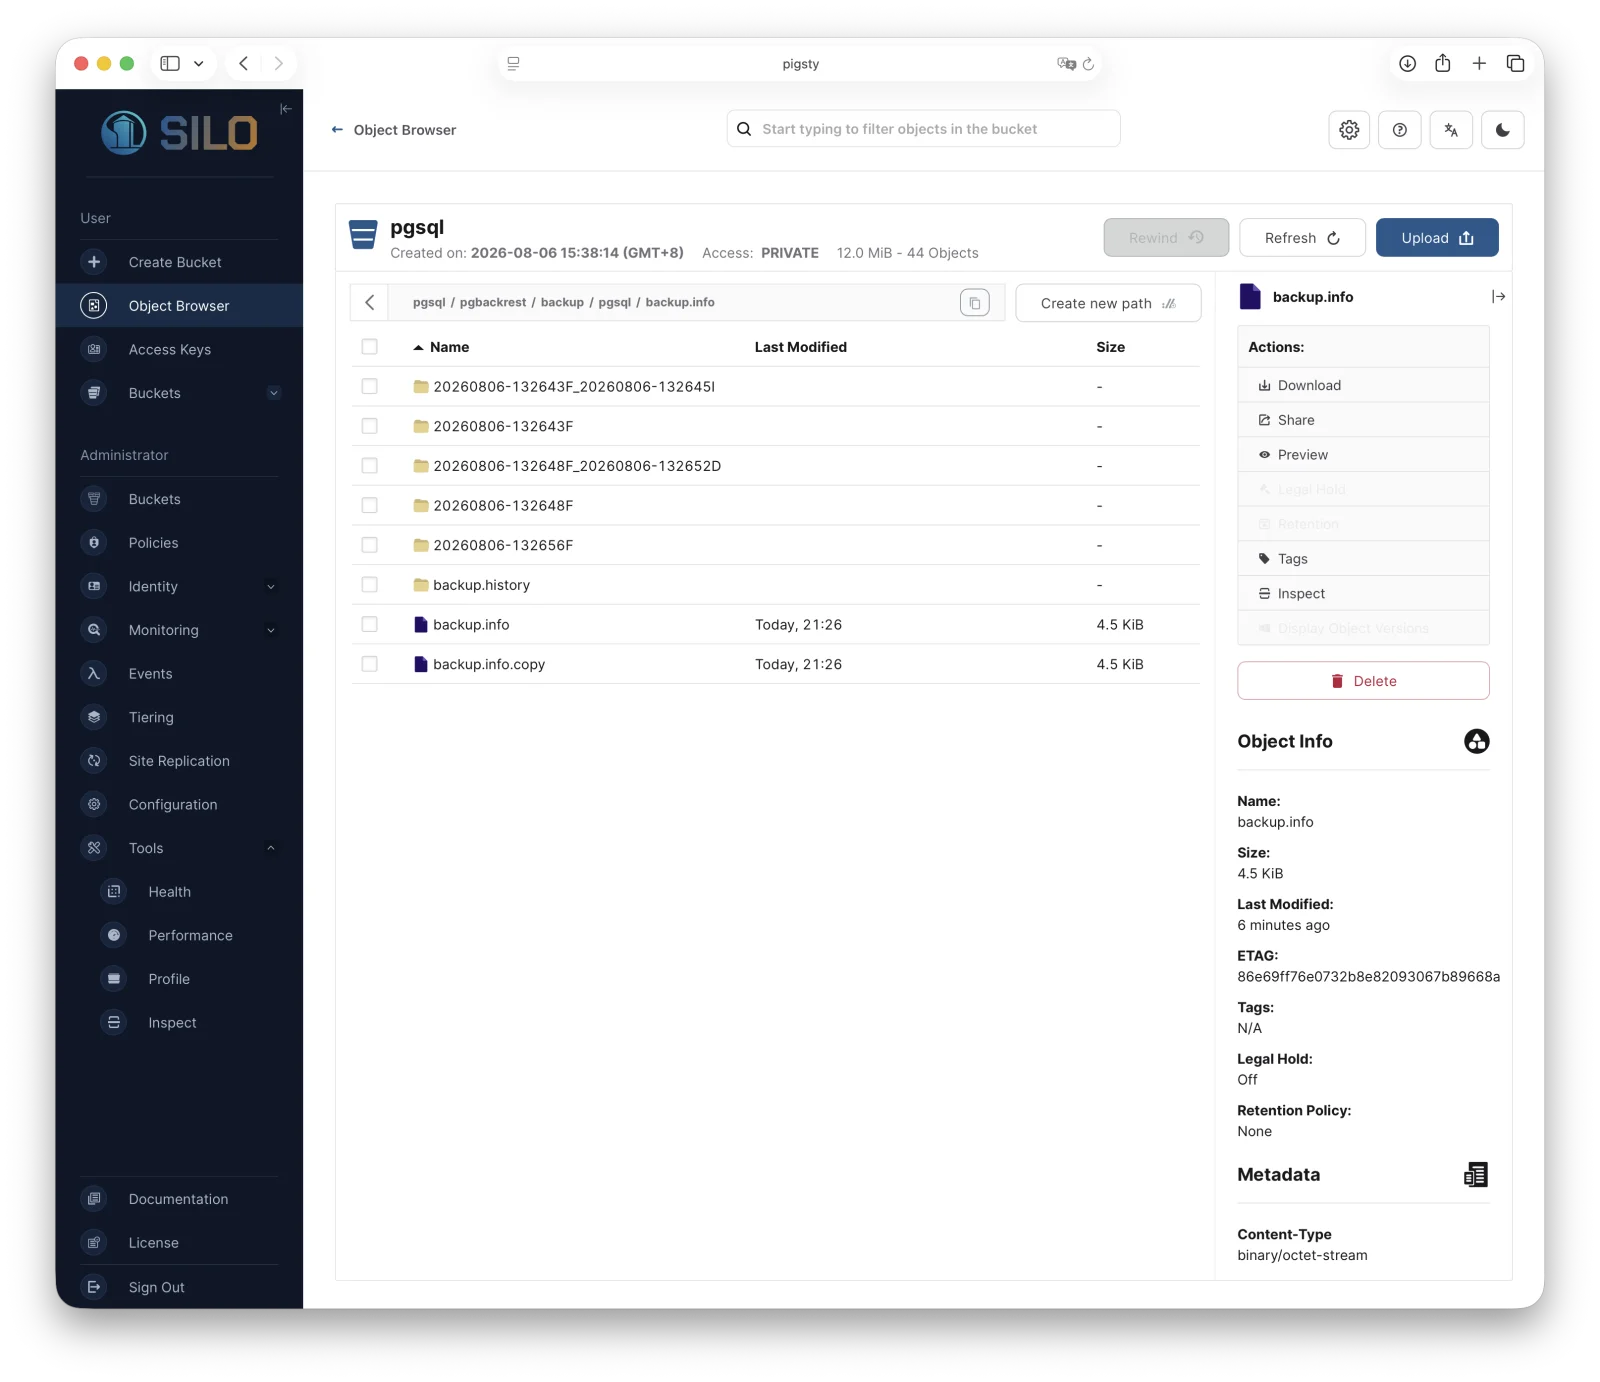
This page provides an overview of the MinIO Console and describes configuration options and instructions for logging in.
You can use the MinIO Console for administration tasks like Identity and Access Management, Metrics and Log Monitoring, or Server Configuration.
SILO embeds the maintained Silo Console in the server. The Silo Console repository documents the downstream source, releases, and compatibility changes; standalone deployment is an advanced integration path and must use a Console version compatible with the target server release.
MinIO Console runs on a variety of current, stable release browsers.
For the best experience in the MinIO Console, use the latest stable release of your preferred browser. Some browsers that are supported include:
This list is not exhaustive and is subject to change.
For a full list of browsers and versions for running MinIO Console, see the Browserslist website.
Tip
MinIO Console does not support Opera Mini.
The MinIO Console inherits the majority of its configuration settings from the MinIO Server. The following environment variables enable specific behavior in the MinIO Console:
Environment Variable |
Description |
|---|---|
The URL for a Prometheus server configured to scrape metrics from the MinIO deployment. The MinIO Console uses this server for populating the metrics dashboard. See Monitoring and Alerting using Prometheus for a tutorial on configuring Prometheus to collect metrics from MinIO. |
|
The externally resolvable hostname for the MinIO Console used by the configured external identity manager for returning the authentication response. This variable is typically necessary when using a reverse proxy, load balancer, or similar system to expose the MinIO Console to the public internet. Specify an externally reachable hostname that resolves to the MinIO Console. |
MinIO by default selects a random port for the MinIO Console on each server startup. Browser clients accessing the MinIO Server are automatically redirected to the MinIO Console on its dynamically selected port. This behavior emulates the legacy web browser behavior while reducing the risk of a port collision on systems which were running MinIO before the embedded Console update.
You can select an explicit static port by passing the minio server --console-address commandline option when starting each MinIO Server in the deployment.
For example, the following command starts a distributed MinIO deployment using a static port assignment of 9001 for the MinIO Console. This deployment would respond to S3 API operations on the default MinIO server port :9000 and browser access on the MinIO Console port :9001.
Deployments behind network routing components which require static ports for routing rules may require setting a static MinIO Console port. For example, load balancers, reverse proxies, or Kubernetes ingress may by default block or exhibit unexpected behavior with the dynamic redirection behavior.
You must also ensure that the host system firewall grants access to the configured Console port.
Changed: RELEASE.2023-03-09T23-16-13Z
The MinIO Console displays a login screen for unauthenticated users. The Console defaults to providing a username and password prompt for a MinIO-managed user.
For deployments configured with multiple identity managers, select the Other Authentication Methods dropdown to select one of the other configured identity providers. You can also log in using credentials generated using a Security Token Service (STS) API.
Try out the Console using MinIO’s Play testing environment
You can explore the Console using https://play.min.io:9443. Log in with the following credentials:
Q3AM3UQ867SPQQA43P2Fzuf+tfteSlswRu7BJ86wekitnifILbZam1KYY3TGThe Play Console connects to the MinIO Play deployment at https://play.min.io. You can also access this deployment using mc and using the play alias.
The Documentation tab opens this documentation site in a separate browser window or tab.
Once logged in to the MinIO Console, users can perform many kinds of tasks.
An object is binary data, such as images, audio files, spreadsheets, or even binary executable code. The term “Binary Large Object” or “blob” is sometimes associated to object storage, although blobs can be anywhere from a few bytes to several terabytes in size. Object Storage platforms like MinIO provide dedicated tools and capabilities for storing, listing, and retrieving objects using a standard S3-compatible API.
Exclusive access to drives
MinIO requires exclusive access to the drives or volumes provided for object storage. No other processes, software, scripts, or persons should perform any actions directly on the drives or volumes provided to MinIO or the objects or files MinIO places on them.
Unless directed by MinIO Engineering, do not use scripts or tools to directly modify, delete, or move any of the data shards, parity shards, or metadata files on the provided drives, including from one drive or node to another. Such operations are very likely to result in widespread corruption and data loss beyond MinIO’s ability to heal.
MinIO Object Storage uses buckets to organize objects. A bucket is similar to a top-level drive, folder, or directory in a filesystem (/mnt/data or C:\), where each bucket can hold an arbitrary number of objects.
The structure of objects on the MinIO server might look similar to the following:
With the example structure, an administrator would create the /images, /videos and /articles buckets. Client applications write objects to those buckets using the full “path” to that object, including all intermediate prefixes.
MinIO supports multiple levels of nested directories and objects using prefixes to support even the most dynamic object storage workloads. MinIO automatically infers the intermediate prefixes, such as /articles/john.doe from the full object path using / as a delimiter. Clients and administrators should not create these prefixes manually.
Neither clients nor administrators would manually create the intermediate prefixes, as MinIO automatically infers them from the object name.
MinIO supports both path-style (default) or virtual-host bucket lookups.
For example, consider a MinIO deployment with an assigned Fully Qualified Domain Name (FQDN) of minio.example.net:
minio.example.net/mybucket.mybucket.minio.example.net/.Some applications may require or expect virtual-host lookup support when performing S3 operations against MinIO. To enable virtual-host bucket lookup, you must set the MINIO_DOMAIN environment variable to a FQDN that resolves to the MinIO Deployment.
If you configure MINIO_DOMAIN, you must consider all subdomains of the specified FQDN as exclusively assigned for use as bucket names. Any MinIO services which conflict with those domains, such as replication targets, may exhibit unexpected or undesired behavior as a result of the collision.
For example, if setting MINIO_DOMAIN=minio.example.net, you cannot assign any subdomains of minio.example.net (in the form of *.minio.example.net) to any MinIO service or target. This includes hostnames for use with bucket, batch, or site replication.
Important
For deployments with TLS enabled, you must ensure your TLS certificate SANs cover all subdomains of the leftmost domain specified to MINIO_DOMAIN.
For example, the example of MINIO_DOMAIN=minio.example.net requires a TLS SAN that covers the subdomains of minio.example.net. You can set an additional TLS SAN of *.minio.example.net to appropriately cover the subdomain namespace.
TLS Wildcard rules prevent chaining to additional subdomain levels, such that a TLS certificate with a wildcard SAN of *.example.net would not cover the virtual host lookups at *.minio.example.net.
Administrators typically control the creation and configuration of buckets. Client applications can then use S3-compatible SDKs to create, list, retrieve, and delete objects on the MinIO deployment. Clients therefore drive the overall hierarchy of data within a given bucket or prefix, where Administrators can exercise control using policies to grant or deny access to an action or resource.
MinIO has no hard thresholds on the number of buckets, objects, or prefixes on a given deployment. The relative performance of the hardware and networking underlying the MinIO deployment may create a practical limit to the number of objects in a given prefix or bucket. Specifically, hardware using slower drives or network infrastructures tend to exhibit poor performance in buckets or prefixes with a flat hierarchy of objects. For other considerations, thresholds, or limitations to keep in mind, see Thresholds and Limits.
Consider the following points as general guidance for client applications workload patterns:
MinIO SUBNET Enterprise accounts can utilize yearly architecture reviews as part of the deployment and maintenance strategy to ensure long-term performance and success of your MinIO-dependent projects.
For a deeper discussion on the benefits of limiting prefix contents, see the article on optimizing S3 performance.
Note
MinIO does not support the \ or : characters in object names, regardless of support for those characters in Windows filesystems. Use / as a delimiter in object names to have MinIO automatically create a folder structure using prefixes.
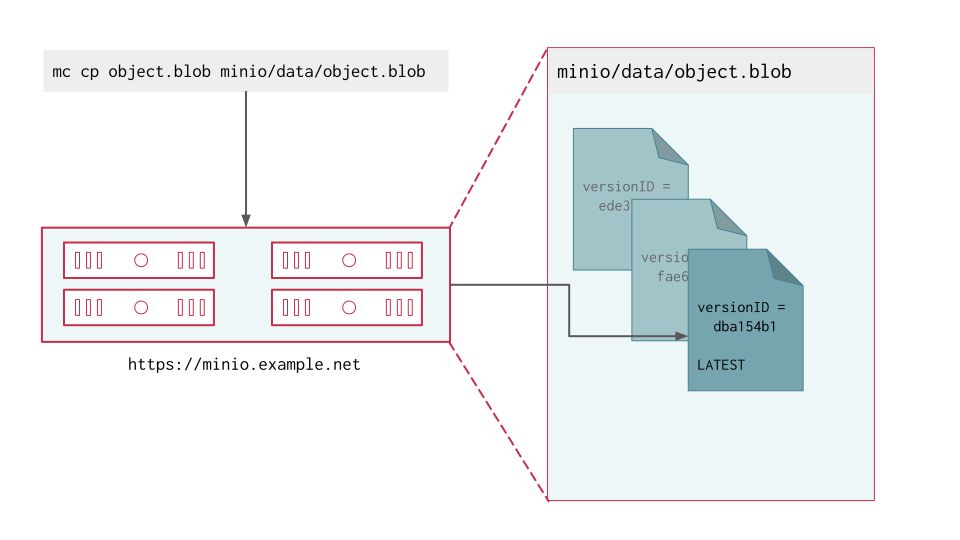
The specific client behavior on write, list, get, or delete operations on a bucket depends on the versioning state of that bucket:
Operation |
Versioning Enabled |
Versioning Disabled | Suspended |
|---|---|---|
|
Create a new full version of the object as the “latest” and assign a unique version ID |
Create the object with overwrite on namespace match. |
|
Retrieve the latest version of the object by default Supports retrieving retrieving any object version by version ID. |
Retrieve the object |
|
Retrieve the latest version of objects at the specified bucket or prefix Supports retrieving all objects with their associated version ID. |
Retrieve all objects at the specified bucket or prefix |
|
Creates a 0-byte “Delete Marker” for the object as “latest” (soft delete) Supports deleting any object version by version ID (hard delete). You cannot undo hard-delete operations. Refer to Object Deletion for more information. |
Deletes the object |
See Bucket Versioning for more complete documentation.
MinIO supports adding custom tags to an object. A tag is a key-value pair included in the metadata of an object. Tags can be used to control access with policies or locate an object with mc find --tags.
MinIO supports adding up to 10 custom tags to an object.
For more on setting tags, refer to mc tag set.
MinIO Object Locking (“Object Retention”) enforces Write-Once Read-Many (WORM) immutability to protect versioned objects from deletion. MinIO supports both duration based object retention and indefinite legal hold retention.
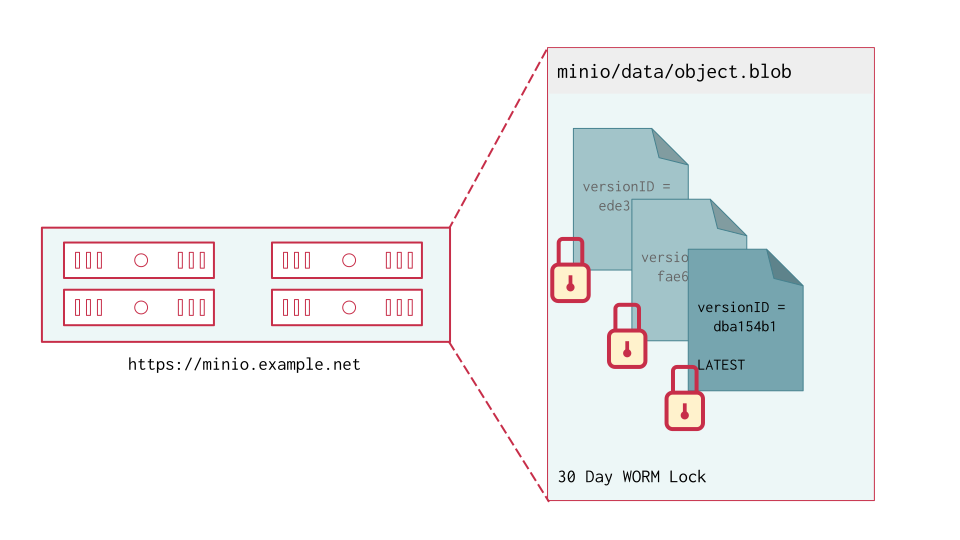
Delete operations against a WORM-locked object depend on the specific operation:
You can only enable object locking when first creating a bucket. Enabling bucket locking also enables versioning.
MinIO Object Locking provides key data retention compliance and meets SEC17a-4(f), FINRA 4511(C), and CFTC 1.31(c)-(d) requirements as per Cohasset Associates.
See MinIO Object Locking and Object Deletion for more complete documentation.
MinIO Object Lifecycle Management allows creating rules for time or date based automatic transition or expiry of objects. For object transition, MinIO automatically moves the object to a configured remote storage tier. For object expiry, MinIO automatically deletes the object.
MinIO applies lifecycle management rules on versioned and unversioned buckets using the same behavior as normal client operations. You can specify transition or lifecycle rules that handle the latest object versions, non-current object versions, or both.
MinIO lifecycle management is built for behavior and syntax compatibility with AWS S3 Lifecycle Management. MinIO uses JSON to describe lifecycle management rules. Conversion to or from XML may be required for importing rules created on S3 or similar compatible platforms.
See Object Lifecycle Management for more complete documentation.
MinIO does not require that the target bucket match object management or versioning configurations with the source bucket. The target bucket may have its own set of object management rules, if defined with care.
Target buckets should not have their own rules for expiration or additional tiering. Expiration rules can result in removal of tiered data still in use by the source bucket. Tiering to an additional remote creates an additional network hop between the hot tier and it’s data while also increasing operational complexity.
You may configure object locking or versioning on the remote bucket.
Enabling versioning or object locking on the target bucket may have effects such as the following:
delete operations from the source bucket from completing.UUID, so versioning on the target bucket is redundant at best.delete operations result in creation of a DeleteMarker rather than freeing space.MinIO must have exclusive access to the target bucket. No other user, process, application, or resource should have any access to or perform any actions against the target bucket.
All access to the transitioned objects must occur through MinIO via S3 API operations only. Manually modifying a transitioned object - whether the metadata on the “hot” MinIO tier or the object data on the remote “warm/cold” tier - may result in loss of that object data.
MinIO ignores any objects in the remote bucket or bucket prefix not explicitly managed by the MinIO deployment. Automatic transition and transparent object retrieval depend on the following assumptions:
To facilitate this exclusive access, grant the lifecycle management user read, write, and delete access to the target bucket in its policy. All other policies should deny access to the target bucket.
Applications must assign non-conflicting, unique keys for all objects. This includes avoiding creating objects where the name can collide with that of a parent or sibling object. MinIO returns an empty set for LIST operations at the location of the collision.
For example, the following operations create a namespace conflicts
While you can perform GET or HEAD operations against these objects, the name collision causes LIST operations to return an empty result set at the /invoices/2024/january path.
MinIO supports keeping multiple “versions” of an object in a single bucket.
When enabled, versioning allows MinIO to keep multiple iterations of the same object. Write operations which would normally overwrite an existing object instead result in the creation of a new versioned object. MinIO versioning protects from unintended overwrites and deletions while providing support for “undoing” a write operation. Bucket versioning is a prerequisite for configuring object locking and retention rules.
For versioned buckets, a write operation results in a new version of that object with a unique version ID. MinIO marks the “latest” version of the object that clients retrieve by default. Clients can then explicitly choose to list, retrieve, or remove a specific object version.
Define object expiration rules to remove versions of objects no longer needed, such as by the number of versions or the date of versions.
Review each of the four images in this series to see how MinIO retrieves objects in a versioned bucket. Use the arrows on either side of the images to navigate from one to the next.
MinIO adds a unique version ID to each object as part of write operations.
MinIO retains all versions of an object and marks the most recent version as the “latest”.
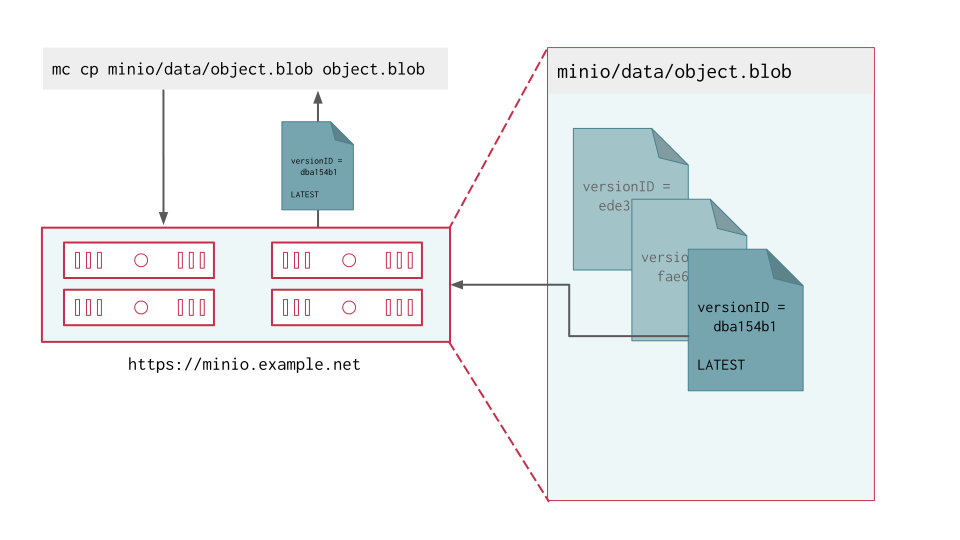
A read operation request without a version ID returns the latest version of the object.
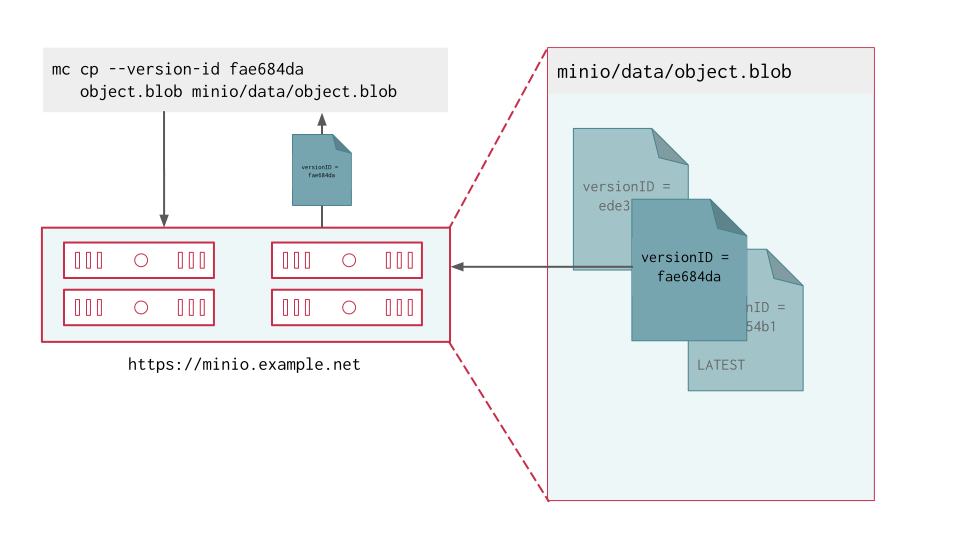
Include the version ID to retrieve a specific version of an object during a read operation.
Changed: MinIO
Server RELEASE.2023-05-04T21-44-30Z
MinIO does not create versions for creation, mutation, or deletion of explicit directory objects (“prefixes”). Objects created within that explicit directory object retain normal versioning behavior.
MinIO implicitly determines prefixes from object paths. Explicit prefix creation typically only occurs with Spark and similar workloads which apply legacy POSIX/HDFS directory creation behavior within the S3 context.
MinIO uses the full namespace (the bucket and path to an object) for each object as part of determining object uniqueness. For example, all of the following namespaces are “unique” objects, where mutations of each object result in the creation of new object versions at that namespace:
While object.blob might be the same binary across all namespaces, MinIO only enforces versioning with a specific namespace and therefore considers each object.blob above as distinct and unique.
MinIO does not perform incremental or differential-type versioning. For mutation-heavy workloads, this may result in substantial drive usage by older or aged object versions.
For example, consider a 1GB object containing log data. An application appends 100MB of data to the log and uploads to MinIO. MinIO would then contain both the 1GB and 1.1GB versions of the object. If the application repeated this process every day for 10 days, the bucket would eventually contain more than 14GB of data associated to a single object.
MinIO supports configuring configuring object lifecycle management rules to automatically expire or transition aged object versions and free up storage capacity. For example, you can configure a rule to automatically expire object versions 90 days after they become non-current (i.e. no longer the “latest” version of that object). See MinIO Object Expiration for more information.
You can alternatively perform manual removal of object versions using the following commands:
mc rm --versions - Removes all versions of an object.
mc rm --versions --older-than -
Removes all versions of an object older than the specified calendar date.
Added: RELEASE.2024-04-18T19-09-19Z
MinIO emits a warning if the cumulative size of versions for any single object exceeds 1TiB.
MinIO generates a unique and immutable identifier for each versioned object as part of write operations. Each object version ID consists of a 128-bit fixed-size UUIDv4. UUID generation is sufficiently random to ensure high likelihood of uniqueness for any environment, are computationally difficult to guess, and do not require centralized registration process and authority to guarantee uniqueness.
MinIO does not support client-managed version ID allocation. All version ID generation is handled by the MinIO server process.
For objects created while versioning is disabled or suspended, MinIO uses a null version ID. You can access or remove these objects by specifying null as the version ID as part of S3 operations.
Performing a DELETE operation on a versioned object creates a 0-byte DeleteMarker as the latest version of that object. For objects where the latest version is a DeleteMarker, clients must specify versioning flags or identifiers to perform GET/HEAD/LIST/DELETE operations on a prior version of that object. The default server behavior omits DeleteMarker objects from consideration for unversioned operations.
MinIO can utilize Lifecycle Management expiration rules to automatically remove versioned objects permanently. Otherwise, use manual DELETE operations to permanently remove non-current versioned objects or DeleteMarker objects.
MinIO Implements Idempotent Delete Markers
Changed: RELEASE.2022-08-22T23-53-06Z
Standard S3 implementations can create multiple sequential delete markers for the same object when processing simple DeleteObject requests with no version identifier. See the S3 docs for details on managing delete markers.
MinIO diverges from standard S3 implementation by avoiding this potential duplication of delete markers. When processing a Delete request with no version identifier, MinIO creates at most one Delete Marker for the specified object. MinIO does not share S3’s behavior in creating multiple sequential delete markers.
To permanently delete an object version, perform the DELETE operation and specify the version ID of the object to delete. Versioned delete operations are irreversible.
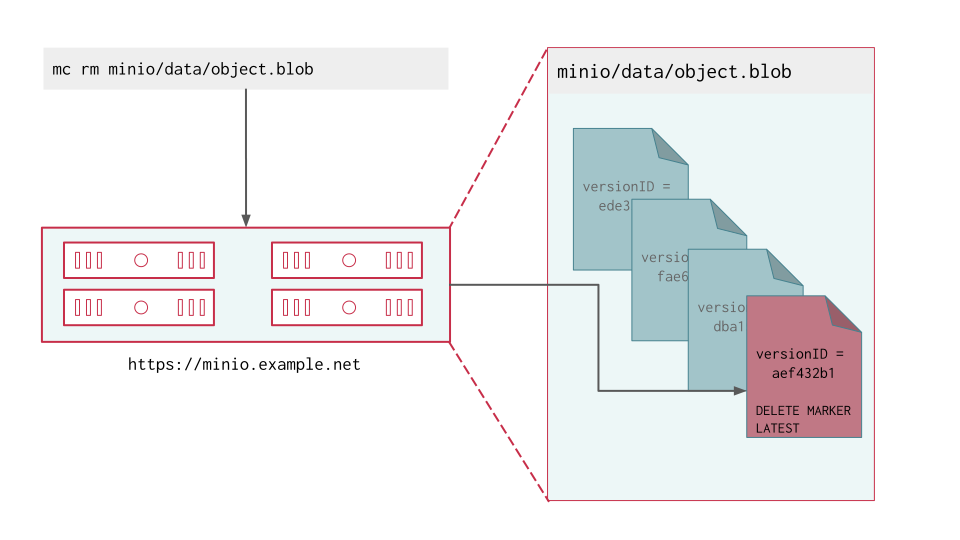
Performing a DELETE operation on a versioned object produces a DeleteMarker for that object.
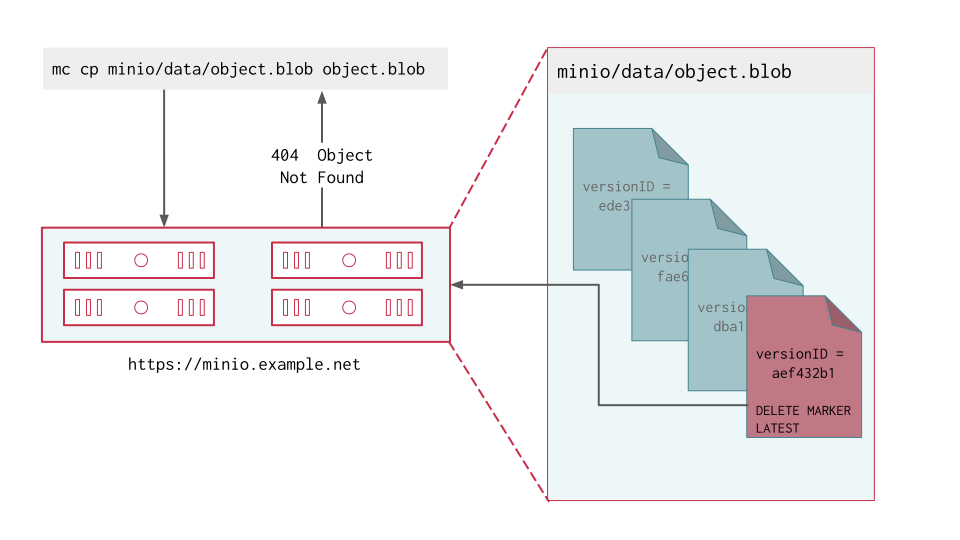
Clients by default retrieve the “latest” object version. MinIO returns a 404-like response if the latest version is a DeleteMarker.
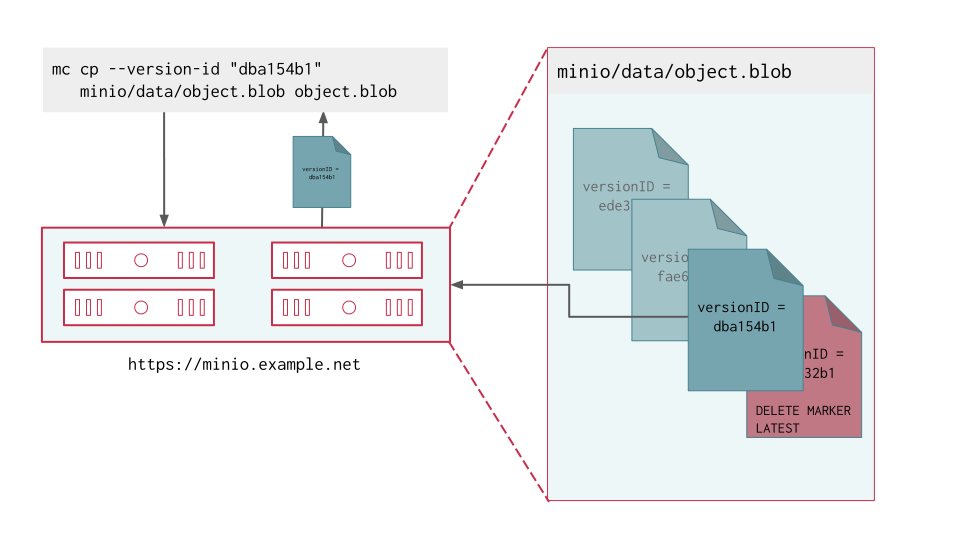
Clients can retrieve any previous version of the object by specifying the version ID, even if the “Latest” version is a DeleteMarker.
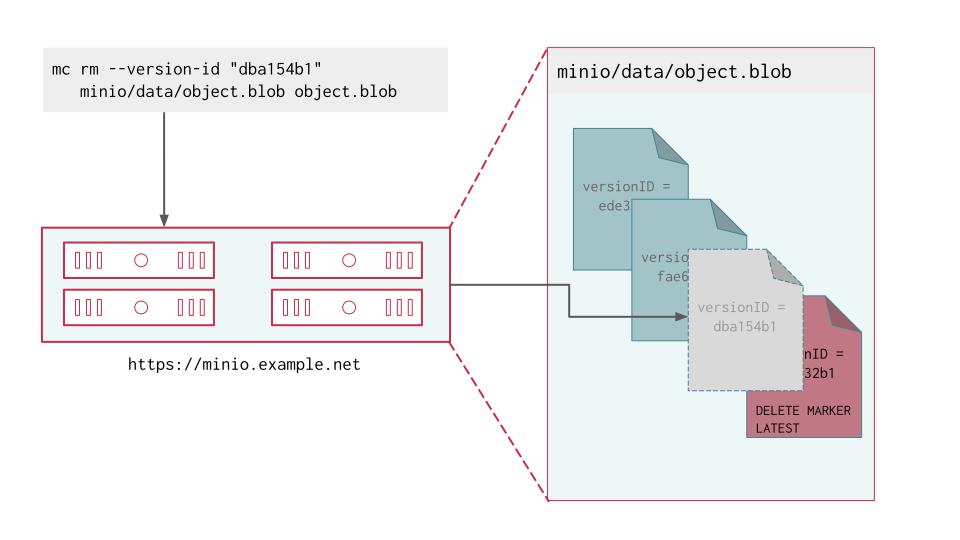
Clients can delete a specific object version by specifying the version ID as part of the DELETE operation. Deleting a specific version is permanent and does not result in the creation of a DeleteMarker.
The following mc commands operate on DeleteMarkers or versioned objects:
mc ls --versions to view all versions of an object, including delete markers.mc cp --version-id=UUID ... to retrieve the version of the “deleted” object with matching UUID.mc rm --version-id=UUID ... to delete the version of the object with matching UUID.mc rm --versions to delete all versions of an object.You can enable versioning using the MinIO Console, the MinIO mc CLI, or using an S3-compatible SDK.
Use the mc version enable command to enable versioning on an existing bucket:
ALIAS with the alias of a configured MinIO deployment.BUCKET with the target bucket on which to enable versioning.Objects created prior to enabling versioning have a null version ID.
You can exclude certain prefixes from versioning using the MinIO Client. This is useful for Spark/Hadoop workloads or others that initially create objects with temporary prefixes.
Replication and Object Locking Require Versioning
MinIO requires versioning to support replication. Objects in excluded prefixes do not replicate to any peer site or remote site.
MinIO does not support excluding prefixes from versioning on buckets with object locking enabled.
Use mc version enable with the --excluded-prefixes option:
The list of --excluded-prefixes prefixes match all objects containing the specified strings in their prefix or name, similar to a regular expression of the form prefix*. To match objects by prefix only, use prefix/*.
For example, the following command excludes any objects containing _test or _temp in their prefix or name from versioning:
You can exclude up to 10 prefixes for each bucket. To add or remove prefixes, repeat the mc version enable command with an updated list. The new list of prefixes replaces the previous one.
To view the currently excluded prefixes, use mc version info with the --json option:
The command output resembles the following, with the list of excluded prefixes in the ExcludedPrefixes property:
To disable prefix exclusion and resume versioning all prefixes, repeat the mc version enable command without --excluded-prefixes:
You can exclude folders from versioning using the MinIO Client.
Replication and Object Locking Require Versioning
MinIO requires versioning to support replication. Objects in excluded folders do not replicate to any peer site or remote site.
MinIO does not support excluding folders from versioning on buckets with object locking enabled.
Object locking
Buckets with object locking enabled require versioning and do not support excluding folders.
Use mc version enable with the --exclude-folders option to exclude objects with names ending in / from versioning:
To check whether folders are versioned for a bucket, use the mc version enable command with the --json option. If the ExcludeFolders property is true, folders in that bucket are not versioned.
The command output resembles the following:
To disable folder exclusion and resume versioning all folders, repeat the mc version enable command without --exclude-folders:
You can suspend bucket versioning at any time using he MinIO mc CLI or using an S3-compatible SDK.
Use the mc version suspend command to enable versioning on an existing bucket:
ALIAS with the alias of a configured MinIO deployment.BUCKET with the target bucket on which to disable versioning.Objects created while versioning is suspended are assigned a null version ID. Any mutations to an object while versioning is suspended result in overwriting that null versioned object. MinIO does not remove or otherwise alter existing versioned objects as part of suspending versioning. Clients can continue interacting with any existing object versions in the bucket.
The procedure on this page creates a new object lifecycle management rule that transitions objects from a bucket on a primary MinIO deployment to a bucket on a remote MinIO deployment. This procedure supports cost-management strategies such as tiering objects from a “hot” MinIO deployment using NVMe storage to a “warm” MinIO deployment using SSD.
mc
This procedure uses mc for performing operations on the MinIO cluster. Install mc on a machine with network access to both source and destination clusters. See the mc Installation Quickstart for instructions on downloading and installing mc.
Use the mc alias set command to create an alias for the source MinIO cluster. Alias creation requires specifying an access key for a user on the source and destination clusters. The specified users must have permissions for configuring and applying transition operations.
MinIO requires the following permissions scoped to the bucket or buckets for which you are creating lifecycle management rules.
MinIO also requires the following administrative permissions on the cluster in which you are creating remote tiers for object transition lifecycle management rules:
For example, the following policy provides permission for configuring object transition lifecycle management rules on any bucket in the cluster:
Object transition lifecycle management rules require additional permissions on the remote storage tier. Specifically, MinIO requires the remote tier credentials provide read, write, list, and delete permissions for the remote bucket.
For example, the following policy on the remote MinIO deployment provides the necessary permission for transitioning objects into and out of the remote tier:
Modify the Resource for the bucket into which MinIO tiers objects.
Refer to the Access Management documentation for more complete guidance on configuring the required permissions.
Create the remote bucket prior to configuring lifecycle management tiers or rules using that bucket as the target.
If the remote bucket contains existing data, use the prefix feature to isolate transitioned objects from any other objects on that bucket.
MinIO uses a scanner process to check objects against all configured lifecycle management rules. Slow scanning due to high IO workloads or limited system resources may delay application of lifecycle management rules.
MinIO requires exclusive access to the transitioned data on the remote storage tier. Object metadata on the “hot” MinIO source is strongly linked to the object data on the “warm/cold” remote tier. MinIO cannot retrieve object data without access to the remote, nor can the remote be used to restore lost metadata on the source.
All access to the transitioned objects must occur through MinIO via S3 API operations only. Manually modifying a transitioned object - whether the metadata on the “hot” MinIO tier or the object data on the remote “warm/cold” tier - may result in loss of that object data.
MinIO ignores any objects in the remote bucket or bucket prefix not explicitly managed by the MinIO deployment. Automatic transition and transparent object retrieval depend on the following assumptions:
MinIO stores all transitioned objects in the remote storage bucket or resource under a unique per-deployment prefix value. This value is not intended to support identifying the source deployment from the backend. MinIO supports an additional optional human-readable prefix when configuring the remote target, which may facilitate operations related to diagnostics, maintenance, or disaster recovery.
MinIO recommends specifying this optional prefix for remote storage tiers which contain other data, including transitioned objects from other MinIO deployments. This tutorial includes the necessary syntax for setting this prefix.
MinIO tiering behavior depends on the remote storage returning objects immediately (milliseconds to seconds) upon request. MinIO therefore cannot support remote storage which requires rehydration, wait periods, or manual intervention.
MinIO creates metadata for each transitioned object that identifies its location on the remote storage. Applications cannot trivially identify and access a transitioned object independent of MinIO. Availability of the transitioned data therefore depends on the same core protections that erasure coding and distributed deployment topologies provide for all objects on the MinIO deployment. Using object transition does not provide any additional business continuity or disaster recovery benefits.
Workloads that require BC/DR protections should implement MinIO Server-Side replication. Replication ensures objects remains preserved on the remote replication site, such that you can resynchronize from the remote in the event of partial or total data loss. See Resynchronization (Disaster Recovery) for more complete documentation on using replication to recover after partial or total data loss.
This step creates users and policies on the MinIO deployment for supporting lifecycle management operations. You can skip this step if the deployment already has users with the necessary permissions.
The following example uses Alpha as a placeholder alias for the MinIO deployment. Replace this value with the appropriate alias for the MinIO deployment on which you are configuring lifecycle management rules. Replace the password LongRandomSecretKey with a long, random, and secure secret key as per your organizations best practices for password generation.
This example assumes that the specified aliases have the necessary permissions for creating policies and users on the deployment. See User Management and MinIO Policy Based Access Control for more complete documentation on MinIO users and policies respectively.
Use the mc ilm tier add command to add the remote MinIO deployment as the new remote storage tier:
The example above uses the following arguments:
Argument |
Description |
|---|---|
The |
|
The name to associate with the new MinIO remote storage tier. Specify the
name in all-caps, e.g. |
|
The URL endpoint for the MinIO storage backend. |
|
The access key MinIO uses to access the bucket. The access key must correspond to an IAM user with the required permissions. |
|
The corresponding secret key for the specified |
|
The name of the bucket on the remote MinIO deployment to which the |
|
The optional bucket prefix within which MinIO transitions objects. MinIO stores all transitioned objects in the specified MinIO recommends specifying this optional prefix for remote storage tiers which contain other data, including transitioned objects from other MinIO deployments. This prefix should provide a clear reference back to the source MinIO deployment to facilitate ease of operations related to diagnostics, maintenance, or disaster recovery. |
|
The Erasure Coding storage class MinIO applies to objects transitions to the remote MinIO bucket. Specify one of the following supported storage classes:
|
|
The MinIO region of the specified MinIO deployments typically do not require setting a region as part of setup.
Only include this option if you explicitly set the |
Use the mc ilm rule add command to create a new transition rule for the bucket. The following example configures transition after the specified number of calendar days:
The example above specifies the following arguments:
Argument |
Description |
|---|---|
Specify the |
|
Specify the full path to the bucket for which you are creating the lifecycle management rule. |
|
The remote storage tier to which MinIO transitions objects. Specify the remote storage tier name created in the previous step. If you want to transition noncurrent object versions to a distinct
remote tier, specify a different tier name for
|
|
The number of calendar days after which MinIO marks an object as
eligible for transition. Specify the number of days as an integer,
e.g. |
|
The number of calendar days after which MinIO marks a noncurrent
object version as eligible for transition. MinIO specifically measures
the time since an object became non-current instead of the object
creation time. Specify the number of days as an integer,
e.g. Omit this value to ignore noncurrent object versions. This option has no effect on non-versioned buckets. |
Use the mc ilm rule ls command to review the configured transition rules:
MinIO Object Locking (“Object Retention”) enforces Write-Once Read-Many (WORM) immutability to protect versioned objects from deletion. MinIO supports both duration based object retention and indefinite legal hold retention.
MinIO Object Locking provides key data retention compliance and meets SEC17a-4(f), FINRA 4511(C), and CFTC 1.31(c)-(d) requirements as per Cohasset Associates.
MinIO versioning preserves the full history of object mutations. However, applications can explicitly delete specific object versions.
Applying a default 30 Day WORM lock to objects in the bucket ensures a minimum period of retention and protection for all object versions.
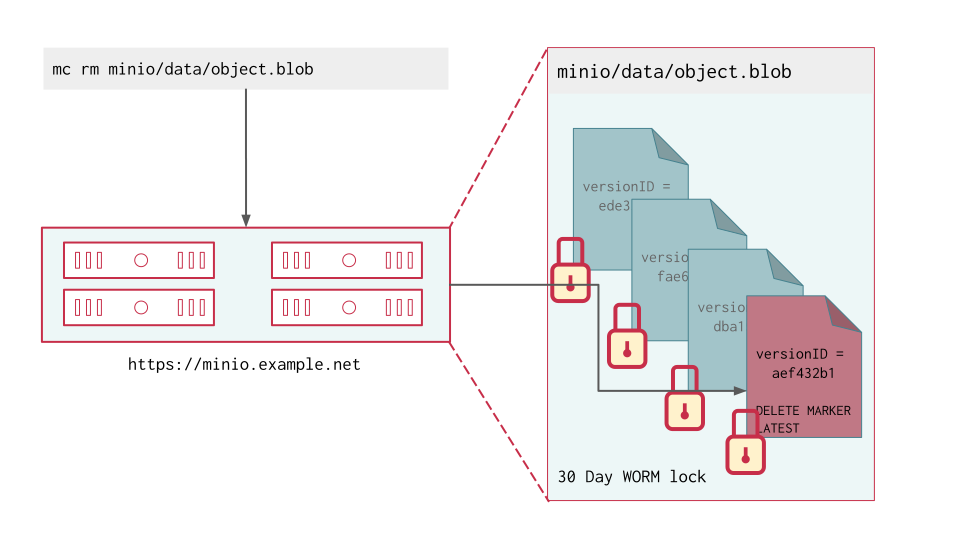
Delete operations follow normal behavior in versioned buckets, where MinIO creates a DeleteMarker for the object. However, non-Delete Marker versions of the object remain under the retention rules and are protected from any specific deletion or overwrite attempts.
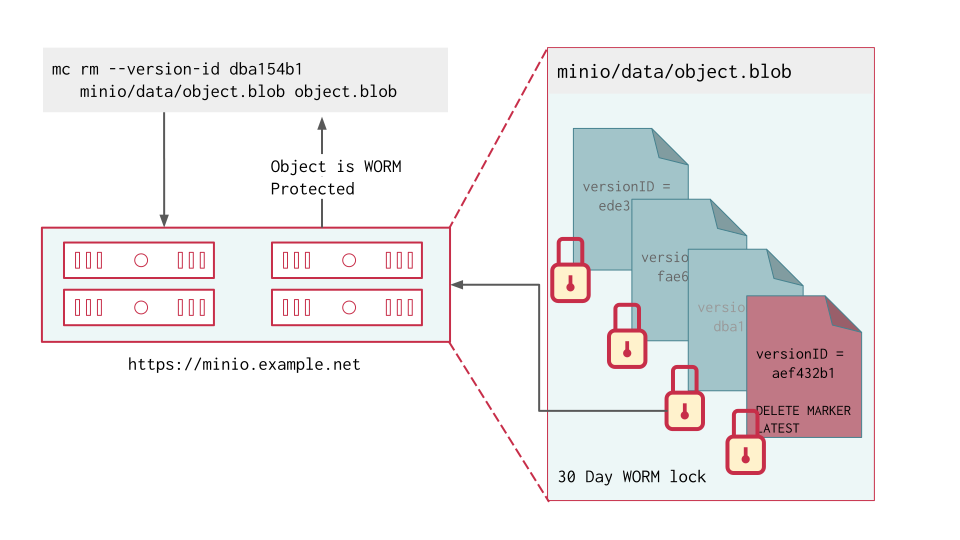
MinIO blocks any attempt to delete a specific object version held under WORM lock. The earliest possible time after which a client may delete the version is when the lock expires.
MinIO object locking is feature and API compatible with AWS S3. This page summarizes Object Locking / Retention concepts as implemented by MinIO. See the AWS S3 documentation on How S3 Object Lock works for additional resources.
You can only enable object locking during bucket creation as per S3 behavior. You cannot enable object locking on a bucket created without locking enabled. You can then configure object retention rules at any time. Object locking requires versioning and enables the feature implicitly.
Objects held under WORM locked are immutable until the lock expires or is explicitly lifted. Locking is per-object version, where each version is independently immutable.
If an application performs an unversioned delete operation on a locked object, the operation produces a delete marker. Attempts to explicitly delete any WORM-locked object fail with an error. Delete Markers are not eligible for protection under WORM locking. See the S3 documentation on Managing delete markers and object lifecycles for more information.
For example, consider the following bucket with GOVERNANCE Mode locking enabled by default:
Attempting to perform a delete on a specific version of data.csv fails due to the object locking settings:
Attempting to perform an unversioned delete on data.csv succeeds and creates a new DeleteMarker for the object:
MinIO object expiration respects any active object lock and retention settings for objects covered by the expiration rule.
For example, consider the following bucket with GOVERNANCE Mode locking enabled by default for 45 days:
Creating an expiration rule for current objects older than 7 days results in a Delete Marker for the object:
However, an expiration rule for non-current objects older than 7 days would only take effect after the configured WORM lock expires. Since the bucket has a 45 day GOVERNANCE retention set, only the v1 version of data.csv is unlocked and therefore eligible for deletion.
You must enable object locking during bucket creation as per S3 behavior. You can create a bucket with object locking enabled using the MinIO mc CLI or using an S3-compatible SDK.
Use the mc mb command with the --with-lock option to create a bucket with object locking enabled:
ALIAS with the alias of a configured MinIO deployment.BUCKET with the name of the bucket to create.You can configure object locking rules (“object retention”) using the MinIO mc CLI, or using an S3-compatible SDK.
MinIO supports setting both bucket-default and per-object retention rules. The following examples set bucket-default retention. For per-object retention settings, defer to the documentation for the PUT operation used by your preferred SDK.
Use the mc retention set command with the --recursive and --default options to set the default retention mode for a bucket:
MODE with either either COMPLIANCE or GOVERNANCE.DURATION with the duration for which the object lock remains in effect.ALIAS with the alias of a configured MinIO deployment.BUCKET with the name of the bucket on which to set the default retention rule.You can enable or disable indefinite legal hold retention for an object using the MinIO mc CLI or using an S3-compatible SDK.
You can place a legal hold on an object already held under a COMPLIANCE or GOVERNANCE lock. The object remains WORM locked under the legal hold even when the retention lock expires. You or another user with the necessary permissions must explicitly lift the legal hold to remove the WORM lock.
Use the mc legalhold set command to toggle the legal hold status on an object.
ALIAS with the alias of a configured MinIO deployment.PATH with the path to the object for which to enable the legal hold.MinIO implements the following S3 Object Locking Modes:
Mode |
Summary |
|---|---|
Prevents any operation that would mutate or modify the object or its locking settings by non-privileged users. Users with the MinIO lifts the lock automatically after the configured retention rule duration has passed. |
|
Prevents any operation that would mutate or modify the object or its locking settings. No MinIO user can modify the object or its settings, including the MinIO root user. MinIO lifts the lock automatically after the configured retention rule duration has passed. |
An object under GOVERNANCE lock is protected from write operations by non-privileged users.
GOVERNANCE locked objects enforce managed-immutability for locked objects, where users with the s3:BypassGovernanceRetention action can modify the locked object, change the retention duration, or lift the lock entirely. Bypassing GOVERNANCE retention also requires setting the x-amz-bypass-governance-retention:true header as part of the request.
The MinIO GOVERNANCE lock is functionally identical to the S3 GOVERNANCE mode.
An object under COMPLIANCE lock is protected from write operations by all users, including the MinIO root user.
COMPLIANCE locked objects enforce complete immutability for locked objects. You cannot change or remove the lock before the configured retention duration has passed.
The MinIO COMPLIANCE lock is functionally identical to the S3 COMPLIANCE mode.
An object under legal hold is protected from write operations by all users, including the MinIO root user.
Legal holds are indefinite and enforce complete immutability for locked objects. Only privileged users with the s3:PutObjectLegalHold permission can set or lift the legal hold.
Legal holds apply at the object level. If you enable legal hold for a group of objects, such as the contents of a bucket, subsequently created objects in that bucket are not affected.
Legal holds are complementary to both GOVERNANCE Mode and COMPLIANCE Mode retention settings. An object held under both legal hold and a GOVERNANCE/COMPLIANCE retention rule remains WORM locked until the legal hold is lifted and the rule expires.
For GOVERNANCE locked objects, the legal hold prevents mutating the object even if the user has the necessary privileges to bypass retention.
The procedure on this page creates a new object lifecycle management rule that transition objects from a MinIO bucket to a remote storage tier on the Amazon Web Services S3 storage backend or an S3-compatible service. This procedure supports use cases such as tiering objects to low-cost or archival storage after a certain time period or calendar date.
mc
This procedure uses mc for performing operations on the MinIO cluster. Install mc on a machine with network access to both source and destination clusters. See the mc Installation Quickstart for instructions on downloading and installing mc.
Use the mc alias set command to create an alias for the source MinIO cluster. Alias creation requires specifying an access key for a user on the source and destination clusters. The specified users must have permissions for configuring and applying transition operations.
MinIO requires the following permissions scoped to the bucket or buckets for which you are creating lifecycle management rules.
MinIO also requires the following administrative permissions on the cluster in which you are creating remote tiers for object transition lifecycle management rules:
For example, the following policy provides permission for configuring object transition lifecycle management rules on any bucket in the cluster:.
Object transition lifecycle management rules require additional permissions on the remote storage tier. Specifically, MinIO requires the remote tier credentials provide read, write, list, and delete permissions for the remote bucket.
For example, the following policy provides the necessary permission for transitioning objects into and out of the remote tier:
Modify the Resource for the bucket into which MinIO tiers objects.
Refer to the Amazon S3 Permissions documentation for more complete guidance on configuring the required permissions.
Create the remote S3 bucket prior to configuring lifecycle management tiers or rules using that bucket as the target.
MinIO uses a scanner process to check objects against all configured lifecycle management rules. Slow scanning due to high IO workloads or limited system resources may delay application of lifecycle management rules. See Lifecycle Management Object Scanner for more information.
MinIO requires exclusive access to the transitioned data on the remote storage tier. Object metadata on the “hot” MinIO source is strongly linked to the object data on the “warm/cold” remote tier. MinIO cannot retrieve object data without access to the remote, nor can the remote be used to restore lost metadata on the source.
All access to the transitioned objects must occur through MinIO via S3 API operations only. Manually modifying a transitioned object - whether the metadata on the “hot” MinIO tier or the object data on the remote “warm/cold” tier - may result in loss of that object data.
MinIO ignores any objects in the remote bucket or bucket prefix not explicitly managed by the MinIO deployment. Automatic transition and transparent object retrieval depend on the following assumptions:
MinIO stores all transitioned objects in the remote storage bucket or resource under a unique per-deployment prefix value. This value is not intended to support identifying the source deployment from the backend. MinIO supports an additional optional human-readable prefix when configuring the remote target, which may facilitate operations related to diagnostics, maintenance, or disaster recovery.
MinIO recommends specifying this optional prefix for remote storage tiers which contain other data, including transitioned objects from other MinIO deployments. This tutorial includes the necessary syntax for setting this prefix.
MinIO tiering behavior depends on the remote storage returning objects immediately (milliseconds to seconds) upon request. MinIO therefore cannot support remote storage which requires rehydration, wait periods, or manual intervention.
MinIO creates metadata for each transitioned object that identifies its location on the remote storage. Applications cannot trivially identify and access a transitioned object independent of MinIO. Availability of the transitioned data therefore depends on the same core protections that erasure coding and distributed deployment topologies provide for all objects on the MinIO deployment. Using object transition does not provide any additional business continuity or disaster recovery benefits.
Workloads that require BC/DR protections should implement MinIO Server-Side replication. Replication ensures objects remains preserved on the remote replication site, such that you can resynchronize from the remote in the event of partial or total data loss. See Resynchronization (Disaster Recovery) for more complete documentation on using replication to recover after partial or total data loss.
This step creates users and policies on the MinIO deployment for supporting lifecycle management operations. You can skip this step if the deployment already has users with the necessary permissions.
The following example uses Alpha as a placeholder alias for the MinIO deployment. Replace this value with the appropriate alias for the MinIO deployment on which you are configuring lifecycle management rules. Replace the password LongRandomSecretKey with a long, random, and secure secret key as per your organizations best practices for password generation.
This example assumes that the specified aliases have the necessary permissions for creating policies and users on the deployment. See User Management and MinIO Policy Based Access Control for more complete documentation on MinIO users and policies respectively.
Use the mc ilm tier add command to add an Amazon S3 service as the new remote storage tier:
The example above uses the following arguments:
Argument |
Description |
|---|---|
The |
|
The name to associate with the new S3 remote storage tier. Specify the
name in all-caps, e.g. |
|
The URL endpoint for the S3 storage backend. |
|
The S3 access key MinIO uses to access the bucket. The access key must correspond to an IAM user with the required permissions. |
|
The corresponding secret key for the specified |
|
The name of the bucket on the S3 storage backend to which MinIO transitions objects. |
|
The optional bucket prefix within which MinIO transitions objects. MinIO stores all transitioned objects in the specified MinIO recommends specifying this optional prefix for remote storage tiers which contain other data, including transitioned objects from other MinIO deployments. This prefix should provide a clear reference back to the source MinIO deployment to facilitate ease of operations related to diagnostics, maintenance, or disaster recovery. |
|
The S3 storage class to which MinIO transitions objects. MinIO tiering behavior depends on the remote storage returning objects immediately (milliseconds to seconds) upon request. MinIO therefore cannot support remote storage which requires rehydration, wait periods, or manual intervention. The following S3 storage classes meet MinIO’s requirements as a remote tier:
Omit this value to use the default storage class for the bucket. Specifying this value overrides the bucket storage class. For more information, see Using Amazon S3 storage classes. |
|
The AWS S3 region of the specified |
Use the mc ilm rule add command to create a new transition rule for the bucket. The following example configures transition after the specified number of calendar days:
The example above specifies the following arguments:
Argument |
Description |
|---|---|
Specify the |
|
Specify the full path to the bucket for which you are creating the lifecycle management rule. |
|
The remote storage tier to which MinIO transitions objects. Specify the remote storage tier name created in the previous step. If you want to transition noncurrent object versions to a distinct
remote tier, specify a different tier name for
|
|
The number of calendar days after which MinIO marks an object as
eligible for transition. Specify the number of days as an integer,
e.g. |
|
The number of calendar days after which MinIO marks a noncurrent
object version as eligible for transition. MinIO specifically measures
the time since an object became non-current instead of the object
creation time. Specify the number of days as an integer,
e.g. Omit this value to ignore noncurrent object versions. This option has no effect on non-versioned buckets. |
Use the mc ilm rule ls command to review the configured transition rules:
This page summarizes how a DELETE operation affects objects depending on the configuration of the bucket that contains the object.
Any combination of the following factors may impact how DELETE operations function:
MinIO uses a policy based access control system for access management. The user or service account must provide the correct policy action and conditions to allow a DELETE for the bucket and object.
When performing a DELETE operation on an object in a bucket that does not have versioning enabled, the operation is straightforward. After verifying the user or service account has permission to perform the DELETE operation, MinIO permanently removes the object.
The user or service account requesting the delete action the action must have the s3:DeleteObject action permission for the bucket and object.
DELETE operations work differently when an object is versioned.
The user or service account must have the s3:DeleteObjectVersion action permission for the bucket and object.
A DELETE operation on a versioned object that does not specify a version UUID results in the creation of a DeleteMarker placed as the head of the object.
In this scenario, MinIO does not actually remove the object or any of its versions from the disk. All existing versions of the object remain available to access by specifying the version’s UUID. When a DeleteMarker is the head for the object, MinIO does not serve the object for GET requests that do not specify a version ID. Instead, MinIO returns a 404-like response.
You can find the UUID of object versions with mc ls --versions.
To remove the current version of the object from the drive, find the UUID of the version, and then use mc rm --version-id=UUID ... to delete the current version. In this scenario, the immediately preceding version of the object then becomes the current version of the object served for GET requests of the object with no UUID specified.
Warning
Specifying a version-id in a DELETE operation is irreversible. MinIO removes the specified version from the drive and cannot retrieve it.
To delete prior versions of an object, specify the version’s UUID. You can retrieve the version UUID with mc ls --versions. When the DELETE request specifies a version-id and the user has the correct permissions to delete the object version, MinIO permanently removes the specified version from the drive.
Warning
Specifying a version-id in a DELETE operation is irreversible. MinIO removes the specified version from the drive and cannot retrieve it.
Use mc rm --versions to delete all versions of an object. This is irreversible.
You can define one or more lifecycle management expiration rule(s) to expire objects after a certain version number count or a certain period of time. When more versions exist than the rule specifies, or when a version is older than specified, MinIO permanently removes the object version from the drive.
These rules rely on the scanner to process the rule on the bucket. The scanner operates as a lower priority continuous process where READ and WRITE actions are preferred. Because of this, object versions that meet the requirements for expiration may not immediately be removed from MinIO.
See the scanner page for more details on how the scanner works and configuration options.
DeleteMarkers are their own objects. Lifecycle rules can remove DeleteMarkers that are the only remaining versions of their objects.
Changed: MinIO
RELEASE.2024-05-01T01-11-10Z
With JSON, lifecycle rules can remove all versions of a deleted object after a specified number of days.
MinIO protects objects subject to a locking rule from being overwritten or deleted. These rules require that objects be retained until either the rule expires or is removed.
DELETE operations on locked objects without a specified version result in the creation of a DeleteMarker for the object. However, the object versions themselves are retained as required by the lock.
DELETE operations that specify an object version are subject to the retention rules. MinIO protects object versions subject to a lock from being overwritten or deleted until the lock expires or is removed.
Replication duplicates objects from one location to another. MinIO supports replication at the bucket level or the cluster (“site”) level.
Delete operations may or may not replicate, depending on the type of replication and how the replication is configured.
For clusters with multi-site replication enabled, MinIO replicates all delete operations performed on any cluster to each of the other clusters in the peer group.
Delete behavior on any single peer follows the same processes as any MinIO deployment.
With bucket replication, MinIO supports replicating delete operations between a source bucket and a configured remote bucket. MinIO synchronizes deleting specific object versions and new delete markers. Delete operation replication uses the same replication process as all other replication operations.
MinIO requires explicitly enabling versioned deletes and delete marker replication. Use the mc replicate add --replicate field to specify either delete and delete-marker or both to enable versioned deletes and delete marker replication, respectively. To enable both, specify both strings using a comma separator: delete,delete-marker.
For delete marker replication, MinIO begins the replication process after a delete operation creates the delete marker. MinIO uses the X-Minio-Replication-DeleteMarker-Status metadata field for tracking delete marker replication status. In active-active replication configurations, MinIO may produce duplicate delete markers if both clusters concurrently create a delete marker for an object or if one or both clusters were down before the replication event synchronized.
For replicating the deletion of a specific object version, MinIO marks the object version as PENDING until replication completes. Once the remote target deletes that object version, MinIO deletes the object version on the source. While this process ensures near-synchronized version deletion, it may result in listing operations returning the object version after the initial delete operation. MinIO uses the X-Minio-Replication-Delete-Status for tracking delete version replication status.
MinIO only replicates explicit client-driven delete operations. MinIO does not replicate objects deleted by lifecycle management expiration rules. For active-active configurations, set the same expiration rules on all of the replication buckets to ensure consistent application of object expiration.
If a delete operation removes the last object in a bucket prefix, MinIO recursively removes each empty part of the prefix up to the bucket root. MinIO only applies the recursive removal to prefixes created implicitly as part of object write operations. MinIO does not recursively remove prefixes created using an explicit directory creation command, such as mc mb.
If a replication rule enables replication delete operations, the replication process also applies the implicit prefix trimming behavior on the destination MinIO cluster.
For example, consider a bucket photos with the following object prefixes:
photos/2021/january/myphoto.jpg // 2021/january/ created implicitly based on the object namephotos/2021/february/myotherphoto.jpg // 2021/february/ created implicitly based on the object namephotos/NYE21/NewYears.jpg // NYE21/ explicitly created in the bucketphotos/NYE21 is the only prefix explicitly created using mc mb. All other prefixes were implicitly created as part of writing the object located at that prefix.
myphoto.jpg. MinIO automatically trims the empty /january/ prefix.myotherphoto.jpg. MinIO automatically trims the /february/ prefix and the now-empty /2021 prefix.NewYears.jpg object. MinIO leaves the /NYE21/ prefix remains in place since it was explicitly created.The procedure on this page creates a new object lifecycle management rule that transition objects from a MinIO bucket to a remote storage tier on the Google Cloud Storage backend. This procedure supports use cases like moving aged data to low-cost public cloud storage solutions after a certain time period or calendar date.
mc
This procedure uses mc for performing operations on the MinIO cluster. Install mc on a machine with network access to both source and destination clusters. See the mc Installation Quickstart for instructions on downloading and installing mc.
Use the mc alias set command to create an alias for the source MinIO cluster. Alias creation requires specifying an access key for a user on the source and destination clusters. The specified users must have permissions for configuring and applying transition operations.
MinIO requires the following permissions scoped to the bucket or buckets for which you are creating lifecycle management rules.
MinIO also requires the following administrative permissions on the cluster in which you are creating remote tiers for object transition lifecycle management rules:
For example, the following policy provides permission for configuring object transition lifecycle management rules on any bucket in the cluster:.
Object transition lifecycle management rules require additional permissions on the remote storage tier. Specifically, MinIO requires the GCS credentials provide read, write, list, and delete permissions for the remote bucket.
Refer to the GCS IAM permissions documentation for more complete guidance on configuring the required permissions.
Create the remote GCS bucket prior to configuring lifecycle management tiers or rules using that bucket as the target.
If you set a default GCS storage class, MinIO uses that default if you do not specify a storage class when defining the remote tier. Ensure you document the settings of both your GCS bucket and MinIO tiering configuration to avoid any potential confusion, misconfiguration, or other unexpected outcomes.
MinIO uses a scanner process to check objects against all configured lifecycle management rules. Slow scanning due to high IO workloads or limited system resources may delay application of lifecycle management rules. See Lifecycle Management Object Scanner for more information.
MinIO requires exclusive access to the transitioned data on the remote storage tier. Object metadata on the “hot” MinIO source is strongly linked to the object data on the “warm/cold” remote tier. MinIO cannot retrieve object data without access to the remote, nor can the remote be used to restore lost metadata on the source.
All access to the transitioned objects must occur through MinIO via S3 API operations only. Manually modifying a transitioned object - whether the metadata on the “hot” MinIO tier or the object data on the remote “warm/cold” tier - may result in loss of that object data.
MinIO ignores any objects in the remote bucket or bucket prefix not explicitly managed by the MinIO deployment. Automatic transition and transparent object retrieval depend on the following assumptions:
MinIO stores all transitioned objects in the remote storage bucket or resource under a unique per-deployment prefix value. This value is not intended to support identifying the source deployment from the backend. MinIO supports an additional optional human-readable prefix when configuring the remote target, which may facilitate operations related to diagnostics, maintenance, or disaster recovery.
MinIO recommends specifying this optional prefix for remote storage tiers which contain other data, including transitioned objects from other MinIO deployments. This tutorial includes the necessary syntax for setting this prefix.
MinIO tiering behavior depends on the remote storage returning objects immediately (milliseconds to seconds) upon request. MinIO therefore cannot support remote storage which requires rehydration, wait periods, or manual intervention.
MinIO creates metadata for each transitioned object that identifies its location on the remote storage. Applications cannot trivially identify and access a transitioned object independent of MinIO. Availability of the transitioned data therefore depends on the same core protections that erasure coding and distributed deployment topologies provide for all objects on the MinIO deployment. Using object transition does not provide any additional business continuity or disaster recovery benefits.
Workloads that require BC/DR protections should implement MinIO Server-Side replication. Replication ensures objects remains preserved on the remote replication site, such that you can resynchronize from the remote in the event of partial or total data loss. See Resynchronization (Disaster Recovery) for more complete documentation on using replication to recover after partial or total data loss.
This step creates users and policies on the MinIO deployment for supporting lifecycle management operations. You can skip this step if the deployment already has users with the necessary permissions.
The following example uses Alpha as a placeholder alias for the MinIO deployment. Replace this value with the appropriate alias for the MinIO deployment on which you are configuring lifecycle management rules. Replace the password LongRandomSecretKey with a long, random, and secure secret key as per your organizations best practices for password generation.
This example assumes that the specified aliases have the necessary permissions for creating policies and users on the deployment. See User Management and MinIO Policy Based Access Control for more complete documentation on MinIO users and policies respectively.
Use the mc ilm tier add command to add a new Google Cloud Storage service as the remote storage tier:
The example above uses the following arguments:
Argument |
Description |
|---|---|
The |
|
The name to associate with the new GCS
remote storage tier. Specify the name in all-caps, e.g. |
|
The name of the bucket on the GCS storage backend to which MinIO transitions objects. |
|
The optional bucket prefix within which MinIO transitions objects. MinIO stores all transitioned objects in the specified MinIO recommends specifying this optional prefix for remote storage tiers which contain other data, including transitioned objects from other MinIO deployments. This prefix should provide a clear reference back to the source MinIO deployment to facilitate ease of operations related to diagnostics, maintenance, or disaster recovery. |
|
The credential file for a user on the remote GCS tier. The specified user credentials must correspond to a GCS user with the required permissions. |
|
The GCS storage class MinIO applies to objects transitioned to the GCS bucket. MinIO tiering behavior depends on the remote storage returning objects immediately (milliseconds to seconds) upon request. MinIO therefore cannot support remote storage which requires rehydration, wait periods, or manual intervention. The following GCS storage classes meet MinIO’s requirements as a remote tier:
For more information, see GCS storage class. |
Use the mc ilm rule add command to create a new transition rule for the bucket. The following example configures transition after the specified number of calendar days:
The example above specifies the following arguments:
Argument |
Description |
|---|---|
Specify the |
|
Specify the full path to the bucket for which you are creating the lifecycle management rule. |
|
The remote storage tier to which MinIO transitions objects. Specify the remote storage tier name created in the previous step. If you want to transition noncurrent object versions to a distinct
remote tier, specify a different tier name for
|
|
The number of calendar days after which MinIO marks an object as
eligible for transition. Specify the number of days as an integer,
e.g. |
|
The number of calendar days after which MinIO marks a noncurrent
object version as eligible for transition. MinIO specifically measures
the time since an object became non-current instead of the object
creation time. Specify the number of days as an integer,
e.g. Omit this value to ignore noncurrent object versions. This option has no effect on non-versioned buckets. |
Use the mc ilm rule ls command to review the configured transition rules:
Use MinIO Object Lifecycle Management to create rules for time or date based automatic transition or expiry of objects. For object transition, MinIO automatically moves the object to a configured remote storage tier. For object expiry, MinIO automatically deletes the object.
MinIO derives it’s behavior and syntax from S3 lifecycle for compatibility in migrating workloads and lifecycle rules from S3 to MinIO. For example, you can export S3 lifecycle management rules and import them into MinIO or vice-versa. MinIO uses JSON to describe lifecycle management rules and may require conversion to or from XML as part of importing S3 lifecycle rules.
MinIO supports creating object transition lifecycle management rules, where MinIO can automatically move an object to a remote storage “tier”. MinIO supports any of the following remote tier targets:
MinIO object transition supports use cases like moving aged data from MinIO clusters in private or public cloud infrastructure to low-cost private or public cloud storage solutions. Directory objects, which are 0-byte objects with a name ending in /, do not tier. MinIO manages retrieving tiered objects on-the-fly without any additional application-side logic.
Use the mc ilm tier add command to create a remote target for tiering data to that target. You can then use the mc ilm rule add --transition-days command to transition objects to that tier after a specified number of calendar days.
Added: RELEASE.2022-11-10T18-20-21Z
You can verify the tiering status of an object using mc ls against the bucket or bucket prefix. The output includes the storage tier of each object:
STANDARD marks objects stored on the MinIO deployment.WARM marks objects stored on the remote tier with matching name.Important
MinIO Object Transition supports cost-saving strategies around moving older or aged data to cost-optimized remote storage tiers, such as cloud storage or high-density HDD storage.
MinIO Object Transition does not provide backup and recovery functionality. You cannot use the remote tier as a recovery source in the event of data loss in MinIO.
Use either site replication or bucket replication to support backup/recovery or BC/DR requirements.
MinIO requires exclusive access to the transitioned data on the remote storage tier. Object metadata on the “hot” MinIO source is strongly linked to the object data on the “warm/cold” remote tier. MinIO cannot retrieve object data without access to the remote, nor can the remote be used to restore lost metadata on the source.
All access to the transitioned objects must occur through MinIO via S3 API operations only. Manually modifying a transitioned object - whether the metadata on the “hot” MinIO tier or the object data on the remote “warm/cold” tier - may result in loss of that object data.
MinIO ignores any objects in the remote bucket or bucket prefix not explicitly managed by the MinIO deployment. Automatic transition and transparent object retrieval depend on the following assumptions:
MinIO stores all transitioned objects in the remote storage bucket or resource under a unique per-deployment prefix value. This value is not intended to support identifying the source deployment from the backend. MinIO supports an additional optional human-readable prefix when configuring the remote target, which may facilitate operations related to diagnostics, maintenance, or disaster recovery.
MinIO recommends specifying this optional prefix for remote storage tiers which contain other data, including transitioned objects from other MinIO deployments. This tutorial includes the necessary syntax for setting this prefix.
MinIO tiering behavior depends on the remote storage returning objects immediately (milliseconds to seconds) upon request. MinIO therefore cannot support remote storage which requires rehydration, wait periods, or manual intervention.
MinIO creates metadata for each transitioned object that identifies its location on the remote storage. Applications cannot trivially identify and access a transitioned object independent of MinIO. Availability of the transitioned data therefore depends on the same core protections that erasure coding and distributed deployment topologies provide for all objects on the MinIO deployment. Using object transition does not provide any additional business continuity or disaster recovery benefits.
Workloads that require BC/DR protections should implement MinIO Server-Side replication. Replication ensures objects remains preserved on the remote replication site, such that you can resynchronize from the remote in the event of partial or total data loss. See Resynchronization (Disaster Recovery) for more complete documentation on using replication to recover after partial or total data loss.
MinIO adopts S3 behavior for transition rules on versioned buckets. Specifically, MinIO by default applies the transition operation to the current object version.
To transition noncurrent object versions, specify the --noncurrent-transition-days and --noncurrent-transition-tier options when creating the transition rule.
MinIO lifecycle management supports expiring objects on a bucket. Object “expiration” involves performing a DELETE operation on the object. For example, you can create a lifecycle management rule to expire any object older than 365 days.
Use mc ilm rule add --expire-days to expire objects after a specified number of calendar days.
For buckets with replication configured, MinIO does not replicate objects deleted by a lifecycle management expiration rule. See Replication of Delete Operations for more information.
MinIO adopts S3 behavior for expiration rules on versioned buckets. MinIO has several default behaviors for versioned buckets:
MinIO applies the expiration option to only the current object version by creating a DeleteMarker as is normal with versioned delete.
To expire noncurrent object versions, specify the --noncurrent-expire-days option when creating the expiration rule.
MinIO does not expire DeleteMarkers even if no other versions of that object exist.
To expire delete markers when there are no remaining versions for that object, specify the --expire-delete-marker option when creating the expiration rule.
To expire all versions of an object that does not have a delete marker after a specified period of days, use the --expire-all-object-versions flag with the --expire-days flag. This permits the permanent deletion of the object after the specified number of days pass.
Changed: MinIO
RELEASE.2024-05-01T01-11-10Z
This flag applies only to objects that do not have a delete marker.
MinIO uses a built-in scanner to actively check objects against all configured lifecycle management rules.
The scanner is a low-priority process that yields to high I/O workloads to prevent performance spikes triggered by rule timing. The scanner may therefore not detect an object as eligible for a configured transition or expiration lifecycle rule until after the lifecycle rule period has passed.
The procedure on this page creates a new object lifecycle management rule that transition objects from a MinIO bucket to a remote storage tier on the Azure storage backend. This procedure supports use cases like moving aged data to low-cost public cloud storage solutions after a certain time period or calendar date.
mc
This procedure uses mc for performing operations on the MinIO cluster. Install mc on a machine with network access to both source and destination clusters. See the mc Installation Quickstart for instructions on downloading and installing mc.
Use the mc alias set command to create an alias for the source MinIO cluster. Alias creation requires specifying an access key for a user on the source and destination clusters. The specified users must have permissions for configuring and applying transition operations.
MinIO requires the following permissions scoped to the bucket or buckets for which you are creating lifecycle management rules.
MinIO also requires the following administrative permissions on the cluster in which you are creating remote tiers for object transition lifecycle management rules:
For example, the following policy provides permission for configuring object transition lifecycle management rules on any bucket in the cluster:.
Object transition lifecycle management rules require additional permissions on the remote storage tier. Specifically, MinIO requires the Azure credentials provide read, write, list, and delete permissions for the remote storage account and container.
Refer to the Azure RBAC documentation for more complete guidance on configuring the required permissions.
Create the remote Azure storage account and container prior to configuring lifecycle management tiers or rules using that resource as the target. When creating the Azure storage account, ensure the storage account corresponds to either Standard or Premium blob storage with the locally redundant storage (LRS) redundancy option. The Azure Go SDK API used by MinIO does not support any other redundancy options.
If you set a Storage Account default access tier, MinIO uses that default if you do not specify a storage class when defining the remote tier. Ensure you document the settings of both your Azure storage account and MinIO tiering configuration to avoid any potential confusion, misconfiguration, or other unexpected outcomes.
For more information on Azure storage accounts, see Storage accounts.
MinIO requires exclusive access to the transitioned data on the remote storage tier. Object metadata on the “hot” MinIO source is strongly linked to the object data on the “warm/cold” remote tier. MinIO cannot retrieve object data without access to the remote, nor can the remote be used to restore lost metadata on the source.
All access to the transitioned objects must occur through MinIO via S3 API operations only. Manually modifying a transitioned object - whether the metadata on the “hot” MinIO tier or the object data on the remote “warm/cold” tier - may result in loss of that object data.
MinIO ignores any objects in the remote bucket or bucket prefix not explicitly managed by the MinIO deployment. Automatic transition and transparent object retrieval depend on the following assumptions:
MinIO stores all transitioned objects in the remote storage bucket or resource under a unique per-deployment prefix value. This value is not intended to support identifying the source deployment from the backend. MinIO supports an additional optional human-readable prefix when configuring the remote target, which may facilitate operations related to diagnostics, maintenance, or disaster recovery.
MinIO recommends specifying this optional prefix for remote storage tiers which contain other data, including transitioned objects from other MinIO deployments. This tutorial includes the necessary syntax for setting this prefix.
Important
MinIO does not support changing the account name associated to an Azure remote tier. Azure storage backends are tied to the account, such that changing the account would change the storage backend and prevent access to any objects transitioned to the original account/backend.
Please contact MinIO Support if you need situation-specific guidance around configuring Azure remote tiers.
MinIO tiering behavior depends on the remote storage returning objects immediately (milliseconds to seconds) upon request. MinIO therefore cannot support remote storage which requires rehydration, wait periods, or manual intervention.
MinIO creates metadata for each transitioned object that identifies its location on the remote storage. Applications cannot trivially identify and access a transitioned object independent of MinIO. Availability of the transitioned data therefore depends on the same core protections that erasure coding and distributed deployment topologies provide for all objects on the MinIO deployment. Using object transition does not provide any additional business continuity or disaster recovery benefits.
Workloads that require BC/DR protections should implement MinIO Server-Side replication. Replication ensures objects remains preserved on the remote replication site, such that you can resynchronize from the remote in the event of partial or total data loss. See Resynchronization (Disaster Recovery) for more complete documentation on using replication to recover after partial or total data loss.
This step creates users and policies on the MinIO deployment for supporting lifecycle management operations. You can skip this step if the deployment already has users with the necessary permissions.
The following example uses Alpha as a placeholder alias for the MinIO deployment. Replace this value with the appropriate alias for the MinIO deployment on which you are configuring lifecycle management rules. Replace the password LongRandomSecretKey with a long, random, and secure secret key as per your organizations best practices for password generation.
This example assumes that the specified aliases have the necessary permissions for creating policies and users on the deployment. See User Management and MinIO Policy Based Access Control for more complete documentation on MinIO users and policies respectively.
Use the mc ilm tier add command to add a new remote storage tier:
The example above uses the following arguments:
Argument |
Description |
|---|---|
The |
|
The name to associate with the new Azure blob
remote storage tier. Specify the name in all-caps, e.g. |
|
The Storage Account to use as the remote storage resource. You cannot change this account name after creating the tier. |
|
The corresponding shared account key for the specified The account key must have an assigned Azure policy with the required permissions. See Managing storage account access keys for more information. |
|
The name of the container on the Azure storage backend to which MinIO transitions objects. |
|
(Optional) The full URL of the Azure blob storage backend to which MinIO transitions objects. Defaults
to |
|
The optional container prefix within which MinIO transitions objects. MinIO stores all transitioned objects in the specified MinIO recommends specifying this optional prefix for remote storage tiers which contain other data, including transitioned objects from other MinIO deployments. This prefix should provide a clear reference back to the source MinIO deployment to facilitate ease of operations related to diagnostics, maintenance, or disaster recovery. |
|
The Azure access tier MinIO applies to objects transitioned to the Azure container. MinIO tiering behavior depends on the remote storage returning objects immediately (milliseconds to seconds) upon request. MinIO therefore cannot support remote storage which requires rehydration, wait periods, or manual intervention. The following Azure access tiers meet MinIO’s requirements as a remote tier:
For more information, see Hot, cool, and archive access tiers for blob data. |
Use the mc ilm rule add command to create a new transition rule for the bucket. The following example configures transition after the specified number of calendar days:
The example above specifies the following arguments:
Argument |
Description |
|---|---|
Specify the |
|
Specify the full path to the bucket for which you are creating the lifecycle management rule. |
|
The remote storage tier to which MinIO transitions objects. Specify the remote storage tier name created in the previous step. If you want to transition noncurrent object versions to a distinct
remote tier, specify a different tier name for
|
|
The number of calendar days after which MinIO marks an object as
eligible for transition. Specify the number of days as an integer,
e.g. |
|
The number of calendar days after which MinIO marks a noncurrent
object version as eligible for transition. MinIO specifically measures
the time since an object became non-current instead of the object
creation time. Specify the number of days as an integer,
e.g. Omit this value to ignore noncurrent object versions. This option has no effect on non-versioned buckets. |
Use the mc ilm rule ls command to review the configured transition rules:
Each procedure on this page creates a new object lifecycle management rule that expires objects on a MinIO bucket. This procedure supports use cases like removing “old” objects after a certain time period or calendar date.
mc
This procedure uses mc for performing operations on the MinIO cluster. Install mc on a machine with network access to both source and destination clusters. See the mc Installation Quickstart for instructions on downloading and installing mc.
Use the mc alias set command to create an alias for the source MinIO cluster and the destination S3-compatible service. Alias creation requires specifying an access key for a user on the source and destination clusters. The specified users must have permissions for configuring and applying expiry operations.
MinIO requires the following permissions scoped to the bucket or buckets for which you are creating lifecycle management rules.
MinIO also requires the following administrative permissions on the cluster in which you are creating remote tiers for object transition lifecycle management rules:
For example, the following policy provides permission for configuring object transition lifecycle management rules on any bucket in the cluster:.
Use mc ilm rule add with --expire-days to expire bucket contents a number of days after object creation:
ALIAS with the alias of the S3-compatible host.PATH with the path to the bucket on the S3-compatible host.DAYS with the number of days after which to expire the object. For example, specify 30 to expire the object 30 days after creation.Use mc ilm rule add to expiring noncurrent object versions and object delete markers:
--noncurrent-expire-days.--expire-delete-marker.To expire all versions of an object, include --expire-all-object-versions. This expiration only applies to objects without a DeleteMarker as the latest or current version.
Replace PATH with the path to the bucket on the S3-compatible host.
Replace NONCURRENT_DAYS with the number of days after which to expire noncurrent object versions. For example, specify 30d to expire a version after it has been noncurrent for at least 30 days.
MinIO Server supports compressing objects to reduce disk usage. Objects are compressed on PUT before writing to disk, and uncompressed on GET before they are sent to the client. This makes the compression process transparent to client applications and services.
Depending on the type of data, compression may also increase overall throughput. Write throughput for a production deployment is generally 500MB per second or greater per available CPU core in the system. Decompression is approximately 1 GB per second or greater for each CPU core.
For best results, review MinIO’s recommended hardware configuration or use MinIO SUBNET to work directly with engineers for analyzing compression performance.
Data compression is a global option, the configured settings apply to all buckets in a deployment. Enabling data compression compresses the following types of data by default:
File Extensions |
Media (MIME) Types |
|---|---|
|
|
You can control which objects are compressed by specifying the desired file extensions and media (MIME) types.
Existing objects are not modified
Enabling, disabling, or updating a deployment’s compression settings does not modify existing objects. New objects are compressed according to the settings in effect at the time they are created.
Some data cannot be effectively compressed. For example: video, already compressed data, or files less than 4KiB. MinIO does not compress common incompressible file types, even if they are specified in the compression configuration.
Objects of these types are never compressed:
Object Type |
File Extension |
Media (MIME) Type |
|---|---|---|
Audio |
|
|
Video |
*.mp4*.mkv*.mov |
|
Image |
*.jpg*.png*.gif |
|
7ZIP Compressed |
|
|
BZIP2 Compressed |
|
|
GZIP Compressed |
|
|
RAR Compressed |
|
|
LZMA Compressed |
|
|
ZIP Compressed |
|
application/zipapplication-x-zip-compressed |
Smaller than 4 KiB |
MinIO supports encrypting compressed objects but recommends against combining compression and encryption without a prior risk assessment. Before enabling encryption for compressed objects, carefully consider the security needs of your environment.
See Transparent Data Compression on MinIO for more about combining compression and encryption. MinIO SUBNET users can log in and engage with our engineering and security teams to review encryption options.
To enable data compression, use mc admin config set to set the compression key enable option to on.
The following enables compression for new objects of the default types:
ALIAS with the alias of a configured MinIO deployment.Existing uncompressed objects are not modified. To configure which extensions and types to compress, see Configure Which Objects to Compress.
To view the current compression settings:
To disable data compression, use mc admin config set to set the compression key enable option to off:
The following disables data compression for new objects:
ALIAS with the alias of a configured MinIO deployment.Existing compressed objects are not modified.
Configure the objects to compress by specifying the desired file extensions and media types in extensions or mime_types arguments.
The default data compression configuration compresses the following types of data:
File Extensions |
Media (MIME) Types |
|---|---|
|
|
Default excluded extensions and types are never compressed
Some objects cannot be efficiently compressed. MinIO will not attempt to compress these objects, even if they are specified in extensions or mime_types arguments. See Excluded File Types for a list of excluded types.
The sections below describe how to configure compression for the desired file extensions and media types.
To compress all objects except the default excluded types, use mc admin config set to set the compression key extensions and mime_types options to empty lists:
ALIAS with the alias of a configured MinIO deployment.To compress objects with certain file extensions, use mc admin config set to set the desired file extensions in an extensions argument.
The following command compresses files with the extensions .bin and .txt:
ALIAS with the alias of a configured MinIO deployment.The new list of file extensions replaces the previous list. To add or remove an extension, repeat the extensions command with the complete list of extensions to compress.
The following adds .pdf to the list of file extensions from the previous example:
ALIAS with the alias of a configured MinIO deployment.To compress objects of certain media types, use mc admin config set to set the compression key mime_types option to a list of the desired types.
The following example compresses files of types application/json and image/bmp:
ALIAS with the alias of a configured MinIO deployment.The new list of media types replaces the previous list. To add or remove a type, repeat the mime_types command with the complete list of types to compress.
You can use * to specify all subtypes of a single media type. The following command adds all text subtypes to the list from the previous example:
ALIAS with the alias of a configured MinIO deployment.MinIO bucket notifications allow administrators to send notifications to supported external services on certain object or bucket events. MinIO supports bucket and object-level S3 events similar to the Amazon S3 Event Notifications.
MinIO supports publishing bucket or object events to the following supported targets on certain supported events.
See Bucket notifications for more complete documentation on MinIO Bucket Notifications.
MinIO provides a Prometheus-compatible endpoint for supporting time-series querying of metrics.
MinIO provides the following interfaces for remotely reading server logs:
mc admin logs command returns the specified server’s console output.MinIO bucket notifications allow administrators to send notifications to supported external services on certain object or bucket events. MinIO supports bucket and object-level S3 events similar to the Amazon S3 Event Notifications.
MinIO supports publishing event notifications to the following targets:
Target |
Description |
|---|---|
AMQP (RabbitMQ) |
Publish notifications to an AMQP service such as RabbitMQ. See Publish Events to AMQP (RabbitMQ) for a tutorial. |
MQTT |
Publish notifications to an MQTT service. See Publish Events to MQTT for a tutorial. |
NATS |
Publish notifications to a NATS service. See Publish Events to NATS for a tutorial. |
NSQ |
Publish notifications to a NSQ service. See Publish Events to NSQ for a tutorial |
Elasticsearch |
Publish notifications to a Elasticsearch service. See Publish Events to Elasticsearch for a tutorial. |
Kafka |
Publish notifications to a Kafka service. See Publish Events to Kafka for a tutorial. |
MySQL |
Publish notifications to a MySQL service. See Publish Events to MySQL for a tutorial. |
PostgreSQL |
Publish notifications to a PostgreSQL service. See Publish Events to PostgreSQL for a tutorial. |
Redis |
Publish notifications to a Redis service. See Publish Events to Redis for a tutorial. |
webhook |
Publish notifications to a Webhook service. See Publish Events to Webhook for a tutorial. |
Added: RELEASE.2023-06-23T20-26-00Z
MinIO supports either asynchronous (default) or synchronous bucket notifications for all remote targets.
With asynchronous delivery, MinIO fires the event at the configured remote and does not wait for a response before continuing to the next event. Asynchronous bucket notification prioritizes sending events with the risk of some events being lost if the remote target has a transient issue during transit or processing.
With synchronous delivery, MinIO fires the event at the configured remote and then waits for the remote to confirm a successful receipt before continuing to the next event. Synchronous bucket notification prioritizes delivery of events with the risk of a slower event-send rate and queue fill.
To enable synchronous bucket notifications for all configured remote targets, use either of the following settings:
MINIO_API_SYNC_EVENTS environment variable to on and restart the MinIO deployment.api.sync_events configuration setting to on and restart the MinIO deployment.Note
For synchronous and asynchronous events, MinIO maintains a per-remote queue where it stores unsent and pending events. The queue limit defaults to 100000.
MinIO discards new events when the queue is full.
You can increase the queue size as necessary to better accommodate the rate of event send and processing of the MinIO deployment and remote target. Use the QUEUE_LIMIT environment variable or configuration setting for your notification method to modify this limit.
For asynchronous events, MinIO allows a maximum of 50000 concurrent send calls.
MinIO bucket notifications are compatible with Amazon S3 Event Notifications. This section lists all supported events.
MinIO supports triggering notifications on the following S3 object events:
s3:ObjectAccessed:Get
data
s3:ObjectAccessed:GetLegalHold
data
s3:ObjectAccessed:GetRetention
data
s3:ObjectAccessed:Head
data
s3:ObjectCreated:CompleteMultipartUpload
data
s3:ObjectCreated:Copy
data
s3:ObjectCreated:DeleteTagging
data
s3:ObjectCreated:Post
data
s3:ObjectCreated:Put
data
s3:ObjectCreated:PutLegalHold
data
s3:ObjectCreated:PutRetention
data
s3:ObjectCreated:PutTagging
data
s3:ObjectRemoved:Delete
data
s3:ObjectRemoved:DeleteMarkerCreated
data
Specify the wildcard * character to select all events related to a prefix:
s3:ObjectAccessed:*
data
Selects all s3:ObjectAccessed -prefixed events.
s3:ObjectCreated:*
data
Selects all s3:ObjectCreated -prefixed events.
s3:ObjectRemoved:*
data
Selects all s3:ObjectRemoved -prefixed events.
MinIO supports triggering notifications on the following S3 replication events:
s3:Replication:OperationCompletedReplication
data
s3:Replication:OperationFailedReplication
data
s3:Replication:OperationMissedThreshold
data
s3:Replication:OperationNotTracked
data
s3:Replication:OperationReplicatedAfterThreshold
data
Specify the wildcard * character to select all s3:Replication events:
s3:Replication:*
data
MinIO supports triggering notifications on the following S3 ILM transition events:
s3:ObjectRestore:Post
data
s3:ObjectRestore:Completed
data
s3:ObjectTransition:Failed
data
s3:ObjectTransition:Complete
data
Specify the wildcard * character to select all events related to a prefix:
s3:ObjectTransition:*
data
Selects all s3:ObjectTransition -prefixed events.
s3:ObjectRestore:*
data
Selects all s3:ObjectRestore -prefixed events.
MinIO supports triggering notifications on the following S3 scanner transition events:
s3:Scanner:ManyVersions
data
Scanner finds objects with more than 1,000 versions.
s3:Scanner:BigPrefix
data
Scanner finds prefixes with more than 50,000 sub-folders.
MinIO supports triggering notifications on the following global events. You can only listen to these events through the ListenNotification API:
s3:BucketCreated
data
s3:BucketRemoved
data
All notification payloads use the same overall schema. Depending on the type of notification, some fields may be omitted or have null values.
The following example is a notification for an s3:ObjectCreated:Put event:
MinIO supports publishing bucket notification events to a AMQP 0-9-1 service endpoint such as RabbitMQ.
MinIO relies on the https://github.com/streadway/amqp project for AMQP connectivity. The project is primarily tested against RabbitMQ deployments, though other AMQP 0-9-1-compatible services may also work. The procedures on this page assume a RabbitMQ deployment using the AMQP 0-9-1 protocol as the service endpoint.
The following procedure adds a new AMQP service endpoint for supporting bucket notifications in a MinIO deployment.
MinIO relies on the https://github.com/streadway/amqp project for AMQP connectivity. The project is primarily tested against RabbitMQ deployments, though other AMQP 0-9-1-compatible services may also work. This procedure assumes a RabbitMQ deployment using the 0-9-1 protocol as the service endpoint.
If the AMQP service requires authentication, you must provide an appropriate username and password during the configuration process to grant MinIO access to the service.
mc Command Line Tool
This procedure uses the mc command line tool for certain actions. See the mc Quickstart for installation instructions.
You can configure a new AMQP service endpoint using either environment variables or by setting runtime configuration settings.
MinIO supports specifying the AMQP service endpoint and associated configuration settings using environment variables. The minio server process applies the specified settings on its next startup.
The following example code sets all environment variables related to configuring an AMQP service endpoint. The minimum required variables are MINIO_NOTIFY_AMQP_ENABLE and MINIO_NOTIFY_AMQP_URL:
Windows
Linux and macOS
Replace <IDENTIFIER> with a unique descriptive string for the AMQP service endpoint. Use the same <IDENTIFIER> value for all environment variables related to the new AMQP service endpoint. The following examples assume an identifier of PRIMARY.
If the specified <IDENTIFIER> matches an existing AMQP service endpoint on the MinIO deployment, the new settings override any existing settings for that endpoint. Use mc admin config get notify_amqp to review the currently configured AMQP endpoints on the MinIO deployment.
Replace <ENDPOINT> with the URL of the AMQP service endpoint. For example:
amqp://user:password@hostname:port
See AMQP Service for Bucket Notifications for complete documentation on each environment variable.
MinIO supports adding or updating AMQP endpoints on a running minio server process using the mc admin config set command and the notify_amqp configuration key. You must restart the minio server process to apply any new or updated configuration settings.
The following example code sets all settings related to configuring an AMQP service endpoint. The minimum required setting is notify_amqp url:
Replace IDENTIFIER with a unique descriptive string for the AMQP service endpoint. The following examples in this procedure assume an identifier of PRIMARY.
If the specified IDENTIFIER matches an existing AMQP service endpoint on the MinIO deployment, the new settings override any existing settings for that endpoint. Use mc admin config get notify_amqp to review the currently configured AMQP endpoints on the MinIO deployment.
Replace ENDPOINT with the URL of the AMQP service endpoint. For example:
amqp://user:password@hostname:port
See AMQP Bucket Notification Configuration Settings for complete documentation on each setting.
You must restart the MinIO deployment to apply the configuration changes. Use the mc admin service restart command to restart the deployment.
Replace ALIAS with the alias of the deployment to restart.
The minio server process prints a line on startup for each configured AMQP target similar to the following:
You must specify the ARN resource when configuring bucket notifications with the associated AMQP deployment as a target.
Identifying the ARN for your bucket notifications
You defined the <IDENTIFIER> to assign to the target ARN for your bucket notifications when creating the endpoint previously. The steps below return the ARNs configured on the deployment. Identify the ARN created previously by looking for the <IDENTIFIER> you specified.
Review the JSON output
Copy and run the following command, replacing ALIAS with the alias of the deployment.
In the JSON output, look for the key info.sqsARN.
The ARN you need is the value of that key that matches the <IDENTIFIER> you specified.
For example, arn:minio:sqs::primary:amqp.
Use jq to parse the JSON for the value
Copy and run the following command, replacing ALIAS with the alias of the deployment.
This returns the ARN to use for notifications, such as arn:minio:sqs::primary:amqp
Use the mc event add command to add a new bucket notification event with the configured AMQP service as a target:
ALIAS with the alias of a MinIO deployment.BUCKET with the name of the bucket in which to configure the event.EVENTS with a comma-separated list of events for which MinIO triggers notifications.Use mc event ls to view all configured bucket events for a given notification target:
Perform an action on the bucket for which you configured the new event and check the AMQP service for the notification data. The action required depends on which events were specified when configuring the bucket notification.
For example, if the bucket notification configuration includes the s3:ObjectCreated:Put event, you can use the mc cp command to create a new object in the bucket and trigger a notification.
The following procedure updates an existing AMQP service endpoint for supporting bucket notifications in a MinIO deployment.
MinIO relies on the https://github.com/streadway/amqp project for AMQP connectivity. The project is primarily tested against RabbitMQ deployments, though other AMQP 0-9-1-compatible services may also work. This procedure assumes a RabbitMQ deployment as the service endpoint.
If the AMQP service requires authentication, you must provide an appropriate username and password during the configuration process to grant MinIO access to the service.
mc Command Line Tool
This procedure uses the mc command line tool for certain actions. See the mc Quickstart for installation instructions.
Use the mc admin config get command to list the currently configured AMQP service endpoints in the deployment:
Replace ALIAS with the alias of the MinIO deployment.
The command output resembles the following:
The notify_amqp key is the top-level configuration key for an AMQP Notification Settings. The url key specifies the AMQP service endpoint for the given notify_amqp key. The notify_amqp:<IDENTIFIER> suffix describes the unique identifier for that AMQP service endpoint.
Note the identifier for the AMQP service endpoint you want to update for the next step.
Use the mc admin config set command to set the new configuration for the AMQP service endpoint:
The notify_amqp url configuration setting is the minimum required for an AMQP service endpoint. All other configuration settings are optional. See AMQP Notification Settings for a complete list of AMQP configuration settings.
You must restart the MinIO deployment to apply the configuration changes. Use the mc admin service restart command to restart the deployment.
Replace ALIAS with the alias of the deployment to restart.
The minio server process prints a line on startup for each configured AMQP target similar to the following:
Perform an action on a bucket which has an event configuration using the updated AMQP service endpoint and check the AMQP service for the notification data. The action required depends on which events were specified when configuring the bucket notification.
For example, if the bucket notification configuration includes the s3:ObjectCreated:Put event, you can use the mc cp command to create a new object in the bucket and trigger a notification.
MinIO supports publishing bucket notification events to MQTT server/broker endpoint.
The following procedure adds a new MQTT service endpoint for supporting bucket notifications in a MinIO deployment.
This procedure assumes an existing MQTT 3.1 or 3.1.1 server/broker to which the MinIO deployment has connectivity. See the mqtt.org software listing for a list of MQTT-compatible server/brokers.
If the MQTT service requires authentication, you must provide an appropriate username and password during the configuration process to grant MinIO access to the service.
mc Command Line Tool
This procedure uses the mc command line tool for certain actions. See the mc Quickstart for installation instructions.
You can configure a new MQTT service endpoint using either environment variables or by setting runtime configuration settings.
MinIO supports specifying the MQTT service endpoint and associated configuration settings using environment variables. The minio server process applies the specified settings on its next startup.
The following example code sets all environment variables related to configuring an MQTT service endpoint. The minimum required variables are:
MINIO_NOTIFY_MQTT_ENABLEMINIO_NOTIFY_MQTT_BROKERMINIO_NOTIFY_MQTT_TOPICMINIO_NOTIFY_MQTT_USERNAME Required if the MQTT server/broker enforces authentication/authorizationMINIO_NOTIFY_MQTT_PASSWORD Required if the MQTT server/broker enforces authentication/authorizationWindows
Linux and macOS
Replace <IDENTIFIER> with a unique descriptive string for the MQTT service endpoint. Use the same <IDENTIFIER> value for all environment variables related to the new MQTT service endpoint. The following examples assume an identifier of PRIMARY.
If the specified <IDENTIFIER> matches an existing MQTT service endpoint on the MinIO deployment, the new settings override any existing settings for that endpoint. Use mc admin config get notify_mqtt to review the currently configured MQTT endpoints on the MinIO deployment.
Replace <ENDPOINT> with the URL of the MQTT service endpoint. For example:
tcp://hostname:port
Replace TOPIC with the MQTT topic to which MinIO associates events published to the server/broker.
See MQTT Service for Bucket Notifications for complete documentation on each environment variable.
MinIO supports adding or updating MQTT endpoints on a running minio server process using the mc admin config set command and the notify_mqtt configuration key. You must restart the minio server process to apply any new or updated configuration settings.
The following example code sets all settings related to configuring an MQTT service endpoint. The following configuration settings are the minimum required for an MQTT server/broker endpoint:
brokertopicusername Required if the MQTT server/broker enforces authentication/authorizationpassword Required if the MQTT server/broker enforces authentication/authorizationReplace IDENTIFIER with a unique descriptive string for the MQTT service endpoint. The following examples in this procedure assume an identifier of PRIMARY.
If the specified IDENTIFIER matches an existing MQTT service endpoint on the MinIO deployment, the new settings override any existing settings for that endpoint. Use mc admin config get notify_mqtt to review the currently configured MQTT endpoints on the MinIO deployment.
Replace ENDPOINT with the URL of the MQTT service endpoint. For example:
tcp://hostname:port
Replace TOPIC with the MQTT topic to which MinIO associates events published to the server/broker.
See MQTT Bucket Notification Configuration Settings for complete documentation on each setting.
You must restart the MinIO deployment to apply the configuration changes. Use the mc admin service restart command to restart the deployment.
Replace ALIAS with the alias of the deployment to restart.
The minio server process prints a line on startup for each configured MQTT target similar to the following:
You must specify the ARN resource when configuring bucket notifications with the associated MQTT deployment as a target.
Identifying the ARN for your bucket notifications
You defined the <IDENTIFIER> to assign to the target ARN for your bucket notifications when creating the endpoint previously. The steps below return the ARNs configured on the deployment. Identify the ARN created previously by looking for the <IDENTIFIER> you specified.
Review the JSON output
Copy and run the following command, replacing ALIAS with the alias of the deployment.
In the JSON output, look for the key info.sqsARN.
The ARN you need is the value of that key that matches the <IDENTIFIER> you specified.
For example, arn:minio:sqs::primary:mqtt.
Use jq to parse the JSON for the value
Copy and run the following command, replacing ALIAS with the alias of the deployment.
This returns the ARN to use for notifications, such as arn:minio:sqs::primary:mqtt
Use the mc event add command to add a new bucket notification event with the configured MQTT service as a target:
ALIAS with the alias of a MinIO deployment.BUCKET with the name of the bucket in which to configure the event.EVENTS with a comma-separated list of events for which MinIO triggers notifications.Use mc event ls to view all configured bucket events for a given notification target:
Perform an action on the bucket for which you configured the new event and check the MQTT service for the notification data. The action required depends on which events were specified when configuring the bucket notification.
For example, if the bucket notification configuration includes the s3:ObjectCreated:Put event, you can use the mc cp command to create a new object in the bucket and trigger a notification.
The following procedure updates an existing MQTT service endpoint for supporting bucket notifications in a MinIO deployment.
This procedure assumes an existing MQTT 3.1 or 3.1.1 server/broker to which the MinIO deployment has connectivity. See the mqtt.org software listing for a list of MQTT-compatible server/brokers.
If the MQTT service requires authentication, you must provide an appropriate username and password during the configuration process to grant MinIO access to the service.
mc Command Line Tool
This procedure uses the mc command line tool for certain actions. See the mc Quickstart for installation instructions.
Use the mc admin config get command to list the currently configured MQTT service endpoints in the deployment:
Replace ALIAS with the alias of the MinIO deployment.
The command output resembles the following:
The notify_mqtt key is the top-level configuration key for an MQTT Notification Settings. The broker key specifies the MQTT server/broker endpoint for the given notify_mqtt key. The notify_mqtt:<IDENTIFIER> suffix describes the unique identifier for that MQTT service endpoint.
Note the identifier for the MQTT service endpoint you want to update for the next step.
Use the mc admin config set command to set the new configuration for the MQTT service endpoint:
The following configuration settings are the minimum required for an MQTT server/broker endpoint:
brokertopicusername Required if the MQTT server/broker enforces authentication/authorizationpassword Required if the MQTT server/broker enforces authentication/authorizationAll other configuration settings are optional. See MQTT Notification Settings for a complete list of MQTT configuration settings.
You must restart the MinIO deployment to apply the configuration changes. Use the mc admin service restart command to restart the deployment.
Replace ALIAS with the alias of the deployment to restart.
The minio server process prints a line on startup for each configured MQTT target similar to the following:
Perform an action on a bucket which has an event configuration using the updated MQTT service endpoint and check the MQTT service for the notification data. The action required depends on which events were specified when configuring the bucket notification.
For example, if the bucket notification configuration includes the s3:ObjectCreated:Put event, you can use the mc cp command to create a new object in the bucket and trigger a notification.
MinIO supports publishing bucket notification events to a NATS service endpoint.
NATS Streaming Deprecated
NATS Streaming is deprecated. Migrate to JetStream instead.
The related MinIO configuration options and environment variables are deprecated.
The following procedure adds a new NATS service endpoint for supporting bucket notifications in a MinIO deployment.
mc Command Line Tool
This procedure uses the mc command line tool for certain actions. See the mc Quickstart for installation instructions.
You can configure a new NATS service endpoint using either environment variables or by setting runtime configuration settings.
MinIO supports specifying the NATS service endpoint and associated configuration settings using environment variables. The minio server process applies the specified settings on its next startup.
The following example code sets all environment variables related to configuring an NATS service endpoint. The minimum required variables are MINIO_NOTIFY_NATS_ADDRESS and MINIO_NOTIFY_NATS_SUBJECT:
Windows
Linux and macOS
Replace <IDENTIFIER> with a unique descriptive string for the NATS service endpoint. Use the same <IDENTIFIER> value for all environment variables related to the new target service endpoint. The following examples assume an identifier of PRIMARY.
If the specified <IDENTIFIER> matches an existing NATS service endpoint on the MinIO deployment, the new settings override any existing settings for that endpoint. Use mc admin config get notify_nats to review the currently configured NATS endpoints on the MinIO deployment.
Replace <ENDPOINT> with the hostname and port of the NATS service endpoint. For example: nats-endpoint.example.com:4222
See NATS Service for Bucket Notifications for complete documentation on each environment variable.
MinIO supports adding or updating NATS endpoints on a running minio server process using the mc admin config set command and the notify_nats configuration key. You must restart the minio server process to apply any new or updated configuration settings.
The following example code sets all settings related to configuring an NATS service endpoint. The minimum required setting are notify_nats address and notify_nats subject:
Replace IDENTIFIER with a unique descriptive string for the NATS service endpoint. The following examples in this procedure assume an identifier of PRIMARY.
If the specified IDENTIFIER matches an existing NATS service endpoint on the MinIO deployment, the new settings override any existing settings for that endpoint. Use mc admin config get notify_nats to review the currently configured NATS endpoints on the MinIO deployment.
Replace ENDPOINT with the hostname and port of the NATS service endpoint. For example: nats-endpoint.example.com:4222.
See NATS Bucket Notification Configuration Settings for complete documentation on each setting.
You must restart the MinIO deployment to apply the configuration changes. Use the mc admin service restart command to restart the deployment.
Replace ALIAS with the alias of the deployment to restart.
The minio server process prints a line on startup for each configured NATS target similar to the following:
You must specify the ARN resource when configuring bucket notifications with the associated NATS deployment as a target.
Identifying the ARN for your bucket notifications
You defined the <IDENTIFIER> to assign to the target ARN for your bucket notifications when creating the endpoint previously. The steps below return the ARNs configured on the deployment. Identify the ARN created previously by looking for the <IDENTIFIER> you specified.
Review the JSON output
Copy and run the following command, replacing ALIAS with the alias of the deployment.
In the JSON output, look for the key info.sqsARN.
The ARN you need is the value of that key that matches the <IDENTIFIER> you specified.
For example, arn:minio:sqs::primary:nats.
Use jq to parse the JSON for the value
Copy and run the following command, replacing ALIAS with the alias of the deployment.
This returns the ARN to use for notifications, such as arn:minio:sqs::primary:nats
Use the mc event add command to add a new bucket notification event with the configured NATS service as a target:
ALIAS with the alias of a MinIO deployment.BUCKET with the name of the bucket in which to configure the event.EVENTS with a comma-separated list of events for which MinIO triggers notifications.Use mc event ls to view all configured bucket events for a given notification target:
Perform an action on the bucket for which you configured the new event and check the NATS service for the notification data. The action required depends on which events were specified when configuring the bucket notification.
For example, if the bucket notification configuration includes the s3:ObjectCreated:Put event, you can use the mc cp command to create a new object in the bucket and trigger a notification.
The following procedure updates an existing NATS service endpoint for supporting bucket notifications in a MinIO deployment.
mc Command Line Tool
This procedure uses the mc command line tool for certain actions. See the mc Quickstart for installation instructions.
Use the mc admin config get command to list the currently configured NATS service endpoints in the deployment:
Replace ALIAS with the alias of the MinIO deployment.
The command output resembles the following:
The notify_nats key is the top-level configuration key for an NATS Notification Settings. The address key specifies the NATS service endpoint for the given notify_nats key. The notify_nats:<IDENTIFIER> suffix describes the unique identifier for that NATS service endpoint.
Note the identifier for the NATS service endpoint you want to update for the next step.
Use the mc admin config set command to set the new configuration for the NATS service endpoint:
The notify_nats address configuration setting is the minimum required for an NATS service endpoint. All other configuration settings are optional. See NATS Notification Settings for a complete list of NATS configuration settings.
You must restart the MinIO deployment to apply the configuration changes. Use the mc admin service restart command to restart the deployment.
Replace ALIAS with the alias of the deployment to restart.
The minio server process prints a line on startup for each configured NATS target similar to the following:
Perform an action on a bucket which has an event configuration using the updated NATS service endpoint and check the NATS service for the notification data. The action required depends on which events were specified when configuring the bucket notification.
For example, if the bucket notification configuration includes the s3:ObjectCreated:Put event, you can use the mc cp command to create a new object in the bucket and trigger a notification.
MinIO supports publishing bucket notification events to NSQ service endpoint.
The following procedure adds a new NSQ service endpoint for supporting bucket notifications in a MinIO deployment.
mc Command Line Tool
This procedure uses the mc command line tool for certain actions. See the mc Quickstart for installation instructions.
You can configure a new NSQ service endpoint using either environment variables or by setting runtime configuration settings.
MinIO supports specifying the NSQ service endpoint and associated configuration settings using environment variables. The minio server process applies the specified settings on its next startup.
The following example code sets all environment variables related to configuring an NSQ service endpoint. The minimum required variables are MINIO_NOTIFY_NSQ_NSQD_ADDRESS and MINIO_NOTIFY_NSQ_TOPIC:
Windows
Linux and macOS
Replace <IDENTIFIER> with a unique descriptive string for the TARGET service endpoint. Use the same <IDENTIFIER> value for all environment variables related to the new target service endpoint. The following examples assume an identifier of PRIMARY.
If the specified <IDENTIFIER> matches an existing NSQ service endpoint on the MinIO deployment, the new settings override any existing settings for that endpoint. Use mc admin config get notify_nsq to review the currently configured NSQ endpoints on the MinIO deployment.
Replace <ENDPOINT> with the URL of the NSQ service endpoint. For example, https://nsq-service.example.com:4150.
See NSQ Service for Bucket Notifications for complete documentation on each environment variable.
MinIO supports adding or updating NSQ endpoints on a running minio server process using the mc admin config set command and the notify_nsq configuration key. You must restart the minio server process to apply any new or updated configuration settings.
The following example code sets all settings related to configuring an NSQ service endpoint. The minimum required setting is notify_nsq nsqd_address and notify_nsq topic:
Replace IDENTIFIER with a unique descriptive string for the NSQ service endpoint. The following examples in this procedure assume an identifier of PRIMARY.
If the specified IDENTIFIER matches an existing NSQ service endpoint on the MinIO deployment, the new settings override any existing settings for that endpoint. Use mc admin config get notify_nsq to review the currently configured NSQ endpoints on the MinIO deployment.
Replace ENDPOINT with the URL of the NSQ service endpoint. For example:
NSQ://user:password@hostname:port
See NSQ Bucket Notification Configuration Settings for complete documentation on each setting.
You must restart the MinIO deployment to apply the configuration changes. Use the mc admin service restart command to restart the deployment.
Replace ALIAS with the alias of the deployment to restart.
The minio server process prints a line on startup for each configured NSQ target similar to the following:
You must specify the ARN resource when configuring bucket notifications with the associated NSQ deployment as a target.
Identifying the ARN for your bucket notifications
You defined the <IDENTIFIER> to assign to the target ARN for your bucket notifications when creating the endpoint previously. The steps below return the ARNs configured on the deployment. Identify the ARN created previously by looking for the <IDENTIFIER> you specified.
Review the JSON output
Copy and run the following command, replacing ALIAS with the alias of the deployment.
In the JSON output, look for the key info.sqsARN.
The ARN you need is the value of that key that matches the <IDENTIFIER> you specified.
For example, arn:minio:sqs::primary:nsq.
Use jq to parse the JSON for the value
Copy and run the following command, replacing ALIAS with the alias of the deployment.
This returns the ARN to use for notifications, such as arn:minio:sqs::primary:nsq
Use the mc event add command to add a new bucket notification event with the configured NSQ service as a target:
ALIAS with the alias of a MinIO deployment.BUCKET with the name of the bucket in which to configure the event.EVENTS with a comma-separated list of events for which MinIO triggers notifications.Use mc event ls to view all configured bucket events for a given notification target:
Perform an action on the bucket for which you configured the new event and check the NSQ service for the notification data. The action required depends on which events were specified when configuring the bucket notification.
For example, if the bucket notification configuration includes the s3:ObjectCreated:Put event, you can use the mc cp command to create a new object in the bucket and trigger a notification.
The following procedure updates an existing NSQ service endpoint for supporting bucket notifications in a MinIO deployment.
mc Command Line Tool
This procedure uses the mc command line tool for certain actions. See the mc Quickstart for installation instructions.
Use the mc admin config get command to list the currently configured NSQ service endpoints in the deployment:
Replace ALIAS with the alias of the MinIO deployment.
The command output resembles the following:
The notify_nsq key is the top-level configuration key for an NSQ Notification Settings. The nsqd_address key specifies the NSQ service endpoint for the given notify_nsq key. The notify_nsq:<IDENTIFIER> suffix describes the unique identifier for that NSQ service endpoint.
Note the identifier for the NSQ service endpoint you want to update for the next step.
Use the mc admin config set command to set the new configuration for the NSQ service endpoint:
The notify_nsq nsqd_address configuration setting is the minimum required for an NSQ service endpoint. All other configuration settings are optional. See NSQ Notification Settings for a complete list of NSQ configuration settings.
You must restart the MinIO deployment to apply the configuration changes. Use the mc admin service restart command to restart the deployment.
Replace ALIAS with the alias of the deployment to restart.
The minio server process prints a line on startup for each configured NSQ target similar to the following:
Perform an action on a bucket which has an event configuration using the updated NSQ service endpoint and check the NSQ service for the notification data. The action required depends on which events were specified when configuring the bucket notification.
For example, if the bucket notification configuration includes the s3:ObjectCreated:Put event, you can use the mc cp command to create a new object in the bucket and trigger a notification.
MinIO supports publishing bucket notification events to an Elasticsearch service endpoint.
MinIO relies on the https://github.com/elastic/go-elasticsearch v7 project for Elastic connectivity.
The following procedure adds a new Elasticsearch service endpoint for supporting bucket notifications in a MinIO deployment.
MinIO relies on the https://github.com/olivere/elastic v7 project for Elastic connectivity. The elastic/v7 library specifically targets Elasticsearch v7.0 and is not compatible with earlier Elasticsearch versions.
mc Command Line Tool
This procedure uses the mc command line tool for certain actions. See the mc Quickstart for installation instructions.
You can configure a new Elasticsearch service endpoint using either environment variables or by setting runtime configuration settings.
MinIO supports specifying the Elasticsearch service endpoint and associated configuration settings using environment variables. The minio server process applies the specified settings on its next startup.
The following example code sets all environment variables related to configuring an Elasticsearch service endpoint. The minimum required variables are:
MINIO_NOTIFY_ELASTICSEARCH_ENABLEMINIO_NOTIFY_ELASTICSEARCH_URLMINIO_NOTIFY_ELASTICSEARCH_INDEXMINIO_NOTIFY_ELASTICSEARCH_FORMATWindows
Linux and macOS
Replace <IDENTIFIER> with a unique descriptive string for the TARGET service endpoint. Use the same <IDENTIFIER> value for all environment variables related to the new target service endpoint. The following examples assume an identifier of PRIMARY.
If the specified <IDENTIFIER> matches an existing Elasticsearch service endpoint on the MinIO deployment, the new settings override any existing settings for that endpoint. Use mc admin config get notify_elasticsearch to review the currently configured Elasticsearch endpoints on the MinIO deployment.
Replace <ENDPOINT> with the URL of the Elasticsearch service endpoint. For example:
See Elasticsearch Service for Bucket Notifications for complete documentation on each environment variable.
MinIO supports adding or updating Elasticsearch endpoints on a running minio server process using the mc admin config set command and the notify_elasticsearch configuration key. You must restart the minio server process to apply any new or updated configuration settings.
The following example code sets all settings related to configuring an Elasticsearch service endpoint. The minimum required settings are:
Replace IDENTIFIER with a unique descriptive string for the Elasticsearch service endpoint. The following examples in this procedure assume an identifier of PRIMARY.
If the specified IDENTIFIER matches an existing Elasticsearch service endpoint on the MinIO deployment, the new settings override any existing settings for that endpoint. Use mc admin config get notify_elasticsearch to review the currently configured Elasticsearch endpoints on the MinIO deployment.
Replace ENDPOINT with the URL of the Elasticsearch service endpoint. For example:
https://user:password@hostname:port
See Elasticsearch Bucket Notification Configuration Settings for complete documentation on each setting.
You must restart the MinIO deployment to apply the configuration changes. Use the mc admin service restart command to restart the deployment.
Replace ALIAS with the alias of the deployment to restart.
The minio server process prints a line on startup for each configured Elasticsearch target similar to the following:
You must specify the ARN resource when configuring bucket notifications with the associated Elasticsearch deployment as a target.
Identifying the ARN for your bucket notifications
You defined the <IDENTIFIER> to assign to the target ARN for your bucket notifications when creating the endpoint previously. The steps below return the ARNs configured on the deployment. Identify the ARN created previously by looking for the <IDENTIFIER> you specified.
Review the JSON output
Copy and run the following command, replacing ALIAS with the alias of the deployment.
In the JSON output, look for the key info.sqsARN.
The ARN you need is the value of that key that matches the <IDENTIFIER> you specified.
For example, arn:minio:sqs::primary:elasticsearch.
Use jq to parse the JSON for the value
Copy and run the following command, replacing ALIAS with the alias of the deployment.
This returns the ARN to use for notifications, such as arn:minio:sqs::primary:elasticsearch
Use the mc event add command to add a new bucket notification event with the configured Elasticsearch service as a target:
ALIAS with the alias of a MinIO deployment.BUCKET with the name of the bucket in which to configure the event.EVENTS with a comma-separated list of events for which MinIO triggers notifications.Use mc event ls to view all configured bucket events for a given notification target:
Perform an action on the bucket for which you configured the new event and check the Elasticsearch service for the notification data. The action required depends on which events were specified when configuring the bucket notification.
For example, if the bucket notification configuration includes the s3:ObjectCreated:Put event, you can use the mc cp command to create a new object in the bucket and trigger a notification.
The following procedure updates an existing Elasticsearch service endpoint for supporting bucket notifications in a MinIO deployment.
MinIO relies on the https://github.com/olivere/elastic v7 project for Elastic connectivity. The elastic/v7 library specifically targets Elasticsearch v7.0 and is not compatible with earlier Elasticsearch versions.
mc Command Line Tool
This procedure uses the mc command line tool for certain actions. See the mc Quickstart for installation instructions.
Use the mc admin config get command to list the currently configured Elasticsearch service endpoints in the deployment:
Replace ALIAS with the alias of the MinIO deployment.
The command output resembles the following:
The notify_elasticsearch key is the top-level configuration key for an Elasticsearch Notification Settings. The url key specifies the Elasticsearch service endpoint for the given notify_elasticsearch key. The notify_elasticsearch:<IDENTIFIER> suffix describes the unique identifier for that Elasticsearch service endpoint.
Note the identifier for the Elasticsearch service endpoint you want to update for the next step.
Use the mc admin config set command to set the new configuration for the Elasticsearch service endpoint:
The notify_elasticsearch url configuration setting is the minimum required for an Elasticsearch service endpoint. All other configuration settings are optional. See Elasticsearch Notification Settings for a complete list of Elasticsearch configuration settings.
You must restart the MinIO deployment to apply the configuration changes. Use the mc admin service restart command to restart the deployment.
Replace ALIAS with the alias of the deployment to restart.
The minio server process prints a line on startup for each configured Elasticsearch target similar to the following:
Perform an action on a bucket which has an event configuration using the updated Elasticsearch service endpoint and check the Elasticsearch service for the notification data. The action required depends on which events were specified when configuring the bucket notification.
For example, if the bucket notification configuration includes the s3:ObjectCreated:Put event, you can use the mc cp command to create a new object in the bucket and trigger a notification.
MinIO supports publishing bucket notification events to a Kafka service endpoint.
MinIO relies on the https://github.com/Shopify/sarama project for Kafka connectivity and shares that project’s Kafka support. See the sarama Compatibility and API stability section for more details.
The following procedure adds a new Kafka service endpoint for supporting bucket notifications in a MinIO deployment.
MinIO relies on the https://github.com/Shopify/sarama project for Kafka connectivity and shares that project’s Kafka support. See the sarama Compatibility and API stability section for more details.
mc Command Line Tool
This procedure uses the mc command line tool for certain actions. See the mc Quickstart for installation instructions.
You can configure a new Kafka service endpoint using either environment variables or by setting runtime configuration settings.
MinIO supports specifying the Kafka service endpoint and associated configuration settings using environment variables. The minio server process applies the specified settings on its next startup.
The following example code sets all environment variables related to configuring a Kafka service endpoint. The minimum required variables are MINIO_NOTIFY_KAFKA_ENABLE and MINIO_NOTIFY_KAFKA_BROKERS:
Windows
Linux and macOS
Replace <IDENTIFIER> with a unique descriptive string for the Kafka service endpoint. Use the same <IDENTIFIER> value for all environment variables related to the new target service endpoint. The following examples assume an identifier of PRIMARY.
If the specified <IDENTIFIER> matches an existing Kafka service endpoint on the MinIO deployment, the new settings override any existing settings for that endpoint. Use mc admin config get notify_kafka to review the currently configured Kafka endpoints on the MinIO deployment.
Replace <ENDPOINT> with a comma-separated list of Kafka brokers. For example:
"kafka1.example.com:2021,kafka2.example.com:2021"
See Kafka Service for Bucket Notifications for complete documentation on each environment variable.
MinIO supports adding or updating Kafka endpoints on a running minio server process using the mc admin config set command and the notify_kafka configuration key. You must restart the minio server process to apply any new or updated configuration settings.
The following example code sets all settings related to configuring an Kafka service endpoint. The minimum required setting is notify_kafka brokers:
Replace IDENTIFIER with a unique descriptive string for the Kafka service endpoint. The following examples in this procedure assume an identifier of PRIMARY.
If the specified IDENTIFIER matches an existing Kafka service endpoint on the MinIO deployment, the new settings override any existing settings for that endpoint. Use mc admin config get notify_kafka to review the currently configured Kafka endpoints on the MinIO deployment.
Replace ENDPOINT with a comma separated list of Kafka brokers. For example:
"kafka1.example.com:2021,kafka2.example.com:2021"
See Kafka Bucket Notification Configuration Settings for complete documentation on each setting.
You must restart the MinIO deployment to apply the configuration changes. Use the mc admin service restart command to restart the deployment.
Replace ALIAS with the alias of the deployment to restart.
The minio server process prints a line on startup for each configured Kafka target similar to the following:
You must specify the ARN resource when configuring bucket notifications with the associated Kafka deployment as a target.
Identifying the ARN for your bucket notifications
You defined the <IDENTIFIER> to assign to the target ARN for your bucket notifications when creating the endpoint previously. The steps below return the ARNs configured on the deployment. Identify the ARN created previously by looking for the <IDENTIFIER> you specified.
Review the JSON output
Copy and run the following command, replacing ALIAS with the alias of the deployment.
In the JSON output, look for the key info.sqsARN.
The ARN you need is the value of that key that matches the <IDENTIFIER> you specified.
For example, arn:minio:sqs::primary:kafka.
Use jq to parse the JSON for the value
Copy and run the following command, replacing ALIAS with the alias of the deployment.
This returns the ARN to use for notifications, such as arn:minio:sqs::primary:kafka
Use the mc event add command to add a new bucket notification event with the configured Kafka service as a target:
ALIAS with the alias of a MinIO deployment.BUCKET with the name of the bucket in which to configure the event.EVENTS with a comma-separated list of events for which MinIO triggers notifications.Use mc event ls to view all configured bucket events for a given notification target:
Perform an action on the bucket for which you configured the new event and check the Kafka service for the notification data. The action required depends on which events were specified when configuring the bucket notification.
For example, if the bucket notification configuration includes the s3:ObjectCreated:Put event, you can use the mc cp command to create a new object in the bucket and trigger a notification.
The following procedure updates an existing Kafka service endpoint for supporting bucket notifications in a MinIO deployment.
MinIO relies on the https://github.com/Shopify/sarama project for Kafka connectivity and shares that project’s Kafka support. See the sarama Compatibility and API stability section for more details.
mc Command Line Tool
This procedure uses the mc command line tool for certain actions. See the mc Quickstart for installation instructions.
Use the mc admin config get command to list the currently configured Kafka service endpoints in the deployment:
Replace ALIAS with the alias of the MinIO deployment.
The command output resembles the following:
The notify_kafka key is the top-level configuration key for an Kafka Notification Settings. The brokers key specifies the Kafka service endpoint for the given notify_kafka key. The notify_kafka:<IDENTIFIER> suffix describes the unique identifier for that Kafka service endpoint.
Note the identifier for the Kafka service endpoint you want to update for the next step.
Use the mc admin config set command to set the new configuration for the Kafka service endpoint:
The notify_kafka brokers configuration setting is the minimum required for a Kafka service endpoint. All other configuration settings are optional. See Kafka Notification Settings for a complete list of Kafka configuration settings.
You must restart the MinIO deployment to apply the configuration changes. Use the mc admin service restart command to restart the deployment.
Replace ALIAS with the alias of the deployment to restart.
The minio server process prints a line on startup for each configured Kafka target similar to the following:
Perform an action on a bucket which has an event configuration using the updated Kafka service endpoint and check the Kafka service for the notification data. The action required depends on which events were specified when configuring the bucket notification.
For example, if the bucket notification configuration includes the s3:ObjectCreated:Put event, you can use the mc cp command to create a new object in the bucket and trigger a notification.
MinIO supports publishing bucket notification events to a MySQL service endpoint. MinIO supports MySQL 5.7.8 and later only.
The following procedure adds a new MySQL service endpoint for supporting bucket notifications in a MinIO deployment.
MinIO relies on features introduced with MySQL 5.7.8.
mc Command Line Tool
This procedure uses the mc command line tool for certain actions. See the mc Quickstart for installation instructions.
You can configure a new MySQL service endpoint using either environment variables or by setting runtime configuration settings.
MinIO supports specifying the MySQL service endpoint and associated configuration settings using environment variables. The minio server process applies the specified settings on its next startup.
The following example code sets all environment variables related to configuring a MySQL service endpoint. The minimum required variables are:
MINIO_NOTIFY_MYSQL_ENABLEMINIO_NOTIFY_MYSQL_DSN_STRINGMINIO_NOTIFY_MYSQL_TABLEMINIO_NOTIFY_MYSQL_FORMATWindows
Linux and macOS
Replace <IDENTIFIER> with a unique descriptive string for the MySQL service endpoint. Use the same <IDENTIFIER> value for all environment variables related to the new target service endpoint. The following examples assume an identifier of PRIMARY.
If the specified <IDENTIFIER> matches an existing MySQL service endpoint on the MinIO deployment, the new settings override any existing settings for that endpoint. Use mc admin config get notify_mysql to review the currently configured MySQL endpoints on the MinIO deployment.
Replace <ENDPOINT> with the DSN of the MySQL service endpoint. MinIO expects the following format:
<user>:<password>@tcp(<host>:<port>)/<database>
For example:
"username:password@tcp(mysql.example.com:3306)/miniodb"
See MySQL Service for Bucket Notifications for complete documentation on each environment variable.
MinIO supports adding or updating MySQL endpoints on a running minio server process using the mc admin config set command and the notify_mysql configuration key. You must restart the minio server process to apply any new or updated configuration settings.
The following example code sets all settings related to configuring an MySQL service endpoint. The minimum required settings are:
Replace IDENTIFIER with a unique descriptive string for the MySQL service endpoint. The following examples in this procedure assume an identifier of PRIMARY.
If the specified IDENTIFIER matches an existing MySQL service endpoint on the MinIO deployment, the new settings override any existing settings for that endpoint. Use mc admin config get notify_mysql to review the currently configured MySQL endpoints on the MinIO deployment.
Replace <ENDPOINT> with the DSN of the MySQL service endpoint. MinIO expects the following format:
<user>:<password>@tcp(<host>:<port>)/<database>
For example:
"username:password@tcp(mysql.example.com:3306)/miniodb"
See MySQL Bucket Notification Configuration Settings for complete documentation on each setting.
You must restart the MinIO deployment to apply the configuration changes. Use the mc admin service restart command to restart the deployment.
Replace ALIAS with the alias of the deployment to restart.
The minio server process prints a line on startup for each configured MySQL target similar to the following:
You must specify the ARN resource when configuring bucket notifications with the associated MySQL deployment as a target.
Identifying the ARN for your bucket notifications
You defined the <IDENTIFIER> to assign to the target ARN for your bucket notifications when creating the endpoint previously. The steps below return the ARNs configured on the deployment. Identify the ARN created previously by looking for the <IDENTIFIER> you specified.
Review the JSON output
Copy and run the following command, replacing ALIAS with the alias of the deployment.
In the JSON output, look for the key info.sqsARN.
The ARN you need is the value of that key that matches the <IDENTIFIER> you specified.
For example, arn:minio:sqs::primary:mysql.
Use jq to parse the JSON for the value
Copy and run the following command, replacing ALIAS with the alias of the deployment.
This returns the ARN to use for notifications, such as arn:minio:sqs::primary:mysql
Use the mc event add command to add a new bucket notification event with the configured MySQL service as a target:
ALIAS with the alias of a MinIO deployment.BUCKET with the name of the bucket in which to configure the event.EVENTS with a comma-separated list of events for which MinIO triggers notifications.Use mc event ls to view all configured bucket events for a given notification target:
Perform an action on the bucket for which you configured the new event and check the MySQL service for the notification data. The action required depends on which events were specified when configuring the bucket notification.
For example, if the bucket notification configuration includes the s3:ObjectCreated:Put event, you can use the mc cp command to create a new object in the bucket and trigger a notification.
The following procedure updates an existing MySQL service endpoint for supporting bucket notifications in a MinIO deployment.
MinIO relies on features introduced with MySQL 5.7.8.
mc Command Line Tool
This procedure uses the mc command line tool for certain actions. See the mc Quickstart for installation instructions.
Use the mc admin config get command to list the currently configured MySQL service endpoints in the deployment:
Replace ALIAS with the alias of the MinIO deployment.
The command output resembles the following:
The notify_mysql key is the top-level configuration key for an MySQL Notification Settings. The dsn_string key specifies the MySQL service endpoint for the given notify_mysql key. The notify_mysql:<IDENTIFIER> suffix describes the unique identifier for that MySQL service endpoint.
Note the identifier for the MySQL service endpoint you want to update for the next step.
Use the mc admin config set command to set the new configuration for the MySQL service endpoint:
The following configuration settings are the minimum required for a MySQL service endpoint:
All other configuration settings are optional. See MySQL Notification Settings for a complete list of MySQL configuration settings.
You must restart the MinIO deployment to apply the configuration changes. Use the mc admin service restart command to restart the deployment.
Replace ALIAS with the alias of the deployment to restart.
The minio server process prints a line on startup for each configured MySQL target similar to the following:
Perform an action on a bucket which has an event configuration using the updated MySQL service endpoint and check the MySQL service for the notification data. The action required depends on which events were specified when configuring the bucket notification.
For example, if the bucket notification configuration includes the s3:ObjectCreated:Put event, you can use the mc cp command to create a new object in the bucket and trigger a notification.
MinIO supports publishing bucket notification events to PostgreSQL. MinIO supports PostgreSQL 9.5 and later only.
The following procedure adds a new PostgreSQL service endpoint for supporting bucket notifications in a MinIO deployment.
MinIO relies on features introduced with PostgreSQL 9.5.
mc Command Line Tool
This procedure uses the mc command line tool for certain actions. See the mc Quickstart for installation instructions.
You can configure a new PostgreSQL service endpoint using either environment variables or by setting runtime configuration settings.
MinIO supports specifying the PostgreSQL service endpoint and associated configuration settings using environment variables. The minio server process applies the specified settings on its next startup.
The following example code sets all environment variables related to configuring a PostgreSQL service endpoint. The minimum required variables are:
Windows
Linux and macOS
Replace <IDENTIFIER> with a unique descriptive string for the PostgreSQL service endpoint. Use the same <IDENTIFIER> value for all environment variables related to the new target service endpoint. The following examples assume an identifier of PRIMARY.
If the specified <IDENTIFIER> matches an existing PostgreSQL service endpoint on the MinIO deployment, the new settings override any existing settings for that endpoint. Use mc admin config get notify_postgres to review the currently configured PostgreSQL endpoints on the MinIO deployment.
Replace <ENDPOINT> with the PostgreSQL Connection String for PostgreSQL service endpoint. MinIO supports key=value format for the connection string. For example:
"host=https://postgresql.example.com port=5432 ..."
For more complete documentation on supported PostgreSQL connection string parameters, see PostgreSQL Connection String.
See PostgreSQL Service for Bucket Notifications for complete documentation on each environment variable.
MinIO supports adding or updating PostgreSQL endpoints on a running minio server process using the mc admin config set command and the notify_postgres configuration key. You must restart the minio server process to apply any new or updated configuration settings.
The following example code sets all settings related to configuring an PostgreSQL service endpoint. The minimum required setting are:
Replace IDENTIFIER with a unique descriptive string for the PostgreSQL service endpoint. The following examples in this procedure assume an identifier of PRIMARY.
If the specified IDENTIFIER matches an existing PostgreSQL service endpoint on the MinIO deployment, the new settings override any existing settings for that endpoint. Use mc admin config get notify_postgres to review the currently configured PostgreSQL endpoints on the MinIO deployment.
Replace <ENDPOINT> with the PostgreSQL URI connection string of the PostgreSQL service endpoint. MinIO supports key=value format for the PostgreSQL connection string. For example:
"host=https://postgresql.example.com port=5432 ..."
For more complete documentation on supported PostgreSQL connection string parameters, see PostgreSQL Connection String.
See PostgreSQL Bucket Notification Configuration Settings for complete documentation on each setting.
You must restart the MinIO deployment to apply the configuration changes. Use the mc admin service restart command to restart the deployment.
Replace ALIAS with the alias of the deployment to restart.
The minio server process prints a line on startup for each configured PostgreSQL target similar to the following:
You must specify the ARN resource when configuring bucket notifications with the associated PostgreSQL deployment as a target.
Identifying the ARN for your bucket notifications
You defined the <IDENTIFIER> to assign to the target ARN for your bucket notifications when creating the endpoint previously. The steps below return the ARNs configured on the deployment. Identify the ARN created previously by looking for the <IDENTIFIER> you specified.
Review the JSON output
Copy and run the following command, replacing ALIAS with the alias of the deployment.
In the JSON output, look for the key info.sqsARN.
The ARN you need is the value of that key that matches the <IDENTIFIER> you specified.
For example, arn:minio:sqs::primary:postgresql.
Use jq to parse the JSON for the value
Copy and run the following command, replacing ALIAS with the alias of the deployment.
This returns the ARN to use for notifications, such as arn:minio:sqs::primary:postgresql
Use the mc event add command to add a new bucket notification event with the configured PostgreSQL service as a target:
ALIAS with the alias of a MinIO deployment.BUCKET with the name of the bucket in which to configure the ßevent.EVENTS with a comma-separated list of events for which MinIO triggers notifications.Use mc event ls to view all configured bucket events for a given notification target:
Perform an action on the bucket for which you configured the new event and check the PostgreSQL service for the notification data. The action required depends on which events were specified when configuring the bucket notification.
For example, if the bucket notification configuration includes the s3:ObjectCreated:Put event, you can use the mc cp command to create a new object in the bucket and trigger a notification.
The following procedure updates an existing PostgreSQL service endpoint for supporting bucket notifications in a MinIO deployment.
MinIO relies on features introduced with PostgreSQL 9.5.
mc Command Line Tool
This procedure uses the mc command line tool for certain actions. See the mc Quickstart for installation instructions.
Use the mc admin config get command to list the currently configured PostgreSQL service endpoints in the deployment:
Replace ALIAS with the alias of the MinIO deployment.
The command output resembles the following:
The notify_postgres key is the top-level configuration key for an PostgreSQL Notification Settings. The connection_string key specifies the PostgreSQL service endpoint for the given notify_postgres key. The notify_postgres:<IDENTIFIER> suffix describes the unique identifier for that PostgreSQL service endpoint.
Note the identifier for the PostgreSQL service endpoint you want to update for the next step.
Use the mc admin config set command to set the new configuration for the PostgreSQL service endpoint:
The following configuration settings are the minimum required for a PostgreSQL service endpoint:
All other configuration settings are optional. See PostgreSQL Notification Settings for a complete list of PostgreSQL configuration settings.
You must restart the MinIO deployment to apply the configuration changes. Use the mc admin service restart command to restart the deployment.
Replace ALIAS with the alias of the deployment to restart.
The minio server process prints a line on startup for each configured PostgreSQL target similar to the following:
Perform an action on a bucket which has an event configuration using the updated PostgreSQL service endpoint and check the PostgreSQL service for the notification data. The action required depends on which events were specified when configuring the bucket notification.
For example, if the bucket notification configuration includes the s3:ObjectCreated:Put event, you can use the mc cp command to create a new object in the bucket and trigger a notification.
MinIO supports publishing bucket notification events to a Redis service endpoint.
The following procedure adds a new Redis service endpoint for supporting bucket notifications in a MinIO deployment.
mc Command Line Tool
This procedure uses the mc command line tool for certain actions. See the mc Quickstart for installation instructions.
You can configure a new Redis service endpoint using either environment variables or by setting runtime configuration settings.
MinIO supports specifying the Redis service endpoint and associated configuration settings using environment variables. The minio server process applies the specified settings on its next startup.
The following example code sets all environment variables related to configuring an Redis service endpoint. The minimum required variables are:
MINIO_NOTIFY_REDIS_ENABLEMINIO_NOTIFY_REDIS_ADDRESSMINIO_NOTIFY_REDIS_KEYMINIO_NOTIFY_REDIS_FORMATWindows
Linux and macOS
Replace <IDENTIFIER> with a unique descriptive string for the TARGET service endpoint. Use the same <IDENTIFIER> value for all environment variables related to the new target service endpoint. The following examples assume an identifier of PRIMARY.
If the specified <IDENTIFIER> matches an existing Redis service endpoint on the MinIO deployment, the new settings override any existing settings for that endpoint. Use mc admin config get notify_redis to review the currently configured Redis endpoints on the MinIO deployment.
Replace <ENDPOINT> with the URL of the Redis service endpoint. For example: https://redis.example.com:6369
See Redis Service for Bucket Notifications for complete documentation on each environment variable.
MinIO supports adding or updating Redis endpoints on a running minio server process using the mc admin config set command and the notify_redis configuration key. You must restart the minio server process to apply any new or updated configuration settings.
The following example code sets all settings related to configuring an Redis service endpoint. The minimum required settings are:
Replace IDENTIFIER with a unique descriptive string for the Redis service endpoint. The following examples in this procedure assume an identifier of PRIMARY.
If the specified IDENTIFIER matches an existing Redis service endpoint on the MinIO deployment, the new settings override any existing settings for that endpoint. Use mc admin config get notify_redis to review the currently configured Redis endpoints on the MinIO deployment.
Replace ENDPOINT with the URL of the Redis service endpoint. For example: https://redis.example.com:6369
See Redis Bucket Notification Configuration Settings for complete documentation on each setting.
You must restart the MinIO deployment to apply the configuration changes. Use the mc admin service restart command to restart the deployment.
Replace ALIAS with the alias of the deployment to restart.
The minio server process prints a line on startup for each configured Redis target similar to the following:
You must specify the ARN resource when configuring bucket notifications with the associated Redis deployment as a target.
Identifying the ARN for your bucket notifications
You defined the <IDENTIFIER> to assign to the target ARN for your bucket notifications when creating the endpoint previously. The steps below return the ARNs configured on the deployment. Identify the ARN created previously by looking for the <IDENTIFIER> you specified.
Review the JSON output
Copy and run the following command, replacing ALIAS with the alias of the deployment.
In the JSON output, look for the key info.sqsARN.
The ARN you need is the value of that key that matches the <IDENTIFIER> you specified.
For example, arn:minio:sqs::primary:redis.
Use jq to parse the JSON for the value
Copy and run the following command, replacing ALIAS with the alias of the deployment.
This returns the ARN to use for notifications, such as arn:minio:sqs::primary:redis
Use the mc event add command to add a new bucket notification event with the configured Redis service as a target:
ALIAS with the alias of a MinIO deployment.BUCKET with the name of the bucket in which to configure the event.EVENTS with a comma-separated list of events for which MinIO triggers notifications.Use mc event ls to view all configured bucket events for a given notification target:
Perform an action on the bucket for which you configured the new event and check the Redis service for the notification data. The action required depends on which events were specified when configuring the bucket notification.
For example, if the bucket notification configuration includes the s3:ObjectCreated:Put event, you can use the mc cp command to create a new object in the bucket and trigger a notification.
The following procedure updates an existing Redis service endpoint for supporting bucket notifications in a MinIO deployment.
mc Command Line Tool
This procedure uses the mc command line tool for certain actions. See the mc Quickstart for installation instructions.
Use the mc admin config get command to list the currently configured Redis service endpoints in the deployment:
Replace ALIAS with the alias of the MinIO deployment.
The command output resembles the following:
The notify_redis key is the top-level configuration key for an Redis Notification Settings. The address key specifies the Redis service endpoint for the given notify_redis key. The notify_redis:<IDENTIFIER> suffix describes the unique identifier for that Redis service endpoint.
Note the identifier for the Redis service endpoint you want to update for the next step.
Use the mc admin config set command to set the new configuration for the Redis service endpoint:
The notify_redis address configuration setting is the minimum required for an Redis service endpoint. All other configuration settings are optional. See Redis Notification Settings for a complete list of Redis configuration settings.
You must restart the MinIO deployment to apply the configuration changes. Use the mc admin service restart command to restart the deployment.
Replace ALIAS with the alias of the deployment to restart.
The minio server process prints a line on startup for each configured Redis target similar to the following:
Perform an action on a bucket which has an event configuration using the updated Redis service endpoint and check the Redis service for the notification data. The action required depends on which events were specified when configuring the bucket notification.
For example, if the bucket notification configuration includes the s3:ObjectCreated:Put event, you can use the mc cp command to create a new object in the bucket and trigger a notification.
MinIO supports publishing bucket notification events to a Webhook service endpoint.
The following procedure adds a new Webhook service endpoint for supporting bucket notifications in a MinIO deployment.
mc Command Line Tool
This procedure uses the mc command line tool for certain actions. See the mc Quickstart for installation instructions.
You can configure a new Webhook service endpoint using either environment variables or by setting runtime configuration settings.
MinIO supports specifying the Webhook service endpoint and associated configuration settings using environment variables. The minio server process applies the specified settings on its next startup.
The following example code sets all environment variables related to configuring an Webhook service endpoint. The minimum required variables are MINIO_NOTIFY_WEBHOOK_ENABLE and MINIO_NOTIFY_WEBHOOK_ENDPOINT:
Windows
Linux and macOS
Replace <IDENTIFIER> with a unique descriptive string for the Webhook service endpoint. Use the same <IDENTIFIER> value for all environment variables related to the new target service endpoint. The following examples assume an identifier of PRIMARY.
If the specified <IDENTIFIER> matches an existing Webhook service endpoint on the MinIO deployment, the new settings override any existing settings for that endpoint. Use mc admin config get notify_webhook to review the currently configured Webhook endpoints on the MinIO deployment.
Replace <ENDPOINT> with the URL of the Webhook service endpoint. For example:
https://webhook.example.com
See Webhook Service for Bucket Notifications for complete documentation on each environment variable.
MinIO supports adding or updating Webhook endpoints on a running minio server process using the mc admin config set command and the notify_webhook configuration key. You must restart the minio server process to apply any new or updated configuration settings.
The following example code sets all settings related to configuring an Webhook service endpoint. The minimum required setting is notify_webhook endpoint:
Replace IDENTIFIER with a unique descriptive string for the Webhook service endpoint. The following examples in this procedure assume an identifier of PRIMARY.
If the specified IDENTIFIER matches an existing Webhook service endpoint on the MinIO deployment, the new settings override any existing settings for that endpoint. Use mc admin config get notify_webhook to review the currently configured Webhook endpoints on the MinIO deployment.
Replace ENDPOINT with the URL of the Webhook service endpoint. For example:
https://webhook.example.com
See Webhook Bucket Notification Configuration Settings for complete documentation on each setting.
You must restart the MinIO deployment to apply the configuration changes. Use the mc admin service restart command to restart the deployment.
Replace ALIAS with the alias of the deployment to restart.
The minio server process prints a line on startup for each configured Webhook target similar to the following:
You must specify the ARN resource when configuring bucket notifications with the associated Webhook deployment as a target.
Identifying the ARN for your bucket notifications
You defined the <IDENTIFIER> to assign to the target ARN for your bucket notifications when creating the endpoint previously. The steps below return the ARNs configured on the deployment. Identify the ARN created previously by looking for the <IDENTIFIER> you specified.
Review the JSON output
Copy and run the following command, replacing ALIAS with the alias of the deployment.
In the JSON output, look for the key info.sqsARN.
The ARN you need is the value of that key that matches the <IDENTIFIER> you specified.
For example, arn:minio:sqs::primary:webhook.
Use jq to parse the JSON for the value
Copy and run the following command, replacing ALIAS with the alias of the deployment.
This returns the ARN to use for notifications, such as arn:minio:sqs::primary:webhook
Use the mc event add command to add a new bucket notification event with the configured Webhook service as a target:
ALIAS with the alias of a MinIO deployment.BUCKET with the name of the bucket in which to configure the event.EVENTS with a comma-separated list of events for which MinIO triggers notifications.Use mc event ls to view all configured bucket events for a given notification target:
Perform an action on the bucket for which you configured the new event and check the Webhook service for the notification data. The action required depends on which events were specified when configuring the bucket notification.
For example, if the bucket notification configuration includes the s3:ObjectCreated:Put event, you can use the mc cp command to create a new object in the bucket and trigger a notification.
The following procedure updates an existing Webhook service endpoint for supporting bucket notifications in a MinIO deployment.
mc Command Line Tool
This procedure uses the mc command line tool for certain actions. See the mc Quickstart for installation instructions.
Use the mc admin config get command to list the currently configured Webhook service endpoints in the deployment:
Replace ALIAS with the alias of the MinIO deployment.
The command output resembles the following:
The notify_webhook key is the top-level configuration key for an Webhook Service Notification Settings. The endpoint key specifies the Webhook service endpoint for the given notify_webhook key. The notify_webhook:<IDENTIFIER> suffix describes the unique identifier for that Webhook service endpoint.
Note the identifier for the Webhook service endpoint you want to update for the next step.
Use the mc admin config set command to set the new configuration for the Webhook service endpoint:
The notify_webhook endpoint configuration setting is the minimum required for an Webhook service endpoint. All other configuration settings are optional. See Webhook Service Notification Settings for a complete list of Webhook configuration settings.
You must restart the MinIO deployment to apply the configuration changes. Use the mc admin service restart command to restart the deployment.
Replace ALIAS with the alias of the deployment to restart.
The minio server process prints a line on startup for each configured Webhook target similar to the following:
Perform an action on a bucket which has an event configuration using the updated Webhook service endpoint and check the Webhook service for the notification data. The action required depends on which events were specified when configuring the bucket notification.
For example, if the bucket notification configuration includes the s3:ObjectCreated:Put event, you can use the mc cp command to create a new object in the bucket and trigger a notification.
MinIO requires the client perform both authentication and authorization for each new operation.
Authentication
The process of verifying the identity of a connecting client. MinIO requires clients authenticate using AWS Signature Version 4 protocol with support for the deprecated Signature Version 2 protocol. Specifically, clients must present a valid access key and secret key to access any S3 or MinIO administrative API, such as
PUT,GET, andDELETEoperations.
Authorization
The process of restricting the actions and resources the authenticated client can perform on the deployment. MinIO uses Policy-Based Access Control (PBAC), where each policy describes one or more rules that outline the permissions of a user or group of users. MinIO supports S3-specific actions and conditions when creating policies. By default, MinIO denies access to actions or resources not explicitly referenced in a user’s assigned or inherited policies.
MinIO supports both internal and external identity management:
| IDentity Provider (IDP) | Description |
|---|---|
| MinIO Internal IDP | Provides built-in identity management functionality. |
| OpenID | Supports managing identities through an OpenID Connect (OIDC) compatible service. |
| MinIO Authentation Plugin | Supports a custom external identity manager using the MinIO Authentication Plugin extension. |
| Active Directory / LDAP | Supports managing identities through an Active Directory or LDAP service. |
| Access Management Plugin | Supports a custom external access manager using the MinIO Access Management Plugin extension. |
Once authenticated, MinIO either allows or rejects the client request depending on whether or not the authenticated identity is authorized to perform the operation on the specified resource.
MinIO uses Policy-Based Access Control (PBAC) to define the authorized actions and resources to which an authenticated user has access. Each policy describes one or more actions and conditions that outline the permissions of a user or group of users.
MinIO manages the creation and storage of policies. The process for assigning a policy to a user or group depends on the configured IDentity Provider (IDP).
MinIO deployments using the MinIO Internal IDP require explicitly associating a user to a policy or policies using the mc admin policy attach command. A user can also inherit the policies attached to the groups in which they have membership.
By default, MinIO denies access to actions or resources not explicitly allowed by an attached or inherited policy. A user with no explicitly assigned or inherited policies cannot perform any S3 or MinIO administrative API operations.
For MinIO deployments using an External IDP, policy assignment depends on the choice of IDP:
MinIO checks for a JSON Web Token (JWT) claim ( MinIO does not support assigning OIDC user identities to groups. The IDP administrator must instead assign all necessary policies to the user’s policy claim. See Access Control for Externally Managed Identities for more information. |
|
MinIO checks for a policy whose name matches the Distinguished Name (DN) of the authenticated AD/LDAP user. MinIO also supports querying for the authenticated AD/LDAP user’s group memberships. MinIO assigns any policy whose name matches the DN for each returned group. If no policies match either the user DN or any of the user’s group DNs, the user cannot perform any action on the MinIO deployment. See Access Control for Externally Managed Identities for more information. |
MinIO PBAC is built for compatibility with AWS IAM policy syntax, structure, and behavior. The MinIO documentation makes a best-effort to cover IAM-specific behavior and functionality. Consider deferring to the IAM documentation for more complete documentation on IAM, IAM policies, or IAM JSON syntax.
Deny overrides Allow
MinIO follows AWS IAM policy evaluation rules where a Deny rule overrides Allow rule on the same action/resource. For example, if a user has an explicitly assigned policy with an Allow rule for an action/resource while one of its groups has an assigned policy with a Deny rule for that action/resource, MinIO would apply only the Deny rule.
For more information on IAM policy evaluation logic, see the IAM documentation on Determining Whether a Request is Allowed or Denied Within an Account.
MinIO includes a built-in IDentity Provider (IDP) that provides core identity management functionality. The MinIO IDP supports creating an arbitrary number of long-lived users on the deployment for supporting client authentication.
Each user consists of a unique access key (username) and corresponding secret key (password). Clients must authenticate their identity by specifying both a valid access key (username) and the corresponding secret key (password) of an existing MinIO user.
Administrators use the mc admin user command to create and manage MinIO users.
MinIO also supports creating access keys. Access Keys are child identities of an authenticated parent user and inherit their permissions from the parent.
MinIO by default denies access to all actions or resources not explicitly allowed by a user’s assigned or inherited policies. You must either explicitly assign a policy describing the user’s authorized actions and resources or assign the user to groups which have associated policies. See Access Management for more information.
External Identity Management
MinIO supports external management of identities using either an OpenID Connect (OIDC) or Active Directory/LDAP IDentity Provider (IDP). For more information, see:
AD/LDAP and OIDC configurations are mutually exclusive. Furthermore, enabling AD/LDAP external identity management disables the MinIO internal IDP, with the exception of creating access keys. You can configure multiple OIDC providers while maintaining MinIO-managed users.
A MinIO user consists of a unique access key (username) and corresponding secret key (password). Clients must authenticate their identity by specifying both a valid access key (username) and the corresponding secret key (password) of an existing MinIO user.
Each user can have one or more assigned policies that explicitly list the actions and resources to which that user has access. Users can also inherit policies from the groups in which they have membership.
MinIO by default denies access to all actions or resources not explicitly allowed by a user’s assigned or inherited policies. You must either explicitly assign a policy describing the user’s authorized actions and resources or assign the user to groups which have associated policies. See Access Management for more information.
This page documents user management for the MinIO internal IDentity Provider (IDP). MinIO also external management of identities using either an OpenID Connect (OIDC) or Active Directory/LDAP IDentity Provider (IDP). For more information, see:
Enabling external identity management disables the MinIO internal IDP, with the exception of creating access keys.
MinIO Access Keys (formerly “Service Accounts”) are child identities of an authenticated MinIO user, including externally managed identities. Each access key inherits its privileges based on the policies attached to it’s parent user or those groups in which the parent user has membership. Access keys also support an optional inline policy which further restricts access to a subset of actions and resources available to the parent user.
A MinIO user can generate any number of access keys. This allows application owners to generate arbitrary access keys for their applications without requiring action from the MinIO administrators. Since the generated access keys have the same or fewer permissions as the parents, administrators can focus on managing the top-level parent users without micro-managing generated access keys.
You can create access keys by using the mc admin user svcacct add command. Identities created by these methods do not expire until you remove the access key or the parent account.
You can also create security token service accounts programmatically with the AssumeRole STS API endpoint. STS tokens default to expire in 1 hour, but you set expiration for up to 7 days from creation.
Access Keys support programmatic access by applications. You cannot use an access key to log into the MinIO Console.
root User
MinIO deployments have a root user with access to all actions and resources on the deployment, regardless of the configured identity manager. When a minio server first starts, it sets the root user credentials by checking the value of the following environment variables:
Rotating the root user credentials requires updating either or both variables for all MinIO servers in the deployment. Specify long, unique, and random strings for root credentials. Exercise all possible precautions in storing the access key and secret key, such that only known and trusted individuals who require superuser access to the deployment can retrieve the root credentials.
root user for regular client access regardless of the environment (development, staging, or production).If these variables are unset, minio defaults to minioadmin and minioadmin as the access key and secret key respectively. MinIO strongly discourages use of the default credentials regardless of deployment environment.
MinIO RELEASE.2021-04-22T15-44-28Z and later deprecates the following variables used for setting or updating root user credentials:
MINIO_ACCESS_KEY to the new access key.MINIO_SECRET_KEY to the new secret key.MINIO_ACCESS_KEY_OLD to the old access key.MINIO_SECRET_KEY_OLD to the old secret key.Use the mc admin user add command to create a new user on the MinIO deployment:
ALIAS with the alias of the MinIO deployment.ACCESSKEY with the access key for the user. MinIO allows retrieving the access key after user creation through the mc admin user info command.SECRETKEY with the secret key for the user. MinIO does not provide any method for retrieving the secret key once set.Specify a unique, random, and long string for both the ACCESSKEY and SECRETKEY. Your organization may have specific internal or regulatory requirements around generating values for use with access or secret keys.
After creating the user, use mc admin policy attach to associate a MinIO Policy Based Access Control to the new user. The following command assigns the built-in readwrite policy:
Replace USERNAME with the ACCESSKEY created in the previous step.
Use the mc admin user rm command to remove a user on a MinIO deployment:
A group is a collection of users. Each group can have one or more assigned policies that explicitly list the actions and resources to which group members are allowed or denied access.
For example, consider the following groups. Each group is assigned a built-in policy or supported policy action. Each group also has one or more assigned users. Each user’s total set of permissions consists of their explicitly assigned permission and the inherited permissions from each of their assigned groups. MinIO by default denies access to any resource or operation not explicitly allowed by a user’s assigned or inherited policies.
Group |
Policy |
Members |
|---|---|---|
|
readwrite on finance bucketreadonly on audit bucket |
|
|
readonly on audit bucket |
|
|
|
Groups provide a simplified method for managing shared permissions among users with common access patterns and workloads. Client’s cannot authenticate to a MinIO deployment using a group as an identity.
The mc admin group command supports the creation and management of groups on the MinIO deployment. See the command reference for examples of usage.
MinIO supports using an OpenID Connect (OIDC) compatible IDentity Provider (IDP) such as Okta, KeyCloak, Dex, Google, or Facebook for external management of user identities.
For identities managed by the external OpenID Connect (OIDC) compatible provider, MinIO can use either of two methods to assign policies to the authenticated user.
RoleArn specified in the authorization request to assign the policies attached to the provider’s RolePolicy.MinIO by default denies access to all actions or resources not explicitly allowed by a user’s assigned or inherited policies. Users managed by an OIDC provider must specify the necessary policies as part of the JWT claim. If the user JWT claim has no matching MinIO policies, that user has no permissions to access any action or resource on the MinIO deployment.
The specific claim which MinIO looks for is configured as part of deploying the cluster with OIDC identity management. This page focuses on creating MinIO policies to match the configured OIDC claims.
MinIO supports two OIDC authentication and authorization flows:
The RolePolicy flow sets the assigned policies for an authenticated user in the MinIO configuration.
MinIO recommends using the RolePolicy method for authenticating with an OpenID provider.
The JWT flow sets the assigned policies for an authenticated user as part of the OIDC configuration.
MinIO supports multiple OIDC provider configurations. However, you can configure only one JWT claim-based OIDC provider per deployment. All other providers must use RolePolicy.
With a RolePolicy, all clients which generate an STS credential using a given RoleArn receive the policy or policies associated to the RolePolicy configuration for that RoleArn.
You can use OpenID Policy Variables to create policies that programmatically manage what each individual user has access to.
The login flow for an application using OIDC credentials with a RolePolicy claim flow is as follows:
Create an OIDC Configuration.
Record the RoleArn assigned to the configuration either at time of creation or at MinIO start. Use this RoleArn with the AssumeRoleWithWebIdentity STS API.
Create a RolePolicy to use with the RoleArn. Use either the MINIO_IDENTITY_OPENID_ROLE_POLICY environment variable or the identity_openid role_policy configuration setting to define the list of policies to use for the provider
Users select the configured OIDC provider when logging in to MinIO.
Users complete authentication to the configured OIDC provider and redirect back to MinIO.
MinIO only supports the OpenID Authorization Code Flow. Authentication using Implicit Flow is not supported.
MinIO verifies the RoleArn in the API call and checks for the RolePolicy to use. Any authentication request with the RoleArn receives the same policy access permissions.
MinIO returns temporary credentials in the STS API response in the form of an access key, secret key, and session token. The credentials have permissions matching those policies specified in the RolePolicy.
Applications use the temporary credentials returned by the STS endpoint to perform authenticated S3 operations on MinIO.
Using JSON Web Tokens allows you to have individual assignment of policies. However, the use of web tokens also comes at the increased cost of managing multiple policies for separate claims.
The login flow for an application using OIDC credentials with a JSON Web Token Claim flow is as follows:
Authenticate to the configured OIDC provider and retrieve a JSON Web Token (JWT).
MinIO only supports the OpenID Authorization Code Flow. Authentication using Implicit Flow is not supported.
Specify the JWT to the MinIO Security Token Service (STS) AssumeRoleWithWebIdentity API endpoint.
MinIO verifies the JWT against the configured OIDC provider.
If the JWT is valid, MinIO checks for a claim specifying a list of one or more policies to assign to the authenticated user. MinIO defaults to checking the policy claim.
MinIO returns temporary credentials in the STS API response in the form of an access key, secret key, and session token. The credentials have permissions matching those policies specified in the JWT claim.
Applications use the temporary credentials returned by the STS endpoint to perform authenticated S3 operations on MinIO.
MinIO provides an example Go application web-identity.go that handles the full login flow.
MinIO uses the JWT token returned as part of the OIDC authentication flow to identify the specific policies to assign to the authenticated user.
You can use a JWT Debugging tool to decode the returned JWT token and validate that the user attributes include the required claims.
See RFC 7519: JWT Claim for more information on JWT claims.
Defer to the documentation for your preferred OIDC provider for instructions on configuring user claims.
Use the mc admin policy command to create policies that match one or more claim values.
The following table contains a list of supported policy variables for use in authorizing OIDC-managed users.
Each variable corresponds to a claim returned as part of the authenticated user’s JWT token:
| Variable | Description |
|---|---|
jwt:sub |
Returns the sub claim for the user. |
jwt:iss |
Returns the Issuer Identifier claim from the ID token. |
jwt:aud |
Returns the Audience claim from the ID token. |
jwt:jti |
Returns the JWT ID claim from the client authentication information. |
jwt:upn |
Returns the User Principal Name claim from the client authentication information. |
jwt:name |
Returns the name claim for the user. |
jwt:groups |
Returns the groups claim for the user. |
jwt:given_name |
Returns the given_name claim for the user. |
jwt:family_name |
Returns the family_name claim for the user. |
jwt:middle_name |
Returns the middle_name claim for the user. |
jwt:nickname |
Returns the nickname claim for the user. |
jwt:preferred_username |
Returns the preferred_username claim for the user. |
jwt:profile |
Returns the profile claim for the user. |
jwt:picture |
Returns the picture claim for the user. |
jwt:website |
Returns the website claim for the user. |
jwt:email |
Returns the email claim for the user. |
jwt:gender |
Returns the gender claim for the user. |
jwt:birthdate |
Returns the birthdate claim for the user. |
jwt:phone_number |
Returns the phone_number claim for the user. |
jwt:address |
Returns the address claim for the user. |
jwt:scope |
Returns the scope claim for the user. |
jwt:client_id |
Returns the client_id claim for the user. |
See the OpenID Connect Core 1.0 document for more information on these scopes. Your OIDC provider of choice may have more specific documentation.
For example, the following policy uses variables to substitute the authenticated user’s preferred_username as part of the Resource field such that the user can only access those prefixes which match their username:
MinIO replaces the ${jwt:preferred_username} variable in the Resource field with the value of the preferred_username in the JWT token. MinIO then evaluates the policy and grants or revokes access to the requested API and resource.
MinIO supports configuring a single Active Directory or LDAP (AD/LDAP) service for external management of user identities. Enabling AD/LDAP external identity management disables the MinIO internal IDP.
For identities managed by the external AD/LDAP provider, MinIO uses the user’s Distinguished Name and attempts to map it against an existing policy.
If the AD/LDAP configuration includes the necessary settings to query the user’s AD/LDAP group membership, MinIO also uses those group Distinguished Names and attempts to map each against an existing policy.
MinIO by default denies access to all actions or resources not explicitly allowed by a user’s assigned or inherited policies. Users managed by an AD/LDAP provider must specify the necessary policies as part of the user profile data. If no policies match either the user DN or group DNs, MinIO blocks all access to actions and resources on the deployment.
The specific AD/LDAP queries MinIO issues to authenticate the user and retrieve it’s group membership are configured as part of deploying the cluster with Active Directory / LDAP identity management. This page covers creation of MinIO policies to match the possible returned Distinguished Names.
The login flow for an application using Active Directory / LDAP credentials is as follows:
Specify the AD/LDAP credentials to the MinIO Security Token Service (STS) AssumeRoleWithLDAPIdentity API endpoint.
MinIO verifies the provided credentials against the AD/LDAP server.
MinIO checks for any policy whose name matches the user Distinguished Name (DN) and assigns that policy to the authenticated user.
If configured to perform group queries, MinIO also queries for a list of AD/LDAP groups in which the user has membership. MinIO checks for any policy whose name matches a returned group DN and assigns that policy to the authenticated user.
MinIO returns temporary credentials in the STS API response in the form of an access key, secret key, and session token. The credentials have permissions matching those policies whose name matches either the authenticated user DN or a group DN.
MinIO provides an example Go application ldap.go that handles the full login flow.
AD/LDAP users can alternatively create access keys associated to their AD/LDAP user Distinguished Name. Access Keys are long-lived credentials which inherit their privileges from the parent user. The parent user can further restrict those privileges while creating the access keys. Use either of the following methods to create a new access key:
Use the mc admin user svcacct add command to create the access keys. Specify the user Distinguished Name as the username to which to associate the access keys.
The following commands use mc idp ldap policy attach to associate an existing MinIO policy to an AD/LDAP User DN.
cn=sisko,cn=users,dc=example,dc=com the consoleAdmin policy, granting complete access to the MinIO server.cn=dax,cn=users,dc=example,dc=com both the readwrite and diagnostics policies, granting general read/write access to the MinIO server and access to diagnostic administrative operations.cn=quark,cn=users,dc=example,dc=com and deny all access to API operations.The following commands use mc idp ldap policy attach to associate an existing MinIO policy to an AD/LDAP Group DN.
cn=ops,cn=groups,dc=example,dc=com AD/LDAP group the consoleAdmin policy, granting complete access to the MinIO server.cn=engineering,cn=groups,dc=example,dc=com AD/LDAP group the diagnostics policy, granting access to diagnostic administrative operations.The MinIO Identity Management Plugin provides a REST interface for offloading authentication to an external identity manager through a webhook service.
Once enabled, client applications use the AssumeRoleWithCustomToken STS API extension to generate access tokens for MinIO. MinIO verifies this token by making a POST request to the configured plugin endpoint and uses the returned response to determine the authentication status of the client.
You can configure the MinIO Identity Management Plugin using the following environment variables or configuration settings:
Specify the following environment variables to each MinIO server in the deployment:
Set the following configuration settings using the mc admin config set command:
The login flow for an application is as follows:
Make a POST request using the AssumeRoleWithCustomToken API.
The request includes a token used by the configured external identity manager for authenticating the client.
MinIO makes a POST call to the configured identity plugin URL using the token specified to the STS API.
On successful authentication, the identity manager returns a 200 OK response with an application/json content-type and body with the following structure:
|
The owner of the requested credentials |
|
The maximum allowed expiry duration for the returned credentials |
|
A JSON string of |
MinIO returns a response to the STS API request that includes temporary credentials for use with making authenticated requests.
If the identity manager rejects the authentication request or otherwise encounters an error, the response must return a 403 FORBIDDEN HTTP status code with an application/json content-type and body with the following structure:
The "reason" field should include the reason for the 403.
Use the mc admin policy command to create policies that match one or more claim values.
MinIO uses Policy-Based Access Control (PBAC) to define the authorized actions and resources to which an authenticated user has access. Each policy describes one or more actions and conditions that outline the permissions of a user or group of users.
MinIO PBAC is built for compatibility with AWS IAM policy syntax, structure, and behavior. The MinIO documentation makes a best-effort to cover IAM-specific behavior and functionality. Consider deferring to the IAM documentation for more complete documentation on AWS IAM-specific topics.
The mc admin policy command supports creation and management of policies on the MinIO deployment. See the command reference for examples of usage.
Changed: RELEASE.2022-10-02T19-29-29Z
Policies can use conditions to limit a user’s access only to objects with a specific tag.
MinIO supports tag-based conditions for selected actions. s3:ExistingObjectTag/<key> evaluates tags stored on the target object when that API path loads the object metadata before authorization. s3:RequestObjectTag/<key> and s3:RequestObjectTagKeys are client-supplied request values, not evidence of stored object state. PutObject, CreateMultipartUpload, and PutObjectTagging explicitly bind them to the tag input those handlers consume; other action paths retain the historical X-Amz-Tagging Header mapping for compatibility, so use request-tag conditions only where the API actually consumes tags.
Bucket tags are separate from object tags. PutBucketTagging does not populate the s3:RequestObjectTag* condition keys from its XML body.
MinIO provides the following built-in policies for assigning to users or groups:
consoleAdmin
userpolicy
Grants complete access to all S3 and administrative API operations against all resources on the MinIO deployment. Equivalent to the following set of actions:
readonly
userpolicy
Grants read-only permissions on any object on the MinIO deployment. The GET action must apply to a specific object without requiring any listing. Equivalent to the following set of actions:
For example, this policy specifically supports GET operations on objects at a specific path (e.g. GET play/mybucket/object.file), such as:
The exclusion of listing permissions is intentional, as typical use cases do not intend for a “read-only” role to have complete discoverability (listing all buckets and objects) on the object storage resource.
readwrite
userpolicy
Grants read and write permissions for all buckets and objects on the MinIO server. Equivalent to s3:*.
diagnostics
userpolicy
Grants permission to perform diagnostic actions on the MinIO deployment. Specifically includes the following actions:
admin:ServerTraceadmin:Profilingadmin:ConsoleLogadmin:ServerInfoadmin:TopLocksInfoadmin:OBDInfoadmin:BandwidthMonitoradmin:Prometheuswriteonly
userpolicy
Grants write-only permissions to any namespace (bucket and path to object) the MinIO deployment. The PUT action must apply to a specific object location without requiring any listing. Equivalent to the s3:PutObject action.
Use mc admin policy attach to associate a policy to a user or group on a MinIO deployment.
For example, consider the following table of users. Each user is assigned a built-in policy or a supported action. The table describes a subset of operations a client could perform if authenticated as that user:
User |
Policy |
Operations |
|---|---|---|
|
readwrite on finance bucketreadonly on audit bucket |
PUT and GET on finance bucket.GET on audit bucket |
|
readonly on audit bucket |
|
|
All |
Each user can access only those resources and operations which are explicitly granted by the built-in role. MinIO denies access to any other resource or action by default.
Deny overrides Allow
MinIO follows the IAM policy evaluation rules where a Deny rule overrides Allow rule on the same action/resource. For example, if a user has an explicitly assigned policy with an Allow rule for an action/resource while one of its groups has an assigned policy with a Deny rule for that action/resource, MinIO would apply only the Deny rule.
For more information on IAM policy evaluation logic, see the IAM documentation on Determining Whether a Request is Allowed or Denied Within an Account.
MinIO policy documents use the same schema as AWS IAM Policy documents.
The following sample document provides a template for creating custom policies for use with a MinIO deployment. For more complete documentation on IAM policy elements, see the IAM JSON Policy Elements Reference.
The maximum size for any single policy document is 20KiB. There is no limit to the number of policy documents that can be attached to a user or group.
For the Statement.Action array, specify one or more supported S3 API operations.
For the Statement.Resource key, specify the bucket or bucket prefix to which to restrict the policy. You can use * and ? wildcard characters as per the S3 Resource Spec.
The * wildcard may result in unintended application of a policy to multiple buckets or prefixes based on the pattern match. For example, arn:aws:s3:::data* would match the buckets data, data_private, and data_internal. Specifying only * as the resource key applies the policy to all buckets and prefixes on the deployment.
An object pattern and a bucket ARN are not interchangeable. See Bucket and Object Resources.
For the Statement.Condition key, you can specify one or more supported Conditions.
A resource ARN either names a bucket or names objects within it, and the two forms authorize different operations:
arn:aws:s3:::mybucket names the bucket itself, and authorizes bucket-level operations such as ListBucket or PutBucketPolicy.arn:aws:s3:::mybucket/* names the objects in the bucket, and authorizes object operations such as GetObject or PutObject.Grant both when a principal needs both, which is the conventional form for a policy that manages a bucket and its contents:
Twelve bucket-level writes require the bucket ARN
An object-only pattern such as arn:aws:s3:::mybucket/* does not authorize the following actions, even when the statement grants s3:*:
PutBucketPolicy, DeleteBucketPolicy, PutBucketObjectLockConfiguration, PutBucketVersioning, PutReplicationConfiguration, PutLifecycleConfiguration, DeleteBucket, ForceDeleteBucket, PutBucketCors, DeleteBucketCors, PutBucketQOS, PutInventoryConfiguration
Each of these hands the caller something an object-scoped grant does not otherwise provide — access for other principals, defeat of a protection aimed at write-holders, activity that outlives the grant, or destruction of the bucket entity. Add the bare bucket ARN alongside the object pattern to grant them.
Earlier releases authorized these through the object pattern as well, because a bucket-level request was matched against the string mybucket/, which mybucket/* also matches. That was an over-grant; see upstream minio/minio#20449. Set MINIO_API_LEGACY_BUCKET_RESOURCE_MATCH to on to restore the previous behaviour while you adjust policies.
Everything else is unchanged. ListBucket, GetBucketLocation, the bucket configuration reads, and CreateBucket are still authorized through an object pattern, so listing and provisioning flows written that way keep working. Deny statements and NotResource exclusions match as they always did, so no restriction written against mybucket/* is weakened. The built-in readwrite, readonly, writeonly and diagnostics policies use arn:aws:s3:::* and are unaffected.
MinIO policy documents support a subset of IAM S3 Action keys. This section also includes any condition keys supported by a specific action beyond the common set of supported keys.
The following actions control access to common S3 operations. The remaining subsections document actions for more advanced S3 operations:
s3:*
policy-action
Selector for all MinIO S3 operations. Applying this action to a given resource allows the user to perform any S3 operation against that resource.
s3:CreateBucket
policy-action
Controls access to the CreateBucket S3 API operation.
s3:DeleteBucket
policy-action
Controls access to the DeleteBucket S3 API operation.
s3:ForceDeleteBucket
policy-action
Controls access to the DeleteBucket S3 API operation for operations with the x-minio-force-delete flag. Required for removing non-empty buckets.
s3:GetBucketLocation
policy-action
Controls access to the GetBucketLocation S3 API operation.
s3:ListAllMyBuckets
policy-action
Controls access to the ListBuckets S3 API operation.
s3:DeleteObject
policy-action
Controls access to the DeleteObject S3 API operation.
Supports the following additional condition key:
s3:GetObject
policy-action
Controls access to the GetObject S3 API operation.
Supports the following additional condition keys:
s3:GetObjectAttributes
policy-action
Controls access to the GetObjectAttributes S3 API operation.
The policy parser admits the following condition key for this action:
The current handler authorizes before it loads object metadata, however, so that condition value is absent for this operation.
s3:GetObjectVersionAttributes
policy-action
Controls access to the GetObjectAttributes S3 API operations on versioned objects.
Supports the following additional condition keys:
The version ID comes from the request query. The current handler authorizes before it loads object metadata, so s3:ExistingObjectTag/<key> is admitted by the policy parser but absent at evaluation time for this operation.
s3:RestoreObject
policy-action
Controls access to the RestoreObject S3 API operation.
s3:ListBucket
policy-action
Controls access to the ListObjectsV2 S3 API operation.
Supports the following additional condition keys:
s3:PutObject
policy-action
Controls access to the PutObject S3 API operation.
Supports the following additional condition keys:
s3:PutObjectTagging
policy-action
Controls access to the PutObjectTagging S3 API operation.
Supports the following additional condition keys:
s3:GetObjectTagging
policy-action
Controls access to the GetObjectTagging S3 API operation.
Supports the following additional condition keys:
s3:DeleteObjectTagging
policy-action
Controls access to the DeleteObjectTagging S3 API operation.
Supports the following additional condition keys:
s3:GetBucketPolicy
policy-action
Controls access to the GetBucketPolicy S3 API operation.
s3:PutBucketPolicy
policy-action
Controls access to the PutBucketPolicy S3 API operation.
s3:DeleteBucketPolicy
policy-action
Controls access to the DeleteBucketPolicy S3 API operation.
s3:GetBucketTagging
policy-action
Controls access to the GetBucketTagging S3 API operation.
s3:PutBucketTagging
policy-action
Controls access to the PutBucketTagging S3 API operation.
The policy parser retains the following condition keys for compatibility:
The handler does not populate them from the bucket-tagging XML body. Only the historical, client-supplied X-Amz-Tagging Header fallback can populate them, and that Header does not constrain the bucket tags stored from the body. Do not use these keys to enforce the contents of a PutBucketTagging request.
s3:GetBucketPolicyStatus
policy-action
Controls access to the GetBucketPolicyStatus S3 API operation.
s3:AbortMultipartUpload
policy-action
Controls access to the AbortMultipartUpload S3 API operation.
s3:ListMultipartUploadParts
policy-action
Controls access to the ListParts S3 API operation.
s3:ListBucketMultipartUploads
policy-action
Controls access to the ListMultipartUploads S3 API operation.
s3:PutBucketVersioning
policy-action
Controls access to the PutBucketVersioning S3 API operation.
s3:GetBucketVersioning
policy-action
Controls access to the GetBucketVersioning S3 API operation.
s3:DeleteObjectVersion
policy-action
Controls access to the DeleteObjectVersion S3 API operation.
Supports the following additional condition keys:
s3:ListBucketVersions
policy-action
Controls access to the ListBucketVersions S3 API operation.
Supports the following additional condition keys:
s3:PutObjectVersionTagging
policy-action
Controls access to the PutObjectVersionTagging S3 API operation.
Supports the following additional condition keys:
s3:GetObjectVersionTagging
policy-action
Controls access to the GetObjectVersionTagging S3 API operation.
Supports the following additional condition keys:
s3:DeleteObjectVersionTagging
policy-action
Controls access to the DeleteObjectVersionTagging S3 API operation.
Supports the following additional condition keys:
s3:GetObjectVersion
policy-action
Controls access to the GetObjectVersion S3 API operation.
Supports the following additional condition keys:
s3:BypassGovernanceRetention
policy-action
Controls access to the following S3 API operations on objects locked under GOVERNANCE retention mode:
s3:PutObjectRetentions3:PutObjects3:DeleteObjectSee the S3 documentation on s3:BypassGovernanceRetention for more information.
Supports the following additional condition keys:
s3:PutObjectRetention
policy-action
Controls access to the PutObjectRetention S3 API operation.
Required for any PutObject operation that specifies retention metadata.
Supports the following additional condition keys:
s3:GetObjectRetention
policy-action
Controls access to the GetObjectRetention S3 API operation.
Required for including object locking metadata as part of the response to a GetObject or HeadObject operation.
Supports the following additional condition keys:
s3:GetObjectLegalHold
policy-action
Controls access to the GetObjectLegalHold S3 API operation.
Required for including object locking metadata as part of the response to a GetObject or HeadObject operation.
s3:PutObjectLegalHold
policy-action
Controls access to the PutObjectLegalHold S3 API operation.
Required for any PutObject operation that specifies legal hold metadata.
Supports the following additional condition keys:
s3:GetBucketObjectLockConfiguration
policy-action
Controls access to the GetObjectLockConfiguration S3 API operation.
s3:PutBucketObjectLockConfiguration
policy-action
Controls access to the PutObjectLockConfiguration S3 API operation.
s3:GetBucketNotification
policy-action
Controls access to the GetBucketNotification S3 API operation.
s3:PutBucketNotification
policy-action
Controls access to the PutBucketNotification S3 API operation.
s3:ListenNotification
policy-action
MinIO Extension for controlling API operations related to MinIO Bucket Notifications.
This action is not intended for use with other S3-compatible services.
s3:ListenBucketNotification
policy-action
MinIO Extension for controlling API operations related to MinIO Bucket Notifications.
This action is not intended for use with other S3-compatible services.
s3:PutLifecycleConfiguration
policy-action
Controls access to the PutLifecycleConfiguration S3 API operation.
s3:GetLifecycleConfiguration
policy-action
Controls access to the GetLifecycleConfiguration S3 API operation.
s3:PutEncryptionConfiguration
policy-action
Controls access to the PutEncryptionConfiguration S3 API operation.
s3:GetEncryptionConfiguration
policy-action
Controls access to the GetEncryptionConfiguration S3 API operation.
s3:GetReplicationConfiguration
policy-action
Controls access to the GetBucketReplication S3 API operation.
s3:PutReplicationConfiguration
policy-action
Controls access to the PutBucketReplication S3 API operation.
s3:ReplicateObject
policy-action
MinIO Extension for controlling API operations related to Server-Side Bucket Replication.
Required for MinIO server-side replication.
Supports the following additional condition keys:
s3:ReplicateDelete
policy-action
MinIO Extension for controlling API operations related to Server-Side Bucket Replication.
Required for synchronizing delete operations as part of MinIO server-side replication.
Supports the following additional condition keys:
s3:ReplicateTags
policy-action
MinIO Extension for controlling API operations related to Server-Side Bucket Replication.
Required for MinIO server-side replication.
Supports the following additional condition keys:
s3:GetObjectVersionForReplication
policy-action
MinIO Extension for controlling API operations related to Server-Side Bucket Replication.
Required for MinIO server-side replication.
Supports the following additional condition keys:
MinIO policy documents support IAM conditional statements.
Each condition element consists of operators and condition keys. MinIO supports a subset of IAM condition keys. For complete information on any listed condition key, see the IAM Condition Element Documentation
MinIO supports the following condition keys for all supported actions:
aws:Refereraws:SourceIpaws:UserAgentaws:SecureTransportaws:CurrentTimeaws:EpochTimeaws:PrincipalTypeaws:useridaws:usernames3:x-amz-content-sha256s3:signatureAgeWarning
The aws:Referer, aws:SourceIp, and aws:UserAgent keys may be spoofed and therefore pose a potential security risk. aws:SourceIp is only as trustworthy as the proxy boundary that supplies or overwrites forwarding headers. MinIO recommends only using these condition keys to deny access as a secondary security measure.
Never use these three keys to grant access by themselves.
Unreleased server behavior (as of 2026-08-03)
The table below describes behavior after companion server change 1a6d5b415. That change is present only on the local pgsty/minio branch: it is not on public origin/master, and the latest published server release (RELEASE.2026-08-04T00-00-00Z) does not contain it. Published builds retain the previous behavior. Verify the server release notes before relying on these precedence guarantees.
Silo constructs the condition-value map from semantic request sources instead of treating every header and query parameter as interchangeable. A raw header or query parameter whose name resembles an internal condition key cannot replace a value calculated by the server or create one that the server did not provide.
| Condition family | Source used for policy evaluation | Precedence and compatibility |
|---|---|---|
Identity, time, transport, authentication, s3:versionid, s3:LocationConstraint, LDAP, and JWT values |
Authenticated credentials and claims, the server clock and transport, or the API field parsed for that operation | Same-named raw headers and query parameters cannot add or replace these values. aws:Referer and aws:UserAgent remain client-controlled by definition; see the warning above for aws:SourceIp. |
s3:signatureAge |
Elapsed time calculated by the SigV4 presigned-request verifier | Available only for a verified SigV4 presigned request. A client-supplied x-amz-signature-age Header on any other request type is ignored. |
s3:prefix, s3:delimiter, s3:max-keys |
Query string only | A similarly named request header is ignored for these list conditions. |
s3:x-amz-content-sha256, s3:x-amz-copy-source, s3:x-amz-metadata-directive, and server-side-encryption keys |
Their corresponding HTTP headers only | Query-string substitutes do not satisfy these conditions. In particular, the X-Amz-Content-Sha256 query value used while verifying a presigned request is not exposed as the policy condition value. |
s3:x-amz-storage-class |
X-Amz-Storage-Class header, with a compatible query-string fallback |
Header presence wins even when the header value is empty. The query form remains available for compatibility with existing upload paths. |
s3:RequestObjectTag/<key> and s3:RequestObjectTagKeys |
The X-Amz-Tagging Header by default; an explicitly supplied effective tag set on tag-aware handlers |
PutObject and CreateMultipartUpload accept the Header or their compatible query fallback, with Header presence winning. PutObjectTagging uses the parsed XML request body. Query tagging is ignored on unrelated operations. The historical Header fallback remains for compatibility on actions whose policy map admits these keys, so outside the three handlers above a request-tag condition does not by itself prove that the operation consumes or stores those tags. |
s3:ExistingObjectTag/<key> |
Tags loaded from the stored target object | Request headers and query parameters never provide existing-object tags. The value is available only on API paths that load those tags before authorization, including object GET/HEAD and object-tagging handlers. |
| Object-lock condition keys | Object-lock request headers or retention values calculated by the handler | Query-string fields with the same names are ignored. |
If an API path does not load or calculate a listed source, that condition key is absent. Its result then follows the semantics of the policy operator in use; do not assume that merely listing a key for an action causes the server to synthesize a value.
For additional keys supported by a specific S3 action, see the reference documentation for that action.
MinIO extends the S3 standard condition keys with the following extended key:
sts:DurationSeconds
NoteAdded: MinIO
SERVER RELEASE.2024-02-06T21-36-22Z
Specify a time in seconds to limit the duration of all Security Token Service credentials generated by AssumeRoleWithWebIdentity.
This value overrides the
DurationSecondsfield specified to the client.For example:
mc admin Policy Action Keys
MinIO supports the following actions for use with defining policies for mc admin operations. These actions are only valid for MinIO deployments and are not intended for use with other S3-compatible services:
admin:*
policy-action
Selector for all admin action keys.
admin:Heal
policy-action
Allows heal command
admin:StorageInfo
policy-action
Allows listing server info
admin:DataUsageInfo
policy-action
Allows listing data usage info
admin:TopLocksInfo
policy-action
Allows listing top locks
admin:Profiling
policy-action
Allows profiling
admin:ServerTrace
policy-action
Allows listing server trace
admin:ConsoleLog
policy-action
Allows listing console logs on terminal
admin:KMSCreateKey
policy-action
Allows creating a new KMS master key
While this option is still supported, kms:CreateKey is preferred.
admin:KMSKeyStatus
policy-action
Allows getting KMS key status
While this option is still supported, kms:KeyStatus is preferred.
admin:ServerInfo
policy-action
Allows listing server info
admin:OBDInfo
policy-action
Allows obtaining cluster on-board diagnostics
admin:ServerUpdate
policy-action
Allows MinIO binary update
admin:ServiceRestart
policy-action
Allows restart of MinIO service.
admin:ServiceStop
policy-action
Allows stopping MinIO service.
admin:ConfigUpdate
policy-action
Allows MinIO config management
admin:CreateUser
policy-action
Allows creating MinIO user
admin:DeleteUser
policy-action
Allows deleting MinIO user
admin:ListUsers
policy-action
Allows list users permission
admin:EnableUser
policy-action
Allows enable user permission
admin:DisableUser
policy-action
Allows disable user permission
admin:GetUser
policy-action
Allows GET permission on user info
admin:AddUserToGroup
policy-action
Allows adding user to group permission
admin:RemoveUserFromGroup
policy-action
Allows removing user to group permission
admin:GetGroup
policy-action
Allows getting group info
admin:ListGroups
policy-action
Allows list groups permission
admin:EnableGroup
policy-action
Allows enable group permission
admin:DisableGroup
policy-action
Allows disable group permission
admin:CreatePolicy
policy-action
Allows create policy permission
admin:DeletePolicy
policy-action
Allows delete policy permission
admin:GetPolicy
policy-action
Allows get policy permission
admin:AttachUserOrGroupPolicy
policy-action
Allows attaching a policy to a user/group
admin:ListUserPolicies
policy-action
Allows listing user policies
admin:CreateServiceAccount
policy-action
Allows creating MinIO Access Key
admin:UpdateServiceAccount
policy-action
Allows updating MinIO Access Key
admin:RemoveServiceAccount
policy-action
Allows deleting MinIO Access Key
admin:ListServiceAccounts
policy-action
Allows listing MinIO Access Key
admin:SetBucketQuota
policy-action
Allows setting bucket quota
admin:GetBucketQuota
policy-action
Allows getting bucket quota
admin:SetBucketTarget
policy-action
Allows setting bucket target
admin:GetBucketTarget
policy-action
Allows getting bucket targets
admin:SetTier
policy-action
Allows creating and modifying remote storage tiers using the mc ilm tier commands.
admin:ListTier
policy-action
Allows listing configured remote storage tiers using the mc ilm tier commands.
admin:BandwidthMonitor
policy-action
Allows retrieving metrics related to current bandwidth consumption.
admin:Prometheus
policy-action
Allows access to MinIO metrics. Only required if MinIO requires authentication for scraping metrics.
admin:ListBatchJobs
policy-action
Allows access to list the active batch jobs.
admin:DescribeBatchJob
policy-action
Allows access to the see the definition details of a running batch job.
admin:StartBatchJob
policy-action
Allows user to begin a batch job run.
admin:CancelBatchJob
policy-action
Allows user to stop a batch job currently in process.
admin:Rebalance
policy-action
Allows access to start, query, or stop a rebalancing of objects across pools with varying free storage space.
MinIO supports restricting key management service (KMS) actions by policy.
You can restrict KMS activities in a policy with any of the following KMS actions:
kms:Status
policy-action
Check the status of KMS.
kms:Metrics
policy-action
Obtain Prometheus-formatted metrics.
kms:API
policy-action
List supported API endpoints.
kms:Version
policy-action
Retrieve the KMS version.
kms:CreateKey
policy-action
Create a new KMS key.
kms:ListKeys
policy-action
Retrieve a list of existing KMS keys.
kms:KeyStatus
policy-action
Retrieve the status of a specified KMS key.
To select all of the available kms policy actions, use kms:*.
Changed: RELEASE.2024-07-16T23-46-41Z
KMS actions can be restricted by resource or a resource prefix. The wildcard character * can be used to apply the KMS action policy to all resources that match the prefix.
For example, the following policy document allows a user to list keys, create new keys, and check the status of keys for any resource that begins with keys-abc- or myuser-.
mc admin Policy Condition Keys
MinIO supports the following conditions for use with defining policies for mc admin actions.
aws:Refereraws:SourceIpaws:UserAgentaws:SecureTransportaws:CurrentTimeaws:EpochTimeFor complete information on any listed condition key, see the IAM Condition Element Documentation.
MinIO supports using policy variables for automatically substituting context from the authenticated user and/or the operation into the user’s assigned policy or policies. Use the ${POLICYVARIABLE} format to specify the variable to the policy as part of the Condition or Resource definition. MinIO policy variables function similarly to AWS IAM policy elements: Variables and tags.
Each MinIO identity provider supports its own set of policy variables:
The following table contains a list of recommended policy variables for use in authorizing MinIO-managed users:
| Variable | Description |
|---|---|
| aws:referrer | The referrer in the HTTP header for the authenticated API call. |
| aws:SourceIp | The source IP in the HTTP header for the authenticated API call. |
| aws:username | The name of the user associated with the authenticated API call. |
For example, the following policy uses variables to substitute the authenticated user’s username as part of the Resource field such that the user can only access those prefixes which match their username:
MinIO replaces the ${aws:username} variable in the Resource field with the username. MinIO then evaluates the policy and grants or revokes access to the requested API and resource.
The following table contains a list of supported policy variables for use in authorizing OIDC-managed users.
Each variable corresponds to a claim returned as part of the authenticated user’s JWT token:
| Variable | Description |
|---|---|
jwt:sub |
Returns the sub claim for the user. |
jwt:iss |
Returns the Issuer Identifier claim from the ID token. |
jwt:aud |
Returns the Audience claim from the ID token. |
jwt:jti |
Returns the JWT ID claim from the client authentication information. |
jwt:upn |
Returns the User Principal Name claim from the client authentication information. |
jwt:name |
Returns the name claim for the user. |
jwt:groups |
Returns the groups claim for the user. |
jwt:given_name |
Returns the given_name claim for the user. |
jwt:family_name |
Returns the family_name claim for the user. |
jwt:middle_name |
Returns the middle_name claim for the user. |
jwt:nickname |
Returns the nickname claim for the user. |
jwt:preferred_username |
Returns the preferred_username claim for the user. |
jwt:profile |
Returns the profile claim for the user. |
jwt:picture |
Returns the picture claim for the user. |
jwt:website |
Returns the website claim for the user. |
jwt:email |
Returns the email claim for the user. |
jwt:gender |
Returns the gender claim for the user. |
jwt:birthdate |
Returns the birthdate claim for the user. |
jwt:phone_number |
Returns the phone_number claim for the user. |
jwt:address |
Returns the address claim for the user. |
jwt:scope |
Returns the scope claim for the user. |
jwt:client_id |
Returns the client_id claim for the user. |
See the OpenID Connect Core 1.0 document for more information on these scopes. Your OIDC provider of choice may have more specific documentation.
For example, the following policy uses variables to substitute the authenticated user’s preferred_username as part of the Resource field such that the user can only access those prefixes which match their username:
MinIO replaces the ${jwt:preferred_username} variable in the Resource field with the value of the preferred_username in the JWT token. MinIO then evaluates the policy and grants or revokes access to the requested API and resource.
The following table contains a list of supported policy variables for use in authorizing AD/LDAP users:
Variable |
Description |
|---|---|
|
The simple username (name) for the authenticated user.This is distinct from the user’s DistinguishedName or CommonName. |
|
The Distinguished Name used by the authenticated user. |
|
The Group Distinguished Name for the authenticated user. |
For example, the following policy uses variables to substitute the authenticated user’s name as part of the Resource field such that the user can only access those prefixes which match their name:
MinIO replaces the ${ldap:username} variable in the Resource field with the value of the authenticated user’s name. MinIO then evaluates the policy and grants or revokes access to the requested API and resource.
The MinIO Access Management Plugin provides a REST interface for offloading authorization through a webhook service.
Once enabled, MinIO sends the request and credential details for every API call to the configured external HTTP(S) endpoint and looks for a response of ALLOW or DENY. MinIO can therefore delegate the access management to the external system instead of relying on S3 policy based access control.
You can configure the MinIO External Access Management Plugin using the following environment variables or configuration settings.
Specify the following environmental variables to each MinIO server in the deployment:
Set the following configuration settings using the mc admin config set command:
The login flow for an application is as follows:
POST call to the configured access management plugin URL which includes the context of the API call and authentication data200 OK response with a JSON body of either result true or "result" : { "allow" : true }:If the access manager rejects the authorization request, MinIO automatically blocks and denies the API call.
The following JSON resembles the request body sent as part of the POST to the configured access manager webhook.
MinIO requires the response body from the Access Management service meet one of the two following formats:
MinIO Server-Side Encryption (SSE) protects objects as part of write operations, allowing clients to take advantage of server processing power to secure objects at the storage layer (encryption-at-rest). SSE also provides key functionality to regulatory and compliance requirements around secure locking and erasure.
MinIO SSE uses the MinIO Key Encryption Service (KES) and an external Key Management Service (KMS) for performing secured cryptographic operations at scale. MinIO also supports client-managed key management, where the application takes full responsibility for creating and managing encryption keys for use with MinIO SSE.
MinIO SSE is feature and API compatible with AWS Server-Side Encryption and supports the following encryption strategies:
MinIO supports enabling automatic SSE-KMS encryption of all objects written to a bucket using a specific External Key (EK) stored on the external KMS. Clients can override the bucket-default EK by specifying an explicit key as part of the write operation.
For buckets without automatic SSE-KMS encryption, clients can specify an EK as part of the write operation instead.
MinIO encrypts backend data as part of enabling server-side encryption. You cannot disable SSE-KMS encryption once enabled.
SSE-KMS provides more granular and customizable encryption compared to SSE-S3 and SSE-C and is recommended over the other supported encryption methods.
For a tutorial on enabling SSE-KMS in a local (non-production) MinIO Deployment, see Quickstart. For production MinIO deployments, use one of the following guides:
MinIO supports enabling automatic SSE-S3 encryption of all objects written to a bucket using an EK stored on the external KMS. MinIO SSE-S3 supports one EK for the entire deployment.
For buckets without automatic SSE-S3 encryption, clients can request SSE encryption as part of the write operation instead.
MinIO encrypts backend data as part of enabling server-side encryption. You cannot disable SSE-KMS encryption once enabled.
For a tutorial on enabling SSE-s3 in a local (non-production) MinIO Deployment, see Quickstart. For production MinIO deployments, use one of the following guides:
Clients specify an EK as part of the write operation for an object. MinIO uses the specified EK to perform SSE-S3.
SSE-C does not support bucket-default encryption settings and requires clients perform all key management operations.
MinIO SSE requires enabling Network Encryption (TLS).
MinIO requires access to the Encryption Key (EK) and external Key Management System (KMS) used as part of SSE operations to decrypt an object. You can use this dependency to securely erase and lock objects from access by disabling access to the EK or KMS used for encryption.
General strategies include, but are not limited to:
Seal the KMS such that it cannot be accessed by MinIO server anymore. This locks all SSE-KMS or SSE-S3 encrypted objects protected by any EK stored on the KMS. The encrypted objects remain unreadable as long as the KMS remains sealed.
Seal/Unmount an EK. This locks all SSE-KMS or SSE-S3 encrypted objects protected by that EK. The encrypted objects remain unreadable as long as the CMK(s) remains sealed.
Delete an EK. This renders all SSE-KMS or SSE-S3 encrypted objects protected by that EK as permanently unreadable. The combination of deleting an EK and deleting the data may fulfill regulatory requirements around secure deletion of data.
Deleting an EK is typically irreversible. Exercise extreme caution before intentionally deleting a master key.
For more information, see:
MinIO Server-Side Encryption (SSE) protects objects as part of write operations, allowing clients to take advantage of server processing power to secure objects at the storage layer (encryption-at-rest). SSE also provides key functionality to regulatory and compliance requirements around secure locking and erasure.
MinIO SSE uses the MinIO Key Encryption Service (KES) and a supported external Key Management Service (KMS) for performing secured cryptographic operations at scale. MinIO also supports client-managed key management, where the application takes full responsibility for creating and managing encryption keys for use with MinIO SSE.
MinIO SSE-KMS encrypts or decrypts objects using an External Key (EK) managed by a Key Management System (KMS). Each bucket and object can have a separate EK, supporting more granular cryptographic operations in the deployment. MinIO can only decrypt an object if it can access both the KMS and the EK used to encrypt that object.
You can enable bucket-default SSE-KMS encryption using the mc encrypt set command:
EXTERNALKEY with the name of the EK to use for encrypting objects in the bucket.play/mybucket with the alias and bucket on which you want to enable automatic SSE-KMS encryption.MinIO SSE-KMS is functionally compatible with AWS S3 Server-Side Encryption with KMS keys stored in AWS while expanding support to include the following KMS providers:
Important
Enabling SSE on a MinIO deployment automatically encrypts the backend data for that deployment using the default encryption key.
MinIO requires access to KES and the external KMS to decrypt the backend and start normally. The KMS must maintain and provide access to the MINIO_KMS_KES_KEY_NAME. You cannot disable KES later or “undo” the SSE configuration at a later point.
The following procedure uses the play MinIO KES sandbox for supporting SSE with SSE-KMS in evaluation and early development environments.
For extended development or production environments, use one of the following supported external Key Management Services (KMS):
Important
The MinIO KES Play sandbox is public and grants root access to all created External Keys (EK). Any EK stored on the Play sandbox may be accessed or destroyed at any time, rendering protected data vulnerable or permanently unreadable.
Play sandbox to protect data you cannot afford to lose or reveal.Play sandbox for production environments.This procedure requires the following components:
mc on a machine with network access to the source deployment. See the mc Installation Quickstart for instructions on downloading and installing mc.kes Getting Started guide for instructions on downloading, installing, and configuring KES.Use the kes command line tool to create a new External Key (EK) for use with SSE-KMS Encryption.
The following command retrieves the root identity for the play KES server:
Set the following environment variables in the terminal or shell:
|
The private key for an identity on the KES server.
The identity must grant access to at minimum the |
|
The corresponding certificate for the identity on the KES server.
This step uses the |
The following command creates a new EK through KES.
This tutorial uses the example my-minio-sse-kms-key name for ease of reference. Specify a unique key name to prevent collision with existing keys.
Specify the following environment variables in the shell or terminal on each MinIO server host in the deployment:
Note
An API key is the preferred way to authenticate with the KES server, as it provides a streamlined and secure authentication process to the KES server.
Alternatively, specify the MINIO_KMS_KES_KEY_FILE and MINIO_KMS_KES_CERT_FILE instead of MINIO_KMS_KES_API_KEY.
API keys are mutually exclusive with certificate-based authentication. Specify either the API key variable or the Key File and Cert File variables.
The documentation on this site uses API keys.
The endpoint for the MinIO |
|
The API key generated by KES for the MinIO deployment. The identity of the API key must grant permission to create, generate, and decrypt keys. The API key is the preferred way to authenticate with the KES server.
If circumstances require it, specify the |
|
The name of the External Key (EK) to use for performing SSE encryption operations. KES retrieves the EK from the configured Key Management Service (KMS). Specify the name of the key created in the previous step. |
You must restart the MinIO deployment to apply the configuration changes. Use the mc admin service restart command to restart the deployment.
Replace ALIAS with the alias of the deployment to restart.
Use the mc encrypt set command to enable automatic SSE-KMS protection of all objects written to a specific bucket.
ALIAS with the alias of the MinIO deployment on which you enabled SSE-KMS.BUCKET with the full path to the bucket or bucket prefix on which you want to enable automatic SSE-KMS.Objects written to the specified bucket are automatically encrypted using the specified EK.
Repeat this step for each bucket on which you want to enable automatic SSE-KMS encryption. You can generate additional keys per bucket or bucket prefix, such that the scope of each EK is limited to a subset of objects.
SSE-KMS protects objects using an EK specified either as part of the bucket automatic encryption settings or as part of the write operation. MinIO therefore requires access to that EK for decrypting that object.
The scope of a single EK depends on:
For example, consider a MinIO deployment using one EK per bucket. Disabling a single EK renders all objects in the associated bucket unreadable without affecting other buckets. If the deployment instead used one EK for all objects and buckets, disabling that EK renders all objects in the deployment unreadable.
Note
This section describes MinIO internal logic and functionality. This information is purely educational and is not a prerequisite for configuring or implementing any MinIO feature.
SSE-KMS uses an External Key (EK) managed by the configured Key Management System (KMS) for performing cryptographic operations and protecting objects. The table below describes each stage of the encryption process:
Stage |
Description |
|---|---|
SSE-Enabled Write Operation |
MinIO receives a write operation requesting SSE-KMS encryption. The write operation must have an associated External Key (EK) to use for encrypting the object.
|
Generate the Data Encryption Key (DEK) |
MinIO generates a Data Encryption Key (DEK) using the EK. Specifically, MinIO Key Encryption Service (KES) requests a new cryptographic key from the KMS using the EK as the “root” key. KES returns both the plain-text and an EK-encrypted representation of the DEK. MinIO stores the encrypted representation as part of the object metadata. |
Generate the Key Encryption Key (KEK) |
MinIO uses a deterministic algorithm to generate a 256-bit unique Key Encryption Key (KEK). The key-derivation algorithm uses a pseudo-random function that takes the plain-text DEK, a randomly generated initialization vector, and a context consisting of values like the bucket and object name. MinIO generates the KEK at the time of each cryptographic encryption or decryption operation and never stores the KEK to a drive. |
Generate the Object Encryption Key (OEK) |
MinIO generates a random 256-bit unique Object Encryption Key (OEK) and uses that key to encrypt the object. MinIO never stores the plaintext representation of the OEK on a drive. The plaintext OEK resides in RAM during cryptographic operations. |
Encrypt the Object |
MinIO uses the OEK to encrypt the object prior to storing the object to the drive. MinIO then encrypts the OEK with the KEK. MinIO stores the encrypted representation of the OEK and DEK as part of the metadata. |
For read operations, MinIO decrypts the object by retrieving the EK to decrypt the DEK. MinIO then regenerates the KEK, decrypts the OEK, and decrypts the object.
MinIO Server-Side Encryption (SSE) protects objects as part of write operations, allowing clients to take advantage of server processing power to secure objects at the storage layer (encryption-at-rest). SSE also provides key functionality to regulatory and compliance requirements around secure locking and erasure.
MinIO SSE uses the MinIO Key Encryption Service (KES) and an external Key Management Service (KMS) for performing secured cryptographic operations at scale. MinIO also supports client-managed key management, where the application takes full responsibility for creating and managing encryption keys for use with MinIO SSE.
MinIO SSE-S3 en/decrypts objects using an External Key (EK) managed by a Key Management System (KMS). You must specify the EK using the MINIO_KMS_KES_KEY_NAME environment variable when starting up the MinIO server. MinIO uses the same EK for all SSE-S3 cryptographic operations.
You can enable bucket-default SSE-S3 encryption using the mc encrypt set command:
play/mybucket with the alias and bucket on which you want to enable automatic SSE-KMS encryption.MinIO SSE-S3 is functionally compatible with AWS S3 Server-Side Encryption with Amazon S3-Managed Keys while expanding support to include the following KMS providers:
Important
Enabling SSE on a MinIO deployment automatically encrypts the backend data for that deployment using the default encryption key.
MinIO requires access to KES and the external KMS to decrypt the backend and start normally. The KMS must maintain and provide access to the MINIO_KMS_KES_KEY_NAME. You cannot disable KES later or “undo” the SSE configuration at a later point.
The following procedure uses the play MinIO KES sandbox for supporting SSE with SSE-S3 in evaluation and early development environments.
For extended development or production environments, use one of the following supported external Key Management Services (KMS):
Important
The MinIO KES Play sandbox is public and grants root access to all created External Keys (EK). Any EK stored on the Play sandbox may be accessed or destroyed at any time, rendering protected data vulnerable or permanently unreadable.
Play sandbox to protect data you cannot afford to lose or reveal.Play sandbox for production environments.This procedure requires the following components:
mc on a machine with network access to the source deployment. See the mc Installation Quickstart for instructions on downloading and installing mc.Use the kes command line tool to create a new External Key (EK) for use with SSE-S3 Encryption.
The following command retrieves the root identity for the KES server connected to the KES play sandbox:
Set the following environment variables in the terminal or shell:
|
The private key for an identity on the KES server.
The identity must grant access to at minimum the |
|
The corresponding certificate for the identity on the KES server.
This step uses the |
The following command creates a new EK through the KES CLI:
This tutorial uses the example my-minio-sse-s3-key name for ease of reference. Specify a unique key name to prevent collision with existing keys.
Specify the following environment variables in the shell or terminal on each MinIO server host in the deployment:
Note
An API key is the preferred way to authenticate with the KES server, as it provides a streamlined and secure authentication process to the KES server.
Alternatively, specify the MINIO_KMS_KES_KEY_FILE and MINIO_KMS_KES_CERT_FILE instead of MINIO_KMS_KES_API_KEY.
API keys are mutually exclusive with certificate-based authentication. Specify either the API key variable or the Key File and Cert File variables.
The documentation on this site uses API keys.
The endpoint for the MinIO |
|
The private key file corresponding to an
identity
on the KES service. The identity must grant permission to
create, generate, and decrypt keys. Specify the same
identity key file as the |
|
The public certificate file corresponding to an
identity
on the KES service. The identity must grant permission to
create, generate, and decrypt keys. Specify the same
identity certificate as the |
|
The name of the External Key (EK) to use for performing SSE encryption operations. KES retrieves the EK from the configured Key Management System (KMS). Specify the name of the key created in the previous step. |
You must restart the MinIO deployment to apply the configuration changes. Use the mc admin service restart command to restart the deployment.
Replace ALIAS with the alias of the deployment to restart.
Optional
You can skip this step if you intend to use only client-driven SSE-S3.
Use the mc encrypt set command to enable automatic SSE-S3 protection of all objects written to a specific bucket.
ALIAS with the alias of the MinIO deployment on which you enabled SSE-S3.BUCKET with the full path to the bucket or bucket prefix on which you want to enable automatic SSE-S3.SSE-S3 protects objects using an EK specified at server startup using the MINIO_KMS_KES_KEY_NAME environment variable. MinIO therefore requires access to that EK for decrypting that object.
The scope of the EK depends on:
Note
The following section describes MinIO internal logic and functionality. This information is purely educational and is not necessary for configuring or implementing any MinIO feature.
SSE-S3 uses an External Key (EK) managed by the configured Key Management System (KMS) for performing cryptographic operations and protecting objects. The table below describes each stage of the encryption process:
Stage |
Description |
|---|---|
SSE-Enabled Write Operation |
MinIO receives a write operation requesting SSE-S3 encryption.
MinIO uses the key name specified to
|
Generate the Data Encryption Key (DEK) |
MinIO generates a Data Encryption Key (DEK) using the EK. Specifically, MinIO Key Encryption Service (KES) requests a new cryptographic key from the KMS using the EK as the “root” key. KES returns both the plain-text and an EK-encrypted representation of the DEK. MinIO stores the encrypted representation as part of the object metadata. |
Generate the Key Encryption Key (KEK) |
MinIO uses a deterministic algorithm to generate a 256-bit unique Key Encryption Key (KEK). The key-derivation algorithm uses a pseudo-random function that takes the plain-text DEK, a randomly generated initialization vector, and a context consisting of values like the bucket and object name. MinIO generates the KEK at the time of each cryptographic encryption or decryption operation and never stores the KEK to a drive. |
Generate the Object Encryption Key (OEK) |
MinIO generates a random 256-bit unique Object Encryption Key (OEK) and uses that key to encrypt the object. MinIO never stores the plaintext representation of the OEK on a drive. The plaintext OEK resides in RAM during cryptographic operations. |
Encrypt the Object |
MinIO uses the OEK to encrypt the object prior to storing the object to a drive. MinIO then encrypts the OEK with the KEK. MinIO stores the encrypted representation of the OEK and DEK as part of the metadata. |
MinIO Server-Side Encryption (SSE) protects objects as part of write operations, allowing clients to take advantage of server processing power to secure objects at the storage layer (encryption-at-rest). SSE also provides key functionality to regulatory and compliance requirements around secure locking and erasure.
The procedure on this page configures and enables Server-Side Encryption with Client-Managed Keys (SSE-C). MinIO SSE-C supports client-driven encryption of objects before writing the object to the drive. Clients must specify the correct key to decrypt objects for read operations.
MinIO SSE-C is functionally compatible with Amazon Server-Side Encryption with Customer-Provided Keys.
SSE-C protects objects using an EK specified by the client as part of the write operation. Assuming the client-side key management supports disabling or deleting these keys:
Disabling the EK temporarily locks any objects encrypted using that
EK by rendering them unreadable. You can later enable the EK to resume normal read operations on those objects.
Deleting the EK renders all objects encrypted by that EK
permanently unreadable. If the client-side KMS does not support backups of the EK, this process is irreversible.
The scope of a single EK depends on the number of write operations which specified that EK when requesting SSE-C encryption.
Changed: Server
RELEASE.2024-03-30T09-41-56Z
Objects encrypted with SSE-C can replicate through both site replication or bucket replication. Previous versions of MinIO Object Store did not replicate SSE-C encrypted objects.
SSE-C encrypted objects that are compressed are not compatible with MinIO bucket replication or site replication. Use SSE-KMS or SSE-S3 to ensure encrypted objects are compatible with replication.
Encrypting an object using SSE-C prevents MinIO from applying SSE-KMS or SSE-S3 encryption to that object.
MinIO SSE-C requires the client to perform all key creation and storage operations.
This procedure uses mc for performing operations on the source MinIO deployment. Install mc on a machine with network access to the source deployment. See the mc Installation Quickstart for instructions on downloading and installing mc.
The SSE-C key must be a 256-bit raw encoded string or a hex encoded string. The client application is responsible for generation and storage of the encryption key. MinIO does not store SSE-C encryption keys and cannot decrypt SSE-C encrypted objects without the client-managed key.
Note
Support for hex encoded keys was added in MinIO Client RELEASE.2024-06-20T14-50-54Z.
Generate the 256-bit base64 raw encoded string or a hex encoded string for use as the encryption key.
The following example generates a string that meets the encryption key requirements. The resulting string is appropriate for non-production environments:
Defer to your organizations requirements for generating cryptographically secure encryption keys.
Copy the encryption key for use in the next step.
MinIO supports the following AWS S3 headers for specifying SSE-C encryption:
X-Amz-Server-Side-Encryption-Customer-Algorithm set to AES256.X-Amz-Server-Side-Encryption-Customer-Key set to the encryption key value.X-Amz-Server-Side-Encryption-Customer-Key-MD5 to the 128-bit MD5 digest of the encryption key.The MinIO mc commandline tool S3-compatible SDKs include specific syntax for setting headers. Certain mc commands like mc cp include specific arguments for enabling SSE-S3 encryption:
ALIAS with the alias of the MinIO deployment on which you want to write the SSE-C encrypted object.BUCKET with the full path to the bucket or bucket prefix to which you want to write the SSE-C encrypted object.MinIO supports the following AWS S3 headers for copying an SSE-C encrypted object to another S3-compatible service:
X-Amz-Copy-Source-Server-Side-Encryption-Algorithm set to AES256X-Amz-Copy-Source-Server-Side-Encryption-Key set to the encryption key value. The copy operation will fail if the specified key does not match the key used to SSE-C encrypt the object.X-Amz-Copy-Source-Server-Side-Encryption-Key-MD5 set to the 128-bit MD5 digest of the encryption key.The MinIO mc commandline tool S3-compatible SDKs include specific syntax for setting headers. Certain mc commands like mc cp include specific arguments for enabling SSE-S3 encryption:
SOURCE/BUCKET with the alias of the MinIO deployment from which you are reading the encrypted object and the full path to the bucket or bucket prefix from which you want to read the SSE-C encrypted object.TARGET/BUCKET with the alias of the MinIO deployment from which you are writing the encrypted object and the full path to the bucket or bucket prefix to which you want to write the SSE-C encrypted object.MinIO supports server-side and client-side replication of objects between source and destination buckets.
Server-Side Bucket Replication
Configure per-bucket rules for automatically synchronizing objects between MinIO deployments. The deployment where you configure the bucket replication rule acts as the “source” while the configured remote deployment acts as the “target”. MinIO applies rules as part of object write operations (e.g.
PUT) and automatically synchronizes new objects and object mutations, such as new object versions or changes to object metadata.MinIO server-side bucket replication only supports a MinIO cluster on an identical release for the remote replication target.
Client-side Bucket Replication
Use the command process to synchronize objects between buckets within the same S3-compatible cluster or between two independent S3-compatible clusters. Client-side replication using
mc mirrorsupports MinIO-to-S3 and similar replication configurations.
Bucket vs Site Replication
Bucket Replication is distinct from and mutually exclusive with site replication.
Bucket Replication synchronizes data at the bucket level, such as bucket prefix paths and objects.
You can configure bucket replication at any time, and the remote MinIO deployments may have pre-existing data on the replication target buckets.
Site Replication extends bucket replication to include IAM, security tokens, access keys, and bucket-level configurations.
Site replication is typically configured when initially deploying the MinIO peer sites. Only one site can hold any bucket or objects at the time of initial configuration.
MinIO server-side bucket replication is an automatic bucket-level configuration that synchronizes objects between a source and destination bucket. MinIO server-side replication requires the source and destination bucket be two separate MinIO clusters running the same MinIO Server version.
For each write operation to the bucket, MinIO checks all configured replication rules for the bucket and applies the matching rule with highest configured priority. MinIO synchronizes new objects and object mutations, such as new object versions or changes to object metadata. This includes metadata operations such as enabling or modifying object locking or retention settings.
MinIO server-side bucket replication is functionally similar to Amazon S3 replication while adding the following MinIO-only features:
Resynchronization primarily supports recovery after partial or total loss of the data on a MinIO deployment using a healthy deployment in the replica configuration. Use the mc replicate resync command completely resynchronize the remote target (mc admin bucket remote) using the specified source bucket.
The resynchronization process checks all objects in the source bucket against all configured replication rules that include existing object replication. For each object which matches a rule, the resynchronization process places the object into the replication queue regardless of the object’s current replication status.
MinIO skips synchronizing those objects whose remote copy exactly match the source, including object metadata. MinIO otherwise does not prioritize or modify the queue with regards to the existing contents of the target.
mc replicate resync operates at the bucket level and does not support prefix-level granularity. Initiating resynchronization on a large bucket may result in a significant increase in replication-related load and traffic. Use this command with caution and only when necessary.
For buckets with object transition (Tiering) configured, replication resynchronization restores objects in a non-transitioned state with no associated transition metadata. Any data previously transitioned to the remote storage is therefore permanently disconnected from the remote MinIO deployment. For tiering configurations which specify an explicit human-readable prefix as part of the remote configuration, you can safely purge the transitioned data in that prefix to avoid costs associated to the “lost” data.
MinIO supports replicating delete operations, where MinIO synchronizes deleting specific object versions and new delete markers. Delete operation replication uses the same replication process as all other replication operations.
MinIO requires explicitly enabling versioned deletes and delete marker replication . Use the mc replicate add --replicate field to specify both or either delete and delete-marker to enable versioned deletes and delete marker replication respectively. To enable both, specify both strings using a comma separator delete,delete-marker.
For delete marker replication, MinIO begins the replication process after a delete operation creates the delete marker. MinIO uses the X-Minio-Replication-DeleteMarker-Status metadata field for tracking delete marker replication status. In active-active replication configurations, MinIO may produce duplicate delete markers if both clusters concurrently create a delete marker for an object or if one or both clusters were down before the replication event synchronized.
For replicating the deletion of a specific object version, MinIO marks the object version as PENDING until replication completes. Once the remote target deletes that object version, MinIO deletes the object on the source. While this process ensures near-synchronized version deletion, it may result in listing operations returning the object version after the initial delete operation. MinIO uses the X-Minio-Replication-Delete-Status for tracking delete version replication status.
MinIO only replicates explicit client-driven delete operations. MinIO does not replicate objects deleted from the application of lifecycle management expiration rules. For active-active configurations, set the same expiration rules on all of the replication buckets to ensure consistent application of object expiration.
If a delete operation removes the last object in a bucket prefix, MinIO recursively removes each empty part of the prefix up to the bucket root. MinIO only applies the recursive removal to prefixes created implicitly as part of object write operations - that is, the prefix was not created using an explicit directory creation command such as mc mb.
If a replication rule enables replication delete operations, the replication process also applies the implicit prefix trimming behavior on the destination MinIO cluster.
For example, consider a bucket photos with the following object prefixes:
photos/2021/january/myphoto.jpgphotos/2021/february/myotherphoto.jpgphotos/NYE21/NewYears.jpgphotos/NYE21 is the only prefix explicitly created using mc mb. All other prefixes were implicitly created as part of writing the object located at that prefix.
myphoto.jpg. MinIO automatically trims the empty /janaury prefix.myotherphoto.jpg. MinIO automatically trims the /february prefix and the now-empty /2021 prefix.NewYears.jpg object. MinIO leaves the /NYE21 prefix remains in place since it was explicitly created.MinIO by default replicates existing objects in the source bucket to the configured remote, similar to AWS: Replicating existing objects between S3 buckets without the overhead of contacting technical support.
MinIO marks all objects or object prefixes that satisfy the replication rules as eligible for synchronization to the remote cluster and bucket. MinIO only excludes those objects without a version ID, such as those objects written before enabling versioning on the bucket.
You can disable existing object replication while configuring or modifying the bucket replication rule. You must specify all desired replication features during creation or modification:
"existing-objects" from the list of replication features specified to mc replicate add --replicate."existing-objects" from the list of existing replication features using mc replicate update --replicate. The new rule replaces the previous rule.Disabling existing object replication does not remove any objects already replicated to the remote bucket.
MinIO supports specifying either asynchronous (default) or synchronous replication for a given remote target.
With asynchronous replication, MinIO completes the originating PUT operation before placing the object into a replication queue. The originating client may therefore see a successful PUT operation before the object is replicated. While this may result in stale or missing objects on the remote, it mitigates the risk of slow write operations due to replication load.
With synchronous replication, MinIO attempts to replicate the object prior to completing the originating PUT operation. MinIO returns a successful PUT operation whether or not the replication attempt succeeds. This reduces the risk of slow write operations at a possible cost of stale or missing objects on the remote location.
You must explicitly enable synchronous replication when configuring the remote target target using the mc admin bucket remote add command with the add flag.
This section documents internal replication behavior and is not critical to using or implementing replication. This documentation is provided strictly for learning and educational purposes.
MinIO uses a replication queuing system with multiple concurrent replication workers operating on that queue. MinIO continuously works to replicate and remove objects from the queue while scanning for new unreplicated objects to add to the queue.
Changed: RELEASE.2022-07-18T17-49-40Z
MinIO queues failed replication operations and retries those operations up to three (3) times.
MinIO dequeues replication operations that fail to replicate after three attempts. The scanner can pick up those affected objects at a later time and requeue them for replication.
MinIO sets the X-Amz-Replication-Status metadata field according to the replication state of the object:
Replication State |
Description |
|---|---|
|
The object has not yet been replicated. MinIO applies this state
if the object meets one of the configured replication rules on the
bucket. MinIO continuously scans for For multi-site replication, objects remain
in the |
|
The object has successfully replicated to the remote cluster. |
|
The object failed to replicate to the remote cluster. MinIO continuously scans for |
|
The object is itself a replica from a remote source. |
The replication process generally has one of the following flows:
PENDING -> COMPLETEDPENDING -> FAILED -> COMPLETEDBucket replication uses rules to synchronize the contents of a bucket on one MinIO deployment to a bucket on a remote MinIO deployment.
Replication can be done in any of the following ways:
Ensure you meet the following prerequisites before you set up any of these replication configurations.
Bucket replication requires specific permissions on the source and destination deployments to configure and enable replication rules.
The following policy provides permissions for configuring and enabling replication on a deployment.
"EnableRemoteBucketConfiguration" statement grants permission for creating a remote target for supporting replication."EnableReplicationRuleConfiguration" statement grants permission for creating replication rules on a bucket. The "arn:aws:s3:::* resource applies the replication permissions to any bucket on the source deployment. You can restrict the user policy to specific buckets as-needed.The following code creates a MinIO-managed user with the necessary policy. Replace the TARGET with the alias of the MinIO deployment on which you are configuring replication:
MinIO deployments configured for Active Directory/LDAP or OpenID Connect user management should instead create a dedicated access keys for bucket replication.
The following policy provides permissions for enabling synchronization of replicated data into the deployment.
"EnableReplicationOnBucket" statement grants permission for a remote target to retrieve bucket-level configuration for supporting replication operations on all buckets in the MinIO deployment. To restrict the policy to specific buckets, specify those buckets as an element in the Resource array similar to "arn:aws:s3:::bucketName"."EnableReplicatingDataIntoBucket" statement grants permission for a remote target to synchronize data into any bucket in the MinIO deployment. To restrict the policy to specific buckets, specify those buckets as an element in the Resource array similar to "arn:aws:s3:::bucketName/*".The following code creates a MinIO-managed user with the necessary policy. Replace TARGET with the alias of the MinIO deployment on which you are configuring replication:
MinIO deployments configured for Active Directory/LDAP or OpenID Connect user management should instead create a dedicated access keys for bucket replication.
See mc admin user, mc admin user svcacct, and mc admin policy for more complete documentation on adding users, access keys, and policies to a MinIO deployment.
MinIO supports replication of objects encrypted using SSE-KMS and SSE-S3:
As part of the replication process, MinIO decrypts the object on the source bucket and transmits the unencrypted object over the network. The destination MinIO deployment then re-encrypts the object using the encryption settings from the target. MinIO therefore strongly recommends enabling TLS on both source and destination deployments to ensure the safety of objects during transmission.
MinIO does not support replicating client-side encrypted objects (SSE-C).
MinIO server-side replication only works between MinIO deployments. Both the source and destination deployments must run MinIO Server with matching versions.
To configure replication between arbitrary S3-compatible services, use mc mirror.
MinIO relies on the immutability protections provided by versioning to support replication and resynchronization.
Use mc version info to validate the versioning status of both the source and remote buckets. Use the mc version enable command to enable versioning as necessary.
If you exclude a prefix or folder from versioning within the source bucket, MinIO cannot replicate objects within that folder or prefix.
MinIO supports replicating objects held under WORM Locking. Both replication buckets must have object locking enabled for MinIO to replicate the locked object. For active-active configuration, MinIO recommends using the same retention rules on both buckets to ensure consistent behavior across sites.
You must enable object locking during bucket creation as per S3 behavior. You can then configure object retention rules at any time. Configure the necessary rules on the unhealthy target bucket prior to beginning this procedure.
The procedure on this page creates a new bucket replication rule for one-way synchronization of objects from one MinIO bucket to another MinIO bucket. The buckets can be on the same MinIO deployment or on separate MinIO deployments.
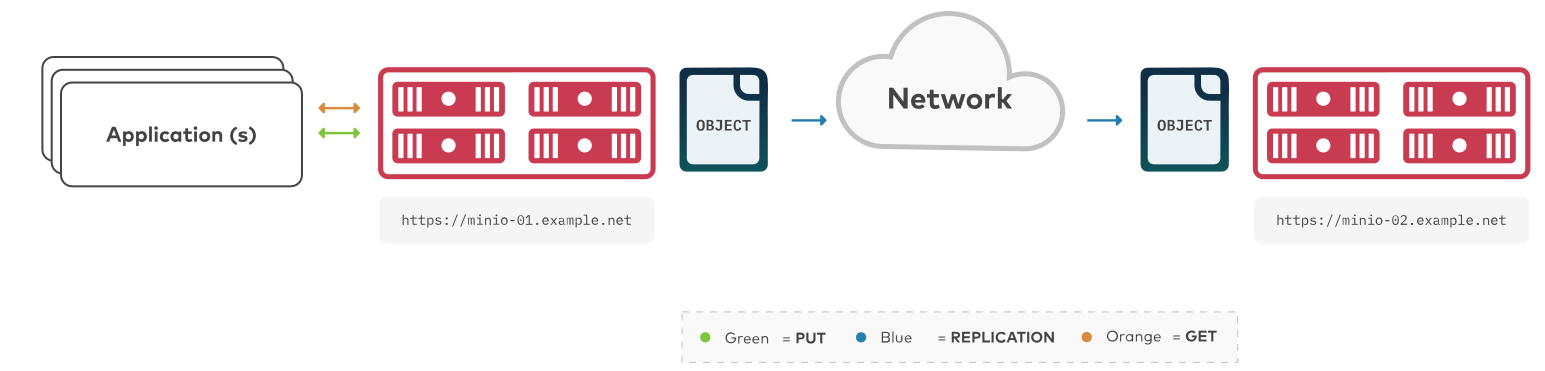
Note
To configure replication between arbitrary S3-compatible services (not necessarily MinIO), use mc mirror.
Replication requires all participating clusters meet the following requirements. This procedure assumes you have reviewed and validated those requirements.
For more details, see the Bucket Replication Requirements page.
Click to expand any of the following:
MinIO supports automatically replicating existing objects in a bucket.
MinIO requires explicitly enabling replication of existing objects using the mc replicate add --replicate or mc replicate update --replicate and including the existing-objects replication feature flag. This procedure includes the required flags for enabling replication of existing objects.
MinIO supports replicating S3 DELETE operations onto the target bucket. Specifically, MinIO can replicate versioning Delete Markers and the deletion of specific versioned objects:
MinIO requires explicitly enabling replication of delete operations using the mc replicate add --replicate or mc replicate update --replicate. This procedure includes the required flags for enabling replication of delete operations and delete markers.
MinIO does not replicate delete operations resulting from the application of lifecycle management expiration rules.
See Replication of Delete Operations and Object Deletion for more complete documentation.
MinIO supports configuring multiple remote targets per bucket or bucket prefix. For example, you can configure a bucket to replicate data to two or more remote MinIO deployments, where one deployment is a 1:1 copy (replication of all operations including deletions) and another is a full historical record (replication of only non-destructive write operations).
This procedure documents one-way replication to a single remote MinIO deployment. You can repeat this tutorial to replicate a single bucket to multiple remote targets.
mc
This procedure uses the aliases SOURCE and REMOTE to reference each MinIO deployment being configured for replication. Replace these values with the appropriate alias for your target MinIO deployments.
This procedure assumes each alias corresponds to a user with the necessary replication permissions.
Changed: RELEASE.2022-12-24T15-21-38Z
mc replicate add automatically creates the necessary replication targets, removing the need for using the deprecated mc admin remote bucket add command. This procedure only documents the procedure as of that release.
Use the mc replicate add command to add a new replication rule to each MinIO deployment.
Replace ALIAS with the alias of the origin MinIO deployment. The name must match the bucket specified when creating the remote target in the previous step.
Replace BUCKET with the name of the bucket to replicate from on the origin deployment.
Replace the --remote-bucket to specify the remote MinIO deployment and bucket to which the ALIAS/BUCKET replicates.
The USER:PASSWORD must correspond to a user on the remote deployment with the necessary replication permissions.
The HOSTNAME:PORT must resolve to a reachable MinIO instance on the remote deployment. The BUCKET must exist and otherwise meet all other replication requirements.
The --replicate "delete,delete-marker,existing-objects" flag enables the following replication features:
See mc replicate add --replicate for more complete documentation. Omit any field to disable replication of that component.
Specify any other supported optional arguments for mc replicate add.
Use mc cp to copy a new object to the replicated bucket on one of the deployments.
Use mc ls to verify the object exists on the destination bucket:
See also
mc replicate update command to modify an existing replication rule.mc replicate update command with the --state "disable" flag to disable an existing replication rule.mc replicate rm command to remove an existing replication rule.The procedure on this page creates a new bucket replication rule for two-way “active-active” synchronization of objects between MinIO buckets.

mc mirror.This tutorial covers configuring Active-Active replication between two MinIO clusters. For a tutorial on multi-site replication between three or more MinIO clusters, see Enable Multi-Site Server-Side Bucket Replication.
You must meet all of the basic requirements for bucket replication described in Bucket Replication Requirements.
In addition, to set up active-active bucket replication, you must meet the following additional requirements:
You must have network access and login credentials with required permissions to both deployment to set up active-active bucket replication.
You can access the deployments by installing mc and using the command line. Use the mc alias set command to create an alias for both MinIO deployments.
Alias creation requires specifying an access key for a user on the deployment. This user must have permission to create and manage users and policies on the deployment.
Specifically, ensure the user has at minimum:
admin:CreateUseradmin:ListUsersadmin:GetUseradmin:CreatePolicyadmin:GetPolicyadmin:AttachUserOrGroupPolicyMinIO supports customizing the replication configuration to enable or disable the following replication behaviors:
When configuring replication rules for a bucket, ensure that both MinIO deployments participating in active-active replication use the same replication behaviors to ensure consistent and predictable synchronization of objects.
MinIO supports automatically replicating existing objects in a bucket.
MinIO requires explicitly enabling replication of existing objects using the mc replicate add --replicate or mc replicate update --replicate and including the existing-objects replication feature flag. This procedure includes the required flags for enabling replication of existing objects.
MinIO supports replicating delete operations onto the target bucket. Specifically, MinIO can replicate versioning Delete Markers and the deletion of specific versioned objects:
MinIO requires explicitly enabling replication of delete operations using the mc replicate add --replicate or mc replicate update --replicate. This procedure includes the required flags for enabling replication of delete operations and delete markers.
MinIO does not replicate delete operations resulting from the application of lifecycle management expiration rules. Configure matching expiration rules on both the source and destination bucket to ensure consistent application of object expiration.
See Replication of Delete Operations and Object Deletion for more complete documentation.
MinIO supports configuring multiple remote targets per bucket or bucket prefix. This enables configuring multi-site active-active replication between MinIO deployments.
This procedure covers active-active replication between two MinIO sites. You can repeat this procedure for each “pair” of MinIO deployments in the replication mesh. For a dedicated tutorial, see Enable Multi-Site Server-Side Bucket Replication.
mc
This procedure creates two-way, active-active replication between two MinIO deployments.
This procedure assumes you have already defined an alias for each deployment as a user with the necessary replication permissions.
Changed: RELEASE.2022-12-24T15-21-38Z
mc replicate add automatically creates the necessary replication targets, removing the need for using the deprecated mc admin remote bucket add command. This procedure only documents the procedure as of that release.
Use the mc replicate add command to add a new replication rule to each MinIO deployment.
Replace ALIAS with the alias of the origin MinIO deployment. The name must match the bucket specified when creating the remote target in the previous step.
Replace BUCKET with the name of the bucket to replicate from on the origin deployment.
Replace the --remote-bucket to specify the remote MinIO deployment and bucket to which the ALIAS/BUCKET replicates.
The USER:PASSWORD must correspond to a user on the remote deployment with the necessary replication permissions.
The HOSTNAME:PORT must resolve to a reachable MinIO instance on the remote deployment. The BUCKET must exist and otherwise meet all other replication requirements.
The --replicate "delete,delete-marker,existing-objects" flag enables the following replication features:
See mc replicate add --replicate for more complete documentation. Omit any field to disable replication of that component.
Specify any other supported optional arguments for mc replicate add.
Repeat this step on the other MinIO deployment. Change the ALIAS and --remote-bucket values to correspond to the first deployment.
You should have two replication rules configured at the conclusion of this step - one created on each deployment that points to the bucket on the other deployment. Use the mc replicate ls command to verify the created replication rules.
Use mc cp to copy a new object to the replicated bucket on one of the deployments.
Use mc ls to verify the object exists on the destination bucket:
Repeat this test by copying another object to the second deployment and verifying the object replicates to the first deployment.
Once both objects exist on both deployments, you have successfully set up two-way, active-active replication between MinIO buckets.
See also
mc replicate update command to modify an existing replication rule.mc replicate update command with the --state "disable" flag to disable an existing replication rule.mc replicate rm command to remove an existing replication rule.The procedure on this page configures automatic server-side bucket replication between multiple MinIO deployments. Multi-Site Active-Active replication builds on the Enable Two-Way Server-Side Bucket Replication procedure with additional considerations required to ensure predictable replication behavior across all sites.
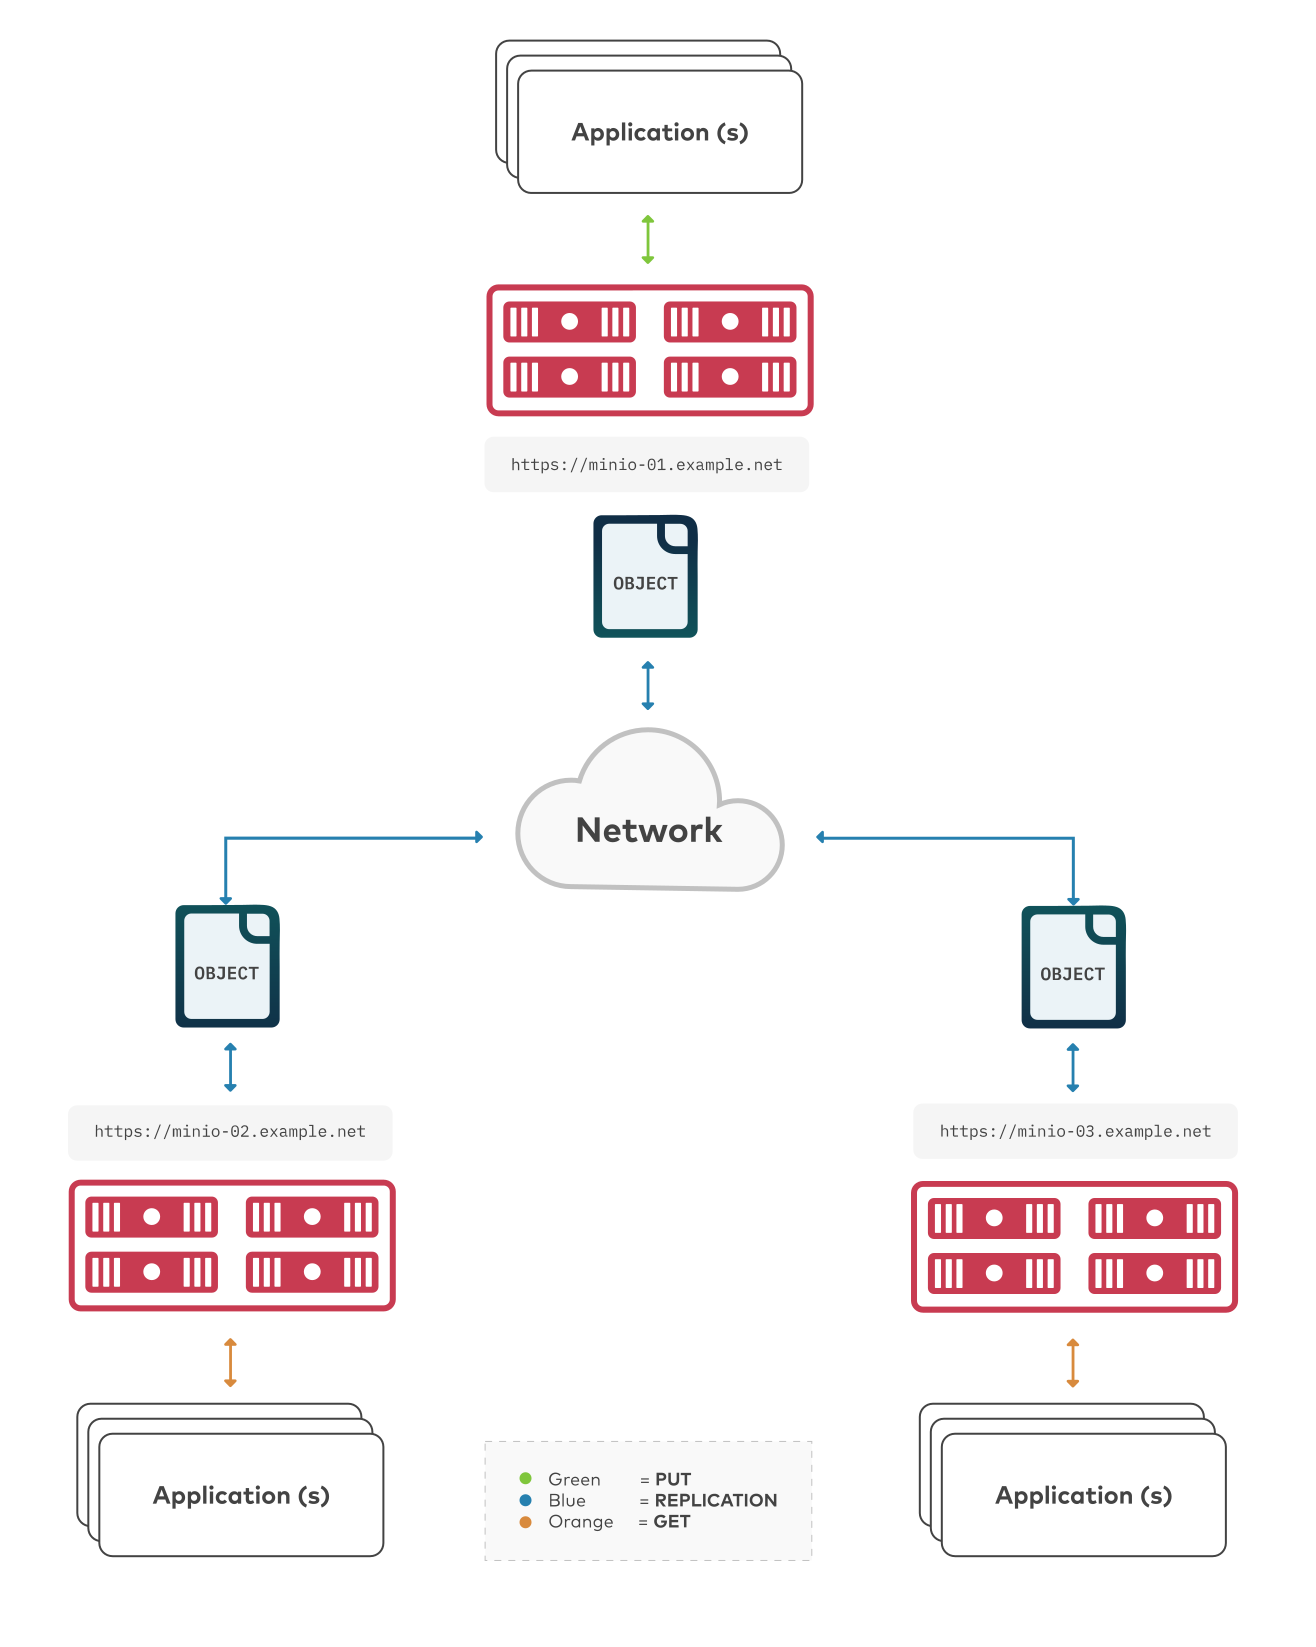
mc mirror.Multi-Site Active-Active replication configurations can span multiple racks, datacenters, or geographic locations. Complexity of configuring and maintaining multi-site configurations generally increase with the number of sites and size of each site. Enterprises looking to implement multi-site replication should consider leveraging MinIO SUBNET support to access the expertise, planning, and engineering resources required for addressing that use case.
See also
mc replicate update command to modify an existing replication rule.mc replicate update command with the --state "disable" flag to disable an existing replication rule.mc replicate rm command to remove an existing replication rule.You must meet all of the basic requirements for bucket replication described in Bucket Replication Requirements.
In addition, to create multi-site bucket replication set up, you must meet the following additional requirements:
You must have network access and log in credentials with correct permissions to all deployments to set up multi-site active-active bucket replication.
You can access the deployments by installing mc and using the command line. Use the mc alias set command to create an alias for each MinIO deployment.
Alias creation requires specifying an access key for a user on the deployment. This user must have permission to create and manage users and policies on the deployment.
Specifically, ensure the user has at minimum:
admin:CreateUseradmin:ListUsersadmin:GetUseradmin:CreatePolicyadmin:GetPolicyadmin:AttachUserOrGroupPolicyClick to expand any of the following:
MinIO supports customizing the replication configuration to enable or disable the following replication behaviors:
When configuring replication rules for a bucket, ensure that all MinIO deployments participating in multi-site replication use the same replication behaviors to ensure consistent and predictable synchronization of objects.
MinIO supports automatically replicating existing objects in a bucket.
MinIO requires explicitly enabling replication of existing objects using the mc replicate add --replicate or mc replicate update --replicate and including the existing-objects replication feature flag. This procedure includes the required flags for enabling replication of existing objects.
MinIO supports replicating delete operations onto the target bucket. Specifically, MinIO can replicate versioning Delete Markers and the deletion of specific versioned objects:
MinIO requires explicitly enabling replication of delete operations using the mc replicate add --replicate or mc replicate update --replicate. This procedure includes the required flags for enabling replication of delete operations and delete markers.
MinIO does not replicate delete operations resulting from the application of lifecycle management expiration rules. Configure matching expiration rules for the bucket on all replication sites to ensure consistent application of object expiration.
This procedure requires repeating steps for each MinIO deployment participating in the multi-site replication configuration. Depending on the number of deployments, this procedure may require significant time and care in implementation. MinIO recommends reading through the procedure before attempting to implement the documented steps.
Configure Multi-Site Bucket Replication Using the Command Line
mc
This procedure uses the placeholder ALIAS to reference the alias each MinIO deployment being configured for replication. Replace these values with the appropriate alias for each MinIO deployment.
This procedure assumes each alias corresponds to a user with the necessary replication permissions.
Changed: RELEASE.2022-12-24T15-21-38Z
mc replicate add automatically creates the necessary replication targets, removing the need for using the deprecated mc admin remote bucket add command. This procedure only documents the procedure as of that release.
Use the mc replicate add command to add a new replication rule to each MinIO deployment.
Replace ALIAS with the alias of the origin MinIO deployment. The name must match the bucket specified when creating the remote target in the previous step.
Replace BUCKET with the name of the bucket to replicate from on the origin deployment.
Replace the --remote-bucket to specify the remote MinIO deployment and bucket to which the ALIAS/BUCKET replicates.
The USER:PASSWORD must correspond to a user on the remote deployment with the necessary replication permissions.
The HOSTNAME:PORT must resolve to a reachable MinIO instance on the remote deployment. The BUCKET must exist and otherwise meet all other replication requirements.
The --replicate "delete,delete-marker,existing-objects" flag enables the following replication features:
See mc replicate add --replicate for more complete documentation. Omit any field to disable replication of that component.
Specify any other supported optional arguments for mc replicate add.
Repeat these commands for each remote MinIO deployment participating in the multi-site replication configuration. For example, a multi-site replication configuration consisting of MinIO deployments minio1, minio2, and minio3 would require repeating this step on each deployment for each remote.
Specifically, in this scenario, perform this step twice on each deployment:
minio1 deployment, once for a rule for minio2 and again for a separate rule for minio3.minio2 deployment, once for a rule for minio1 and again for a separate rule for minio3.minio3 deployment, once for a rule for minio1 and again for a separate rule for minio2.Use mc cp to copy a new object to the replicated bucket on one of the deployments.
Use mc ls to verify the object exists on the destination bucket:
Repeat this test on each deployment by copying a new unique file and checking that the file replicates to each of the other deployments.
You can also use mc stat to check the file to check the current replication stage of the object.
The procedure on this page resynchronizes the contents of a MinIO bucket using a healthy replication remote. Resynchronization supports recovery after partial or total loss of data on a MinIO deployment in a replica configuration.
For example, consider a MinIO active-active replication configuration similar to the following:
Resynchronization allows using the healthy data on one of the participating MinIO deployments as the source for rebuilding the other deployment.
Resynchronization is a per-bucket process. You must repeat resynchronization for each bucket on the remote which suffered partial or total data loss.
Professional Support during BC/DR Operations
MinIO SUBNET users can log in and create a new issue related to resynchronization. Coordination with MinIO Engineering via SUBNET can ensure successful resynchronization and restoration of normal operations, including performance testing and health diagnostics.
Community users can seek support on the MinIO Community Slack. Community Support is best-effort only and has no SLAs around responsiveness.
Resynchronization requires both the source and target deployments be online and able to accept read and write operations. The source must have complete network connectivity to the remote.
The remote deployment may be “unhealthy” in that it has suffered partial or total data loss. Resynchronization addresses the data loss as long as both source and destination maintain connectivity.
Resynchronization requires the healthy source deployment have an existing replication configuration for the unhealthy target bucket. Additionally, resynchronization only applies to those replication rules created with the existing object replication option.
Use mc replicate ls to review the configured replication rules and targets for the healthy source bucket.
MinIO supports replication of objects encrypted using SSE-KMS and SSE-S3:
As part of the replication process, MinIO decrypts the object on the source bucket and transmits the unencrypted object over the network. The destination MinIO deployment then re-encrypts the object using the encryption settings from the target. MinIO therefore strongly recommends enabling TLS on both source and destination deployments to ensure the safety of objects during transmission.
MinIO does not support replicating client-side encrypted objects (SSE-C).
MinIO server-side replication only works between MinIO deployments. Both the source and destination deployments must run MinIO Server with matching versions.
To configure replication between arbitrary S3-compatible services, use mc mirror.
MinIO relies on the immutability protections provided by versioning to support replication and resynchronization.
Use mc version info to validate the versioning status of both the source and remote buckets. Use the mc version enable command to enable versioning as necessary.
If you exclude a prefix or folder from versioning within the source bucket, MinIO cannot replicate objects within that folder or prefix.
MinIO supports replicating objects held under WORM Locking. Both replication buckets must have object locking enabled for MinIO to replicate the locked object. For active-active configuration, MinIO recommends using the same retention rules on both buckets to ensure consistent behavior across sites.
You must enable object locking during bucket creation as per S3 behavior. You can then configure object retention rules at any time. Configure the necessary rules on the unhealthy target bucket prior to beginning this procedure.
Resynchronization is a background processes that continually checks objects in the source MinIO bucket and copies them to the remote as-needed. The time required for replication to complete may vary depending on the number and size of objects, the throughput to the remote MinIO deployment, and the load on the source MinIO deployment. Total time for completion is generally not predictable due to these variables.
MinIO recommends configuring load balancers or proxies to direct traffic only to the healthy cluster until synchronization completes. The following commands can provide insight into the resynchronization status:
mc replicate resync status on the source to track the resynchronization progress.mc replicate status on the source and remote to track normal replication data.mc ls -r --versions ALIAS/BUCKET | wc -l against both source and remote to validate the total number of objects and object versions on each.This procedure uses an existing MinIO replication configuration to restore missing data to one of the MinIO deployments participating in that configuration. Specifically, a healthy MinIO deployment (the SOURCE) synchronizes it’s existing data to the unhealthy MinIO deployment (the TARGET).
This procedure assumes an existing alias for the SOURCE that has the necessary permissions for configuring replication.
You can repeat this procedure for each bucket that requires resynchronization. You can have no more than one replication job running per bucket.
Run the mc replicate ls command to list the configured remote targets on the healthy SOURCE deployment for the BUCKET that requires resynchronization.
SOURCE with the alias of the source MinIO deployment.BUCKET with the name of the bucket to use as the source for resynchronization.The output resembles the following:
Each document in the output represents one configured replication rule. The Destination.Bucket field specifies the ARN for a given rule on the bucket. Identify the correct ARN for the Bucket from which you want to resynchronize objects.
Run the mc replicate resync start command to begin the resynchronization process:
--remote-bucket value with the ARN of the unhealthy BUCKET on the TARGET MinIO deployment.SOURCE with the alias of the source MinIO deployment.BUCKET with the name of the bucket on the healthy SOURCE MinIO deployment.The command returns a resynchronization job ID indicating that the process has begun.
Use the mc replicate resync status command on the source deployment to track the received replication data:
The output resembles the following:
The Status updates to Completed once the resynchronization process completes.
TARGET bucket damage extends to replication rules, you must recreate those rules to match the previous replication configuration. See Enable Two-Way Server-Side Bucket Replication for additional guidance.mc ls and mc stat.The MinIO Batch Framework allows you to create, manage, monitor, and execute jobs using a YAML-formatted job definition file (a “batch file”). The batch jobs run directly on the MinIO deployment to take advantage of the server-side processing power without constraints of the local machine where you run the MinIO Client.
A batch file defines one job task.
Once started, MinIO starts processing the job. Time to completion depends on the resources available to the deployment.
If any portion of the job fails, MinIO retries the job up to the number of times defined in the job definition.
The MinIO Batch Framework supports the following job types:
| Job Type | Description |
|---|---|
| replicate | Perform a one-time replication procedure from one MinIO location to another MinIO location. |
| keyrotate | Perform a one-time process to cycle the sse-s3 or sse-kms cryptographic keys on objects. |
| expire | Perform a one-time immediate expiration of objects in a bucket. |
alias for the MinIO deploymentThe mc batch commands include
The |
|
The |
|
The |
|
The |
|
The |
|
The |
mc batch
Each batch job executes using the credentials specified in the batch definition. The success of a given batch job depends on those credentials having the appropriate permissions to perform all requested actions.
The user executing the batch job must have the following permissions. You can alternatively restrict users from accessing these functions by blocking or limiting access to these actions:
admin:ListBatchJobs
Grants the user the ability to see batch jobs currently in process.
admin:DescribeBatchJobs
Grants the user the ability to see the definition details of batch job currently in process.
admin:StartBatchJob
Grants the user the ability to start a batch job. The job may be further restricted by the credentials the job uses to access either the source or target deployments.
admin:CancelBatchJob
Allows the user to stop a batch job currently in progress.
You can assign any of these actions to users independently or in any combination.
The built-in ConsoleAdmin policy includes sufficient access to perform all of these types of batch job actions.
Local Deployment
You run a batch job against a particular deployment by passing an alias to the mc batch command. The deployment you specify in the command becomes the local deployment within the context of that batch job.
The following core concepts are fundamental to the administration of MinIO deployments, including but not limited to object retention, encryption, and access management.
An object is binary data, sometimes referred to as a Binary Large OBject (BLOB). Blobs can be images, audio files, spreadsheets, or even binary executable code. Object Storage platforms like MinIO provide dedicated tools and capabilities for storing, retrieving, and searching for blobs.
MinIO Object Storage uses buckets to organize objects. A bucket is similar to a folder or directory in a filesystem, where each bucket can hold an arbitrary number of objects. MinIO buckets provide the same functionality as AWS S3 buckets.
For example, consider an application that hosts a web blog. The application needs to store a variety of blobs, including rich multimedia like videos and images.
MinIO supports multiple levels of nested directories through the feature of prefixing to support even the most dynamic object storage workloads.
MinIO requires the client perform both authentication and authorization for each new operation. Identity and access management (IAM) is therefore a critical component of a MinIO configuration.
Authentication verifies the identity of a connecting client. MinIO requires clients to authenticate using AWS Signature Version 4 protocol with support for the deprecated Signature Version 2 protocol. Specifically, clients must present a valid access key and secret key to access any S3 or MinIO administrative API, such as PUT, GET, and DELETE operations.
MinIO then checks that authenticated users or clients have authorization to perform actions or use resources on the deployment. MinIO uses Policy-Based Access Control (PBAC), where each policy describes one or more rules that outline the permissions of a user or group of users. MinIO supports S3-specific actions and conditions when creating policies.
By default, MinIO denies access to actions or resources not explicitly referenced in a user’s assigned or inherited policies.
MinIO provides an access management feature as part of the software. Alternatively, you can configure MinIO to authenticate with one of several external IAM providers using either Active Directory/LDAP or OpenID/OIDC.
MinIO supports methods that encode objects while on drive (encryption-at-rest) and during transition from one location to another (encryption-in-transit, or “in flight”). When enabled, MinIO utilizes server-side encryption to write objects in an encrypted state. To retrieve and read an encrypted object, the user must have appropriate access privileges and also provide the object’s decryption key.
MinIO supports Transport Layer Security (TLS) versions 1.2 and 1.3 encrypting objects. TLS replaces the previously used Secure Socket Layer (SSL) method that has since been deprecated. The TLS standard, maintained by the Internet Engineering Task Force (IETF), provides the standards used by internet communications to support encryption, authentication, and data integrity.
The process of authenticating a user and verifying access to objects is known as the TLS Handshake. Once authenticated, TLS provides the cipher to encrypt and then decrypt the transfer of information from the server to the requesting client.
MinIO supports several methods of Server-Side Encryption.
MinIO utilizes a prefix method for each object that mimics a folder structure from traditional file systems. Prefixing involves prepending the name of an object with a fixed string.
With prefixes, you do not manually create folders and subfolders. Instead, MinIO looks for the / character in the prefix of an object’s name. Each / indicates a new folder or subfolder.
Using the object’s name and prefix, MinIO automatically generates a series of folders and subfolders for stored objects. When you use the same prefix string on multiple objects, MinIO identifies those as similar or grouped objects.
For example, an object named /articles/john.doe/2022-01-02-MinIO-Object-Storage.md winds up in the articles bucket in a folder labeled john.doe.
A MinIO object store might resemble the following structure, with three buckets. MinIO automatically generates two folders in the articles bucket based on the prefixes for those objects.
MinIO itself does not limit the number of objects that any specific prefix can contain. However, hardware and network conditions may show performance impacts with large prefixes.
MinIO SUBNET Enterprise accounts can utilize yearly architecture reviews as part of the deployment and maintenance strategy to ensure long-term performance and success of your MinIO-dependent projects.
For a deeper discussion on the benefits of limiting prefix contents, see the article on optimizing S3 performance.
MinIO provides two types of replication to copy an object, its versions, and its metadata from one location to another. You can configure replication at either the bucket level or at the site level.
Besides replication, MinIO provides a mirroring service. mc mirror copies only the actual object to any other S3 compatible data store, including other MinIO stores. However, versions and metadata do not back up with the mc mirror command.
Exclusive access to drives
MinIO requires exclusive access to the drives or volumes provided for object storage. No other processes, software, scripts, or persons should perform any actions directly on the drives or volumes provided to MinIO or the objects or files MinIO places on them.
Unless directed by MinIO Engineering, do not use scripts or tools to directly modify, delete, or move any of the data shards, parity shards, or metadata files on the provided drives, including from one drive or node to another. Such operations are very likely to result in widespread corruption and data loss beyond MinIO’s ability to heal.
Tiering rules allow frequently accessed objects to store on hot or warm storage, which is typically more expensive but provides better performance.
Less frequently accessed objects can move to cold storage. Cold storage often exchanges slower performance for a cheaper price.
Locks, a Write Once Read Many (WORM) mechanism, prevent the deletion or modification of an object. When locked, MinIO retains the objects indefinitely until someone removes the lock or the lock expires.
MinIO provides:
By default, objects written with the same name (including prefix) overwrite an existing object of the same name. MinIO provides a configuration option to create buckets with versioning enabled. Versioning provides access to various iterations of a uniquely named object as it changes over time. When enabled, MinIO writes mutated objects to a different version than the original, allowing access to both the original object and the newer, changed object.
Additional configurations on the MinIO bucket determine how long to retain older versions of each object in the bucket.